In this tutorial, a topology optimization is performed on a bracket-hook modeled with shell elements. The structural model with loads and constraints applied is shown in the figure below. The objective is to minimize the volume of the material used in the model subject to certain stress constraints. Topology optimization is performed to find the optimal material placement and reduce the volume. This optimization normalizes each element according to its density and lets you remove elements that have low density.
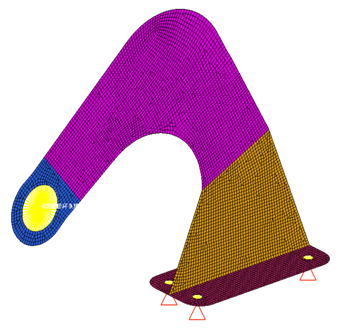
FEA model
The structural model is loaded into HyperMesh Desktop. The constraints, loads, subcases and material properties are already defined in the model. The topology design variables and the optimization problem setup will be defined using HyperMesh, and OptiStruct is used to determine the optimal material layout. The results can then be reviewed in HyperView.
The optimization problem is stated as:
Objective function:
|
Minimize mass.
|
Constraints:
|
Minimum Member Size = 1.0
Von Mises stress < 1000
|
Design Variables:
|
The density of each element in the design space.
|
The exercises covered in this tutorial include:
| • | Setting up the optimization problem in HyperMesh |
| • | Post-processing the results in HyperView |
Exercise
Step 1: Launch HyperMesh and Set the User Profile
| 1. | Launch HyperMesh Desktop. |
| 2. | Choose OptiStruct in the User Profiles dialog and click OK. |
Step 2: Import the Finite Element Model File
| 1. | Select the Import Solver Deck icon  . An Import tab is added to your tab menu. . An Import tab is added to your tab menu. |
| 2. | Make sure the File type: is set to Optistruct. |
| 3. | Click the Select file icon  to locate and open the hook.fem file you saved to your working directory from the optistruct.zip file. Refer to Accessing the Model Files. to locate and open the hook.fem file you saved to your working directory from the optistruct.zip file. Refer to Accessing the Model Files. |
Setting up the Optimization Problem in HyperMesh
Step 3: Set the View
| 1. | In the Model browser, right-click on Component. |
| 3. | Click  to fit the model to the screen. This displays only the components in the graphics area. to fit the model to the screen. This displays only the components in the graphics area. |
Step 4: Create the Design Variables for Topology Optimization
| 1. | From the Analysis page, select the optimization panel. |
| 2. | Click the topology panel. |
| 3. | Select the create radio button. |
| 4. | Click props and select the check boxes by the Design and Base properties. |
| 6. | Enter the name shells in the desvar= field. |
| 7. | Set the type: to PSHELL. |
| 9. | Select the parameters subpanel. |
| 10. | Toggle minmemb off to mindim=. |
| 11. | For mindim=, enter 1.0. |
| 12. | Under stress constraint, toggle from none to stress=. |
| 13. | For stress=, enter 1000. |

A topology design variable (DESVAR) is created.
| 15. | Click return twice to get back to the main menu. |
This sets the optimization to optimize the shell elements in the Design and Base components to create structural members with minimum member size of 1.0 unit in width with thicknesses that vary between zero and the thickness of the shell. The optimization will use 1000 as the maximum stress for any element within the design region when validating the design.
Step 5: Create the Responses
A detailed description is available in the OptiStruct User's Guide, under Responses.
| 1. | Select the optimization panel. |
| 2. | Click responses to go to the Responses panel. |
| 3. | Click response = and enter mass. |
| 4. | Click the response type switch and select mass from the pop-up menu. |

| 5. | Click create. A response, mass, is defined for the total volume of the model. |
| 6. | Click return to go back to the Optimization panel. |
Step 6: Define the Constraints
In this step, there is no need for additional constraints, since setting a stress target in the design variable serves as a constraint that limits the amount of material used in the optimized model.
Step 7: Define the Objective Function
In this step, the objective is to minimize the mass response defined in Step 5.
| 1. | Select the objective panel. |
| 2. | Click the switch in the upper left corner of the panel and select min from the pop-up menu. |
| 3. | Click response = and select mass from the response list. |
| 4. | Click create. The objective function is now defined. |
| 5. | Click return twice to return to the main panel. |
Step 8: Save the HyperMesh Database
| 1. | Click the Save .hm File icon  . A Save file browser window opens. . A Save file browser window opens. |
| 2. | Select the directory where you want to save the database and enter the name for the database, hook_opt.hm, in the File name: field. |
Step 9: Submit the Job to OptiStruct
| 1. | From the Analysis page, select the OptiStruct panel. |
| 2. | Click save as following the input file: field. |
| 3. | Select the directory where you would like to write the OptiStruct model file and enter the name for the model, hook_opt.fem, in the File name: field. .fem is the suggested extension for OptiStruct input decks. |
The name and location of the hook_opt.fem file displays in the input file: field.
| 5. | Make sure the memory options: toggle is set to memory default. |
| 6. | Click the run options: switch and select optimization. |
| 7. | Make sure the export options: toggle is set to all. |
| 8. | Click OptiStruct. This launches the OptiStruct job. |
If the job was successful, new results files can be seen in the directory where the OptiStruct model file was written. The hook_opt.out file is a good place to look for error messages that will help to debug the input deck if any errors are present.
Step 10: View an Isosurface Plot of the Density Results
| 1. | Click Results in the HyperWorks Solver View window that displays the progress of the optimization run. |
| 2. | The results of the Optimization run and the corresponding Linear Static subcases are loaded into HyperView. |
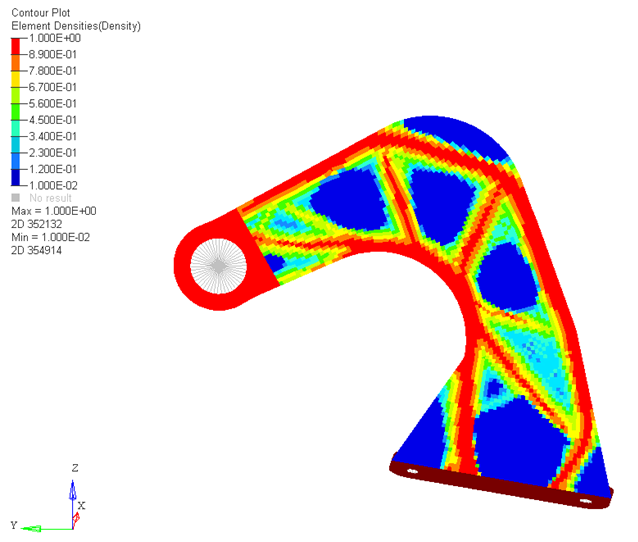
| 3. | Click the Contour plot icon  . . |
| 4. | For Result type:, select Element Densities (s) and click Apply. |
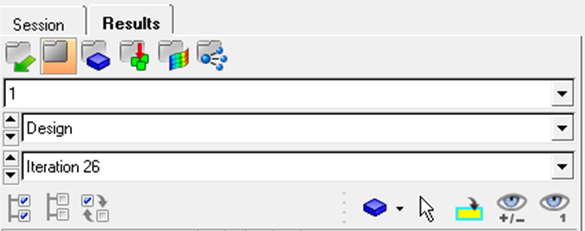
| 5. | In the Results browser, select Design and Iteration 26 (or your final iteration number from the drop-down menu). |
| 6. | Click the Iso toolbar icon  . . |
| 7. | Select the Result type: Element densities (s). |
| 8. | In the Results browser, set the Design Iteration to the last one, and click Apply. |
| 9. | Change the value of the Current value: field (in the Iso panel) to see the results with varying density values. |
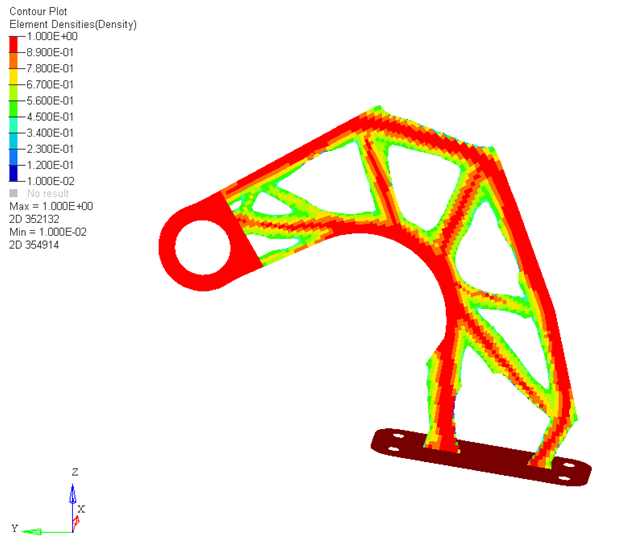
The isosurface post-processing feature is an excellent tool to use for viewing the density results from OptiStruct (Current value=0.4528).
You will see the isosurface in the graphics window interactively update when you change it to a new value. Use this tool to get a better look at the material layout and the load paths from OptiStruct.
Step 11: View the Element Stress Results
| 1. | Click the Next Page toolbar icon  to move to the page which displays results from the Linear Static Analysis of Subcase 1. to move to the page which displays results from the Linear Static Analysis of Subcase 1. |
The next page, which has results loaded from hook_opt_s19.h3d is displayed; this contains the linear static results for the 1st subcase.
| 2. | Click the Contour toolbar icon  . . |
| 3. | Select the first pull-down menu below Result type: and select Element stresses(2D&3D)(t). |
| 4. | Select the second pull down menu and select vonMises. |
| 5. | In the Results browser, set the displayed Iteration to the last one. |
| 7. | Similarly, you can review the results from the other subcases. |
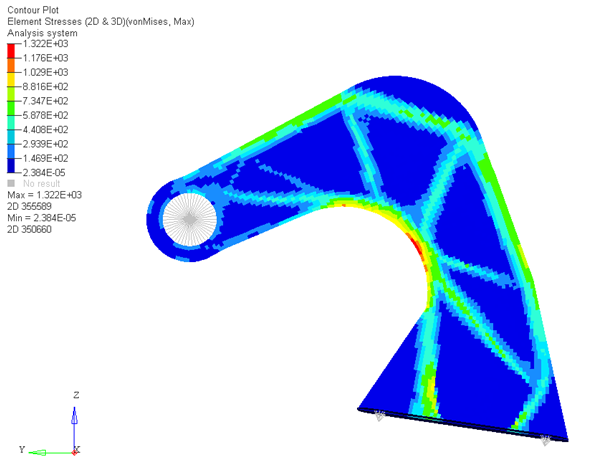
von Mises Stress results shown
Notice that there are some local regions where the stresses are still high; this is because topology stress constraints should be interpreted as global stress control or global stress target.
The functionality has some ways to filter out the artificial or local stresses caused by point loading or boundary conditions, but those artificial stresses will not be completely removed unless the geometry is changed by shape optimization.
| Note: | There might still be high local stress regions which can be improved more effectively with local shape and size optimization. |
|
See Also:
OptiStruct Tutorials


