This tutorial demonstrates the capability of frequency response optimization using OptiStruct. Initially, an existing finite element (FE) model of a flat plate is retrieved and modal frequency response analysis is performed to derive the peak magnitude. A dynamic response optimization is then performed on the same plate to obtain a new design.
The new design gives an optimized material layout with a minimized peak response. Post-processing tools will be used in HyperView to visualize iso-plots, magnitude, and phase of the complex displacement results.
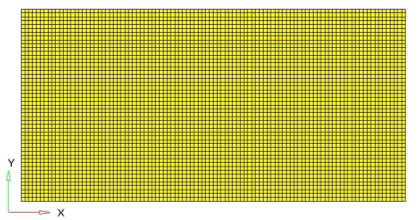
Plate model
Objective:
|
Minimize volume
|
Constraints:
|
Max FRF Disp. < 600 mm
|
Design variables:
|
The density for each element in the design space
|
The following exercises are covered:
| • | Setting up a modal frequency response analysis in HyperMesh |
| • | Post-processing FRF results |
| • | Setting up a topology optimization |
| • | Post-processing the topologic results |
Exercise
Step 1: Launch the HyperMesh Desktop, Set the User Profile and Import a File
| 1. | Launch HyperMesh Desktop. |
| 2. | A User Profiles GUI will appear, select OptiStruct. |
| 3. | Click OK. This loads the user profile. It includes the appropriate template, macro menu, and import reader, paring down the functionality of HyperMesh to what is relevant for generating models for OptiStruct. |
The User Profiles GUI can also be accessed from the Preferences menu on the toolbar.
| 4. | Click the Import Solver Deck icon  . . |
| 5. | Click the File icon  and select the frf_response_input.fem file you saved to your working directory from the optistruct.zip file. Refer to Accessing the Model Files. and select the frf_response_input.fem file you saved to your working directory from the optistruct.zip file. Refer to Accessing the Model Files. |
| 6. | Click Import. The frf_response_input.fem OptiStruct input file is loaded into the current HyperMesh session. |
| 7. | Click Close to exist the Import panel. |
Setting Up a Modal Frequency Response Analysis in HyperMesh
Step 2: Create the SPC and Unit Load Collectors
In this section, the model is constrained at one edge. A unit vertical load will be applied acting upwards in the positive z-direction at a point on a free edge corner of the plate. First, create the two load collectors spcs and unit-load.
| 1. | Click the Model tab to active the Model browser. |
| 2. | In the Model browser, right-click and select Create > Load Collector. |
| 4. | Click Color and select a color from the palette. |
| 5. | Leave Card Image set to None. |
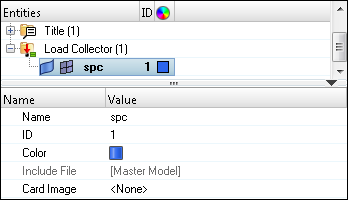
| 6. | In the Model browser, right-click and select Create > Load Collector. |
| 7. | For Name, enter unit-load. |
| 8. | Click Color and select a different color from the color palette. |
Step 3: Create Constraints
| 1. | In the Model browser, expand Load Collector, right-click on spcs, and click Make Current. |
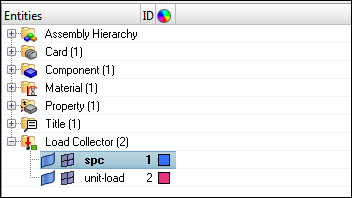
| 2. | From the Tool page, select the numbers panel. |
| 3. | Click nodes and select by id from the extended entity selection menu. |
| 4. | Enter the following numbers one by one: 1, 2, 3, and 4. |
| 7. | From the Analysis page, enter the constraints panel. |
| 8. | Make sure the create subpanel is selected using the radio buttons on the left-hand side of the panel. |
| 9. | Click the entity selection switch and select nodes from the pop-up menu. |
| 10. | Select the nodes with the following IDs: 1 and 2. |
Dofs with a check will be constrained, while dofs without a check will be free.
Dofs 1, 2, and 3 are x, y, and z translation degrees of freedom.
Dofs 4, 5, and 6 are x, y, and z rotational degrees of freedom.
| 12. | Click create. This applies these constraints to the selected nodes. |
| 13. | Again, select nodes and select node by id, node 4. |
| 14. | Uncheck all dofs except dof3 and click create. |
| 15. | Click return to go to the main menu. |
Step 4: Create a Unit Load at a Point on the Flat Plate
| 1. | From the Model browser, right-click on unit-load, and click Make Current. |
| 2. | From the Analysis page, enter the constraints panel. |
| 3. | Select the create subpanel using the radio buttons on the left-hand side of the panel. |
| 4. | Click the entity selection switch and select nodes from the pop-up menu. |
| 5. | Select node number 3 on the plate by clicking on it (see figure). |
| 6. | Un-check all dof except dof3, and click the = to the right of dof3 and enter a value of 20. |
| 7. | Click on the load types field and select DAREA. |
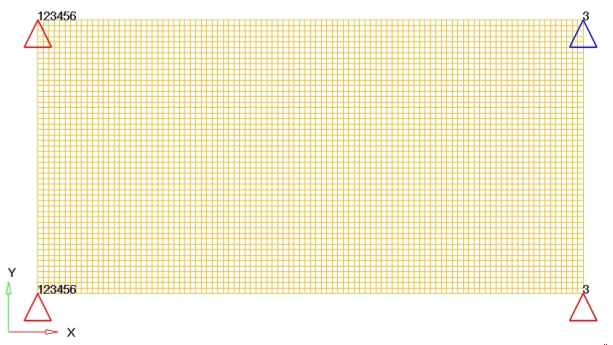
FE plate model with dofs
Step 5: Create a Frequency Range Table
| 1. | In the Model browser, right-click and select Create > Load Collector. |
| 2. | Click Name and enter tabled1. |
| 3. | Click Color and select a color from the palette. |
| 4. | For Card Image, select TABLED1 from the list. |
| 5. | Click TABLED1_NUM = and input a value of 2. |
| 6. | Click  to open the TABLED1_NUM = dialog. to open the TABLED1_NUM = dialog. |
| 7. | Click in the input field below y(1), and enter a value of 1.0. |
| 8. | Click in the input field below x(2), and enter a value of 1000.0. |
| 9. | Click in the input field below y(2), and enter a value of 1.0. Notice x(1) was not changed from 0.0. |
| 10. | Click Close to close the dialog. |
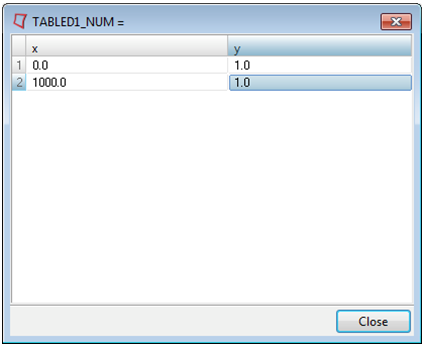
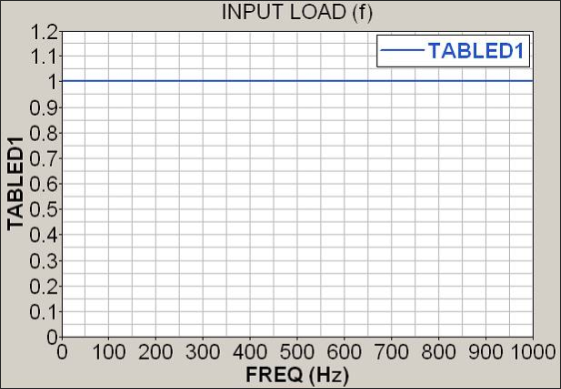
This provides a frequency range of 0.0 to 1000.0 with a constant load over this range.
Step 6: Create a Frequency Dependent Dynamic Load
| 1. | In the Model browser, right-click and select Create > Load Collector. |
| 2. | Click Name and enter rload2. |
| 3. | Click Color and select a color from the palette. |
| 4. | For Card Image, select RLOAD2 from the list. |
| 5. | Click EXCITEID to activate the option, click Loadcol. |
| 6. | In the Select Loadcol dialog, select the collector unit-load from the list of collectors and click OK. |
| 7. | Click TB to activate the option, click Loadcol. |
| 8. | In the Select Loadcol dialog, select collector tabled1 and click OK. |
| 9. | For TYPE, set LOAD. This defines the input as a force. |
Step 7: Create a Set of Frequencies to be used in the Response Solution
| 1. | In the Model browser, right-click and select Create > Load Collector. |
| 2. | Click Name and enter freq5. |
| 3. | Click Color and select a color from the palette. |
| 4. | For Card Image, select FREQi from the list. |
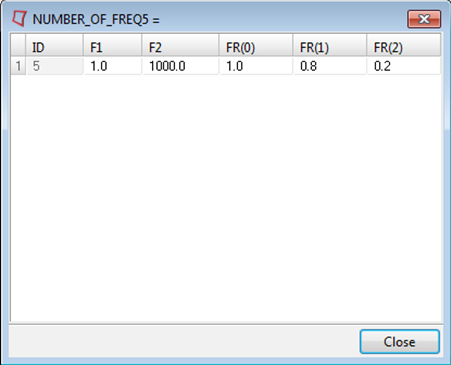
| 5. | Check the FREQ5 checkbox and enter NUMBER_OF_FREQ5= as 1 and FREQ5_MAX_NUMBER_OF_FR= as 3. |
| 6. | Click  to open the NUMBER OF FREQ = dialog. to open the NUMBER OF FREQ = dialog. |
| 7. | Click F1 and input a value of 1.0. |
| 8. | Click F2 and input a value of 1000. |
| 9. | Click FR(0) and input a value of 1. |
| 10. | Click FR(1) and input a value of 0.8. |
| 11. | Click FR(2) and input a value of 0.2. |
| 12. | Click Close to close the dialog. |
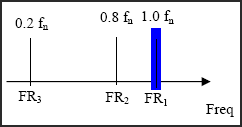
This defines a set of frequencies for the modal method of frequency response analysis by specification of a frequency range and fractions of the natural frequencies within that range, as shown in the following image.
Step 8: Create a LoadCollector EIGRL to Use as the Modal Method
| 1. | In the Model browser, right-click and select Create > Load Collector. |
| 2. | Click Name and enter eigrl. |
| 3. | Click Color and select a color from the palette. |
| 4. | For Card Image, select EIGRL from the list. |
| 5. | Click ND and enter a value of 17 in the field below it. |
This specifies the eigenvalue extraction of the first 17 frequencies using the Lanczos method.
Step 9: Create an OptiStruct Loadstep (also referred to as a subcase)
| 1. | From the Analysis page, click loadsteps. |
| 2. | Click name = and enter subcase1. |
| 3. | Click the type: switch and choose freq.resp (modal) from the pop-up menu. |
| 4. | Check the box preceding SPC. |
| 5. | Click on the entry field and select spcs from the list of load collectors. |
| 6. | Check the box preceding METHOD (STRUCT). |
| 7. | Click on the entry field and select eigrl from the list of load collectors. |
| 8. | Check the box preceding DLOAD. |
| 9. | Click on the entry field and select rload2 from the list of load collectors. |
| 10. | Check the box preceding FREQ. |
| 11. | Click on the entry field and select freq5 from the list of load collectors. |

An OptiStruct subcase has been created which references the constraints in the load collector spc, the unit load in the load collector rload2; with a set of frequencies defined in load collector freq5 and modal method defined in the load collector eigrl.
It is recommended to do a modal analysis before any FRF simulation. Here, this step is suppressed to focus on Frequency Response Analysis setup.
| 13. | Click edit and check the box next to RESVEC. |
| 14. | Set TYPE to APPLOAD with OPTION set to YES. |
| 15. | Click return twice to go to the main menu. |
Step 10: Create a Set of Nodes for Output of Results
| 1. | From the Analysis page, enter the entity sets panel. |
| 2. | Click name = and enter SETA. Set the Card Image to SET_GRID. |
| 3. | Set the set type: switch to non-ordered. |
| 4. | Click the entity: switch and choose nodes from the pop-up menu. |
| 5. | Make sure that the yellow selection type box is set to nodes and select the node 3. |
This is the node where the load was applied.
A message appears stating that the entity set has been created.
With FRF simulation, the amount of data generated can easily create big results files. It is a good practice to work with sets where you can specify only the points of interest. This reduces the CPU time and the amount of data to be saved.
Step 11: Create a Set of Outputs and Include Damping for Frequency Response Analysis
| 1. | On the Analysis page, click the control cards panel and enter the GLOBAL_OUTPUT_REQUEST panel. |
| 2. | Check DISPLACEMENTS. A new set of options appears in the work area screen. |
| 3. | Click the field box for FORM(1) and select PHASE from the pop-up menu. |
| 4. | Click the field box for OPTION(1) and select SID from the pop-up menu. |
A new field appears in yellow.
| 5. | Double-click the yellow SID(1) box and select SETA from the pop-up selection on the bottom left corner. |
A value of 1 now appears below the SID field box. This sets the output for only the nodes in set 1.

| 6. | Click return to exit the GLOBAL_OUTPUT_REQUEST menu. |
| 7. | Select the FORMAT subpanel. A new window appears in the work area screen. |
| 8. | Click number_of_formats = and input a value of 2. |
| 9. | On the extended menu in the work area, click the FORMAT_V1 field box and select OPTI from the pop-up menu for the second time. |
| 10. | Click return to exit the FORMAT menu. |
| 11. | Click next to move to another page. |
| 12. | Select the PARAM subpanel, and check the box next to G. A new window appears in the work area screen. |
| 13. | Click below G_V1, and input a value of 0.05 into the field box. |
This specifies that the system will have a constant damping coefficient equal to 2.5% of the Critical Damping Ratio.
| 14. | Click return to exit the PARAM menu. |
| 15. | Select the OUTPUT subpanel. A new window appears in the work area. |
| 16. | Verify KEYWORD is set to HGFREQ. |
| 17. | Click on the box beneath FREQ and select LAST from the pop-up selection. |
| 18. | Leave number_of_outputs set equal to 1. |
| 19. | Click return to exit the OUTPUT subpanel. |
| 20. | Click return to exit the control cards menu. |
| 21. | Click File > Save > Model to save the model. |
| 22. | Enter frf_response_input.hm for the model name and click Save. |
Step 12: Run the Analysis
| 1. | From the Analysis page, enter the OptiStruct panel. |
| 2. | Click save as following the input file: field, select the directory where you would like to write the model file and enter the name for the model, frf_response_analysis.fem, in the File name: field. |
The name and location of the frf_response_analysis.fem file displays in the input file: field.
| 4. | Set the export options: toggle to all. |
| 5. | Click the run options: switch and select analysis. |
| 6. | Set the memory options: toggle to memory default. |
| 7. | Leave the options: field blank. |
| 8. | Click OptiStruct. This launches the OptiStruct analysis job. |
If the job is successful, new results files can be seen in the directory where the OptiStruct model file was written. The frf_response_analysis.out file is a good place to look for error messages that will help to debug the input deck if any errors are present.
Post-processing FRF Results
Step 13: Viewing the Peak Displacement of the Baseline Model in HyperGraph
This section describes how to view displacement results (.mvw file) in HyperGraph and also how to understand the displacement output (.disp file) from this run. The results file (.h3d) contains only the displacement results for the three nodes specified in the node set output.
| 1. | Click HyperView in the OptiStruct panel to load the results from the analysis into the next page. |
| 2. | Click Close to close the message log menu which appears that informs about the result files loaded into HyperView. |
| 3. | In the HyperView window, select File on the menu bar, and select Open > Session. An Open Session File window opens. |
| 4. | Find the directory where the job was run and open the file frf_response_analysis_freq.mvw. If you launched from the OptiStruct panel, click Yes to discard the current session. |
Two graphs are displayed. The graph title shows Subcase 1(subcase1)-Displacements of grid 3.
The top graph shows Phase Angle verses Frequency. The bottom graph shows Displacement Response verses Frequency.
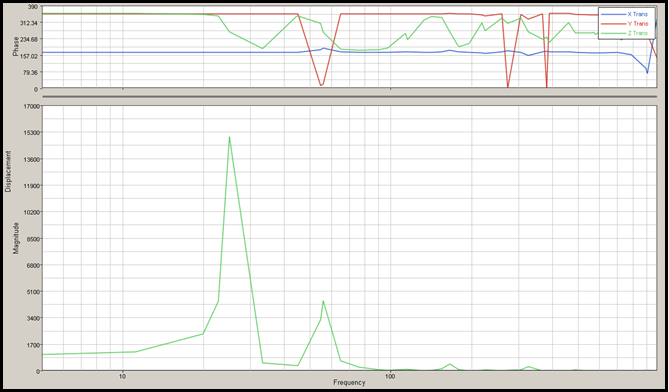
| 5. | Click the Define Curves button  and delete the X Trans and Y Trans curves. and delete the X Trans and Y Trans curves. |
The excitation is applied on Z direction then, the main effect will be detected on this direction.
| 6. | Click the Curve Attributes button  and change the line attribute to continue and change the line attribute to continue  . . |
| 7. | On the same panel, click Symbol Attributes and select the square symbol. |

| 8. | Click the Axes button  and change to Vertical to edit the vertical axis. and change to Vertical to edit the vertical axis. |

| 9. | Click the Scale and Tics (Magnitude) tab and change it to Logarithmic. |
| 10. | Change the Min: to 5 and the Max: to 200000. |
| 11. | Click the Scale and Tics (Phase) tab and change the Tics per axis: to 7. |
| 12. | Click Horizontal X or change it using the drop-down list and change the Min: to 5 and the Max: to 1000. |

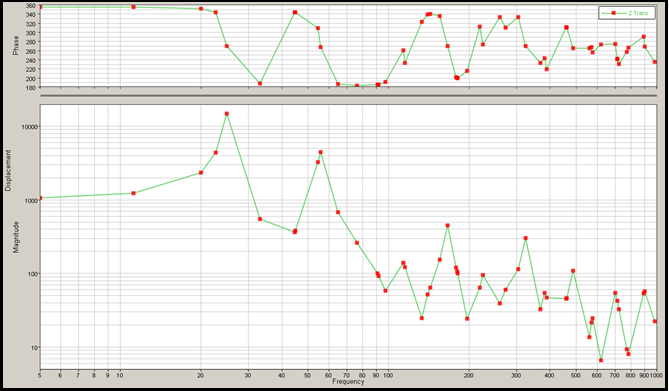
Frequency Response Function FRF (Node 3, Z-Displacement)
| 13. | Click Coordinate info  . . |
| 14. | Click the Magnitude radio button. |
| 15. | Click the maximum button to see the maximum Y-magnitude ~ 15055 in the table. The peak displacement of the baseline model. |

This concludes the HyperGraph results processing.
Step 14: Create the Design Variables for Topology Optimization
| 1. | Return to HyperMesh by changing the client selector to HyperMesh  . Reload the frf_response_input.hm file and save it as frf_response_optimization.hm. . Reload the frf_response_input.hm file and save it as frf_response_optimization.hm. |
| 2. | From the Analysis page, enter optimization panel. |
| 3. | Click topology to enter the panel. |
| 4. | Select the create subpanel using the radio buttons on the left-hand side of the panel. |
| 5. | Click desvar = and enter plate. |
| 7. | Check the box next to Design and click select. |
| 8. | Set the type: toggle to PSHELL. |
| 9. | Set the base thickness toggle to base thickness =. |
| 10. | Click base thickness = and enter 0.15. |
| 12. | Click the parameters radio button. |
| 13. | Toggle minmemb off to mindim and then enter 2. |
| 14. | Toggle maxmemb off to maxdim and then enter 6. |
A topology design space definition, plate, has been created. All elements organized into the design component collector are now included in the design space. The thickness of these shells can vary between 0.15 (base thickness defined above) and the maximum thickness defined by the T (thickness) field on the PSHELL card.
The object of this exercise is to determine where to locate ribs in the designable region. Therefore, a non-zero base thickness is defined, which is the original thickness of the shells. The maximum thickness, which is defined by the T field on the PSHELL card, should be the allowable depth of the rib.
Currently, the T field on the PSHELL card is still set to 0.15 (the original shell thickness), this needs to be changed to a higher value to create a design space where the material can be removed.
| 16. | Click return to go back to the optimization panel. |
| 17. | In the Model browser, expand the Property folder. |
| 18. | Click Design to open the Entity Editor. |
| 19. | Replace 0.150 in the T field with 1.000. |
Step 15: Create Responses
A detailed description of the available responses can be found in the OptiStruct User's Guide under Responses.
Two responses will be defined here:
| • | Frequency Response Displacement (Constraint) |
| • | Total Volume Response (Objective) |
| 1. | Select the responses panel. |
| 2. | Click response = and enter frfdisp. |
| 3. | Click the response type: switch and select frf displacement. |
| 4. | Make sure the component switch is set to magnitude and the function switch is set to all freq. |
| 5. | Click the yellow nodes button and choose node ID 3. |
| 6. | Choose the dof3 radio button. |
| 7. | Click create. A response, frfdisp, is defined for the maximum magnitude on dof3. |
| 8. | Click response = and enter volume. |
| 9. | Click the response type: switch and select volume from the pop-up menu. |
| 10. | Make sure the toggle is set to total. |
| 11. | Click create. A response, volume, is defined for the volume of the design space. |
| 12. | Click return to go to the optimization panel. |
Step 16: Create the Constraints
The maximum displacement criterion for the load case in this problem is 600mm.
| 1. | Select the dconstraints panel from the optimization panel |
| 2. | Click constraint= and enter constr. |
| 3. | Click response= and select frfdisp from the response list. |
| 4. | Check the box to the left of upper bound =. |
| 5. | Click upper bound = and enter the value 600. |
| 6. | Click loadstep and select subcase1. |
| 8. | Click return to go to the optimization panel. |
Step 17: Define the Objective
| 1. | Select the objective panel from the optimization panel. |
| 2. | Click response = and select volume response. |
| 4. | Click return twice to exit the panel. |
Step 18: Run the Optimization
| 1. | From the Analysis page, click OptiStruct. |
| 2. | Click save as following the input file: field. |
| 3. | Select the directory where you would like to write the OptiStruct model file, enter the name for the model, frf_response_optimization.fem, in the File name: field, and click Save. |
The name and location of the frf_response_optimization.fem file displays in the input file: field.
| 4. | Set the export options: toggle to all. |
| 5. | Click the run options: switch and select optimization. |
| 6. | Set the memory options: toggle to memory default. |
| 7. | Click OptiStruct. This launches the OptiStruct job. |
If the job is successful, new results files can be seen in the directory where the OptiStruct model file was written. The frf_response_optimization.out file is a good place to look for error messages that will help to debug the input deck if any errors are present.
Important files written to the directory include:
frf_response_optimization.hgdata
|
HyperGraph file containing data for the objective function, percent constraint violations and constraint for each iteration.
|
frf_response_optimization.his_data
|
The OptiStruct history file containing iteration number, objective function values, and percent of constraint violation for each iteration.
|
frf_response_optimization.HM.comp.cmf
|
HyperMesh command file used to organize elements into components based on their density result values. This file is only used with OptiStruct topology optimization runs.
|
frf_response_optimization.HM.ent.cmf
|
HyperMesh command file used to organize elements into entity sets based on their density result values. This file is only used with OptiStruct topology optimization runs.
|
frf_response_optimization.html
|
HTML report of the optimization, giving a summary of the problem formulation and the results from the final iteration.
|
frf_response_optimization.oss
|
OSSmooth file with a default density threshold of 0.3. You may edit the parameters in the file to obtain the desired results.
|
frf_response_optimization.out
|
OptiStruct output file containing specific information on the file setup, the setup of your optimization problem, estimates for the amount of RAM and disk space required for the run, information for all optimization iterations, and compute time information. Review this file for warnings and errors.
|
frf_response_optimization.sh
|
Shape file for the final iteration. It contains the material density, void size parameters and void orientation angle for each element in the analysis. The .sh file may be used to restart a run and, if necessary, to run OSSmooth files for topology optimization.
|
frf_response_optimization_des.h3d
|
The .h3d file is a compressed binary file, containing both model and optimization history data results. It can be used to post-process results in Altair HyperView.
|
frf_response_optimization_s#.h3d
|
The .h3d file is a compressed binary file, containing both model and first and last iteration data results for the # load case. It can be used to post-process results in Altair HyperView.
|
frf_response_optimization.stat
|
Summary of analysis process, providing CPU information for each step during the analysis process.
|
Post-processing the Topologic Results
Element Density and Element Thickness results are output from OptiStruct for all iterations. This section describes how to view an iso-plot of the new design in HyperView.
Step 19: View a Static Plot of the Density Results
| 1. | Click the HyperView button in the OptiStruct panel. |
| 2. | In the HyperView window, select File on the menu bar, and select Open > Session. An Open Session File window opens. |
| 3. | Find the directory where the job was run and open the file frf_response_optimization.mvw. |
| 4. | Click Close to exit the Message Log window. |
| 5. | Click the Contour toolbar button  . . |
| 6. | Set the last Load Case Simulation by clicking the Subcase Selection box above the Results browser. |

| 7. | Change the averaging method to Simple. |
| 8. | Click Apply in the contour panel. |
Each element of the model is assigned a legend color, indicating the density of each element for the selected iteration. The last design iteration gives the optimized material layout.
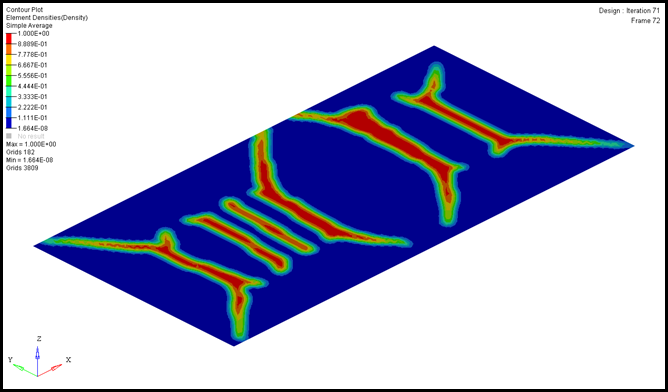
Contour of the baseline model (final design iteration)
Step 20: Compare the Peak Displacement of the Optimization Run
| 1. | From the File menu, select Open. |
| 2. | Open the analysis session FRF_response_analysis_freq.mvw. |
| 3. | Click the Build Plots icon  to prepare to add curves on top of the existing analysis information. to prepare to add curves on top of the existing analysis information. |
| 4. | For the Data File:, load the optimization file with the final iteration analysis in it: frf_response_optimization_s2.h3d. |

| 5. | For Subcase:, select the last iteration. Leave the X Type: as Frequency. Select Y Type: Displacement (Grids), Y Request: N3, and Y Component: X,Y, and Z. |
| 6. | Click Apply to overlay the new information onto the original plot. |
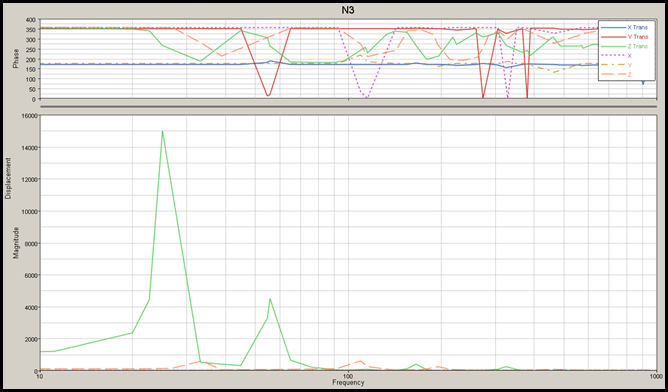
Original and final design results for the plate
See Also:
OptiStruct Tutorials


