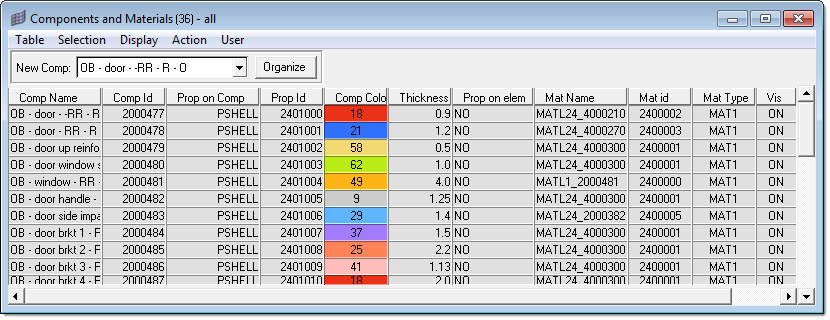
The OptiStruct Component Table displays components and their associated attributes in an interactive table. The information displayed in the table may be configured.
This utility also allows you to create components, assign materials to components, change component colors, and change component visualization modes. Most actions are available either from shortcut (right-click) menus or from the pull-down menus.
Before performing actions, such as changing the values of component data, you must select Editable from the Table menu. Once the table is editable, you can modify the values of existing components. The following sections describe how to use the component table in both read-only mode and editable mode.
Using the Component Table in Read-Only Mode
When you open the Component Table, displayed components are listed in a table using a default configuration. This configuration displays the name, ID number, type, thickness, material name, material ID, material type, color, and visibility (display) for each displayed component.
The table may be adjusted to display information for all components by selecting Table; Configure; Components; All.
The display of the Component Table can be customized according to your preferences. You can:
| • | Change which columns are displayed. |
| • | Sort the components by column data, ascending or descending. |
| • | Filter which components are displayed based on column data values (see below). |
You can save your settings by creating a configuration file. From the Table menu, open the Configure sub-menu and select the Save CFG-File option. This configuration file saves the set of table configuration options so you can use them again. By default, a configuration file (comptable.cfg) is saved in the working directory for each component table session and settings from this file are applied each time the table is built.
Using the Component Table in Editable Mode
When you switch the Component Table from the default read-only mode to editable mode (by selecting Editable from the Table menu), you can perform all the actions described in the section above, plus edit the attributes of the components listed in the table. To change the value of an attribute, select the attribute in the Assign Values drop-down, type the new value in the adjacent field, and click Set.
How Do I…
| 1. | From the Table menu of the Component Table, select New. The Component Create dialog opens. |
| 2. | Type a name in the Component Name = field. |
| 3. | Select a material type for the component from the Mat Name: drop-down field. (Or click the adjacent New button to define a new material and select it.) |
| 4. | Click the Properties button to assign a property, or click the adjacent New button to define a new property and select it. |
| 6. | A panel opens, on which you must confirm the component creation. Click return. |
The new component appears in the Component Table.
|
| 1. | From the Assign Values drop-down field, select Mat Name. |

| 2. | Click New to create a new material or select a material from the HM-Mats drop-down field and click Edit to edit that material. |
|
| 1. | Select the components that you want to change. You can use ctrl+click and shift+click to select non-adjacent and adjacent rows in the table, respectively. Other options are available in the Selection menu. |
| 2. | Select the column type you want to change from the Assign Values drop-down field. |
| 3. | Type the new value in the adjacent field. |
| 4. | Click Assign. The selected column types are updated to the new value you specified. |
|
The Component Table includes advanced filtering features based on the available columns of data. If your model contains a large number of components, you can filter the components to quickly see components that are of interest to you.
| 1. | From the Table pull-down menu, select Filter…. The Filter dialog opens. |
| 2. | Type a search string, with optional wildcard characters (*), in the fields for the columns you want to search. (Search strings are case-sensitive.) For example, to search for all components that begin with the letter ‘c’ and have ‘steel’ as the material type, you would complete the dialog as shown below: |
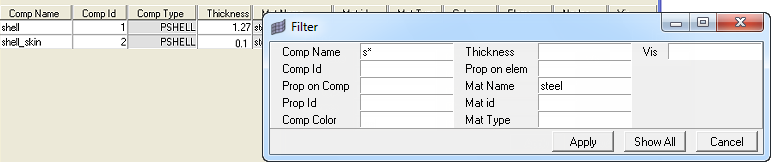
| 3. | Click Apply in the Filter dialog. The filter is applied to the Component Table and only those components that match the search criteria are shown. |
| 4. | To remove filtering and display all the components, click the Show All button on the Filter dialog. You can also keep the Filter dialog open after applying filter changes by selecting the Table menu and selecting Configure and Filter on top. |
|
To customize what appears in the table, you can specify which columns of data appear in the table.
| 1. | From the Table menu, select Configure and Columns… The Configure dialog opens. |
| 2. | The Configure dialog contains a list of column types that are available. Select the check boxes for the data you want to view. |
|
| 1. | From the Table menu, click Save and then either CSV or HTML, depending on which type of data file you prefer. |
| 2. | If you chose CSV, you must select delimiter Comma (,)… or delimiter Semi-colon (;)…, depending on which character you want to be the data delimiter in the output file. |
| 3. | The Select Output File dialog opens, on which you can select an existing file to overwrite or type the name of the file you are creating. Click Save. The data file is saved in the location you specified. |
|
See Also:
Utility Menu


