Engineering Solutions

ID-Manager

ID-Manager

Previous topic Next topic Expand/collapse all hidden text  

ID-Manager

Previous topic Next topic JavaScript is required for expanding text JavaScript is required for the print function  

FE entities in CAE models are labeled and tagged using IDs and names. IDs are used by the solvers during analysis and then passed on by the solver to the results. This process enables you to interpret the results and relate them to the FE model. In most cases, the IDs of the FE entities in a FE model must be unique for efficient identification. In large models that involve several parts assembled into sub-assemblies and main assemblies, it is essential to have a tool that manages a model's IDs consistently in the part level, sub-assembly level, and in the global level for ease of identification using IDs.

Use the ID-Manager to manage all of the IDs for the entities that you create, and define ID ranges for all of the entities in each Include file in relation to the full model in order to avoid ID duplication. Access the ID-Manager from the Tools menu when the Abaqus, LS-DYNA, Nastran, OptiStruct, PAM-CRASH 2G, and RADIOSS user profiles are loaded.

In the Abaqus user profile, the following entity types are supported and impacted by the operations performed in the ID-Manager: Assembly, Component, Element, Node, Property, Material, Beam Collector, Beam Section, and Tags. Only these entity types will honor the Min and Max ID ranges defined in the ID-Manager. Corrections made to an Include file only impact these entity types. During the creation of new entities that are not supported by the ID-Manager, the Max ID + 1 is used to assign new IDs.

hmtoggle_plus1greyID-Manager Dialog

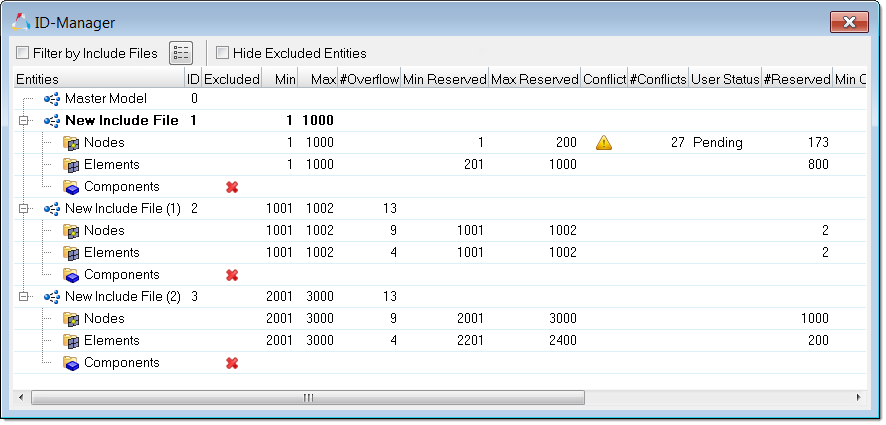
Open the ID-Manager from the menu bar by clicking Tools > ID-Manager. ID ranges and possible operations for ID management can be defined.

Note:When importing and/or creating new IDs, as well as editing entities in the Master Model or Include files, the ID-Manager updates accordingly.

id-mnager

ID-Manager Options

Option

Description

Filter by Include Files

When enabled, Include files selected in the Select Includes dialog are filtered from the ID-Manager.

Click icon_filter_include to open the Select Includes dialog.

Data related to filtered Include files is saved to an .hm file.

Hide Excluded Entities

When enabled, entities marked as "Excluded" are hidden in the ID-Manager.

Data related to "Excluded" entities is saved to an .hm file.

Entities

Displays the Master Model and its child entities, as well as each Include file and its child entities.

ID

Displays the ID of each Include file.

Excluded

Displays an X icon (red_x_idmanager) when an entity is excluded from ID management operations.

Min

Enter a minimum integer value for the ID range that does not overlap with any other range definitions in the model.

The Min should always be:

greater than the Max of the previous range defined in the model.
less than the Min of the next range defined in the model.
less than the Max of the current range.

Max

Enter a maximum integer value for the ID range that does not overlap with any other range definitions in the model.

The Max should always be:

greater than the Max of the previous range defined in the model.
less than the Min of the next range defined in the model.
greater than the Min of the current Include file.

#Overflow

Displays the number of IDs in an Include file or entity folder that are outside of the defined range.

Min Reserved

Minimum integer value for the reserve ID range. You can manually edit the Min Reserved column as long as your modifications do not violate the Min and Max ID range.

When you reserve all IDs, the Min Reserved and Max Reserved columns are populated using the Min and Max ID range defined at the entity level.

Max Reserved

Maximum integer value for the reserve ID range. You can manually edit the Max Reserved column as long as your modifications do not violate the Min and Max ID range.

When you reserve all IDs, the Min Reserved and Max Reserved columns are populated using the Min and Max ID range defined at the entity level.

Conflict

Displays a conflict icon (id_manager_conflict_icon) when there are IDs in the reserve range that already exist in the model.

#Conflicts

Displays the number of conflicts in a reserve range.

User Status

Indicates the status of reserve conflicts.

Pending. Pending displays as soon as conflicts occur. When conflicts are resolved with the use of the Move Out correction method, the user status automatically resets to a blank status.
WIP (Work in Progress). When the conflict icon is displayed and conflicts have not been addressed or are not completely resolved, change the status from Pending to WIP.
Completed. When conflicts are resolved with the use of the Lock correction method, change the status to Completed. The conflict icon will still be displayed, but changing the status to Completed indicates conflicts have been resolved.

#Reserved

Displays the number of IDs reserved at the entity level.

When IDs are reserved, this column is populated for the corresponding entity. All IDs within a defined ID range for an entity can be reserved, or discrete IDs within a defined ID range can be reserved. For IDs being reserved that do not fall into the defined ID range, these entities will be moved into the #Reserved column of the Master Model.

If an entity type supports ID pools, the #Reserved column will display the total number of reserves applied to each ID pool in that entity type.

Min Occupied

Displays the minimum ID occupied by all of the entities in an Include file. For individual entities, it displays the corresponding minimum ID occupied in the Include file.

Max Occupied

Displays the maximum ID occupied by all of the entities in an Include file. For individual entities, it displays the corresponding maximum ID occupied in the Include file.

#Entities

Displays the total number of entities in Include files and entity folders.

#Locks

Displays the number of IDs that have been locked from renumbering.

New ID

Determines where new IDs will be placed within the current Include file range.

After Max

Uses any free IDs available starting after the maximum ID occupied within the defined range.

Before Min

Uses any free IDs available starting before the minimum ID occupied within the defined range.

Fill in Gaps

Uses any free IDs available, starting after the minimum ID within the defined range.

If the ID-Manager cannot find any free IDs using the After Max and Before Min options, then newly created entities will be assigned IDs using the Fill in Gaps option.

If the ID-Manager cannot find any free IDs within the defined ID range using any of the above options, then newly created entities will be assigned IDs beyond the Max ID occupied or the Max ID defined in the model, whichever one is being the highest.

Correction

Determines how duplicate IDs are renumbered to correct overflow.

None

Does not correct overflow IDs.

Compact And Fit

Compacts the IDs that are already occupied in an Include file, and moves the overflow IDs into the range starting from the Min ID in the defined ID range.

Move After Max

Moves the overflow IDs after the Max ID occupied in the defined ID range.

Move Before Min

Moves the overflow IDs before the Min ID occupied in the defined ID range.

Insert In Gaps

Moves the overflow IDs into gaps within the defined ID range.

Note:IDs that are locked or reserved in an Include file will not be renumbered.


hmtoggle_plus1greyID-Manager Operations

In the ID-Manager, the following ID management operations can be performed.

Create Include Files

In the ID-Manager, right-click and select Create > Include File from the context menu.


Delete Include Files

1.In the ID-Manager, right-click on an Include file and select Delete from the context menu.
2.In the Delete Entity dialog, select Also delete children entities to delete the selected Include file(s) along with its child entities.
3.Click OK.


ID ranges can be defined for entity types that do not yet exist in the Master Model or in an Include file.

1.In the ID-Manager, right-click on the Master Model or an Include file and select Create > ID-Range from the context menu.
2.In the Create dialog, select an entity type and enter a Minimum ID and Maximum ID.
3.Click OK.


Edit the minimum and maximum ID range of the Master Model, Include files, and entities by double-clicking the Min and Max columns and entering new values.


In the ID-Manager, right-click on the Master Model, an Include file, or an entity and select Clear ID-Ranges from the context menu.

Clearing an Include file's ID range also clears ID ranges defined for child entities. If you clear the ID range defined for a child entity, when it is different from the Include range, then the range defined for the Include file will be updated for the child entity. Clearing ID ranges will not remove exclusions.


Exclude Entities

In the ID-Manager, right-click on a Master Model, Include file, or entity and select Exclude from the context menu. If you right-click on a Master Model or Include file you must select a type of entity to exclude in the Exclude dialog. Exclusion is automatically applied if you right-click on an entity. When an entity is excluded, an X icon (red_x_idmanager) displays in the Excluded column.

Excluded entities can be hidden in the ID-Manager by selecting the Hide Excluded Entities checkbox.


Clear Exclusions

In the ID-Manager, right-click on an entity and select Clear Exclusion from the context menu.


Lock IDs

IDs can be locked in the ID-Manager to prevent them from being changed by future ID management and renumbering operations.

To lock

Do this

All IDs

Right-click on a Master Model, Include file, or entity and select Lock > All IDs from the context menu.

Discrete IDs

Right-click on an entity and select Lock > Discrete IDs from the context menu. In the panel area, select specific IDs to lock.


Unlock IDs

Locked IDs can be unlocked in the ID-Manager so they can be changed by future ID management and renumbering operations.

To unlock

Do this

All IDs

Right-click on a Master Model, Include file, or entity and select Unlock > All IDs from the context menu.

Discrete IDs

Right-click on an entity and select Unlock > Discrete IDs from the context menu. In the panel area, select specific IDs to unlock.


Reserve IDs

In the ID-Manager, available IDs can be reserved for future use. You can either reserve all IDs within a defined ID range at the entity level or reserve discrete IDs.

Reserve > all IDs can only be used when there is an ID range defined at the entity level. When you reserve all IDs, the Min Reserved and Max Reserved columns are populated using the Min and Max ID range defined at the entity level. The Min and Max Reserved columns can be manually edited as long as your modifications fall within the Min and Max ID range. IDs within the reserve range that already exist in the model will be populated in the Conflicts column.

When reserving discrete IDs, if the ID or set of IDs being reserved does not fall within the defined ID range, then those IDs will still be reserved but will be listed under the Master Model.

If you reserve IDs for an entity that supports ID pools, the reserved IDs will be applied to each ID pool. For example, the count for elements reserves in LS-DYNA includes reserves for each element pool available for the given ID range.

After IDs are reserved, they cannot be changed from renumbering operations. When an ID range is cleared, reserved IDs will be moved to the Master Model. If the ID range is re-entered, reserved IDs will be moved back to the entity it was originally reserved for. If you create an exclusion or delete an ID range at the entity level, the reserve range defined and the reserves defined within that range will be removed.

To reserve

Do this

All IDs

Right-click on a Master Model, Include file, or entity and select Reserve > All IDs from the context menu.

All IDs within the defined ID range are automatically reserved if you right-click on an entity. If you right-click on the Master Model or an Include file you must select a type of entity to reserve all IDs for in the Reserve All dialog.

Discrete IDs

Right-click on a Master Model, Include file, or entity and select Reserve > Discrete IDs from the context menu.

In the Reserve dialog, select an entity type and correction option, and enter IDs to be reserved.


Unreserve IDs

To unreserve

Do this

All IDs

Right-click on a Master Model, Include file, or entity and select Un-Reserve > All IDs from the context menu.

Discrete IDs

Right-click on a Master Model, Include file, or entity and select Un-Reserve > Discrete IDs from the context menu.

In the Un-Reserve dialog, select an entity type and enter IDs to be unreserved.


IDs that are already occupied in an Include File can be compacted using the Compact Entities option. Overflowed IDs are then placed into the ID range, starting from the Min ID occupied without any gaps. Locked IDs in an Include file will not be renumbered.

To compact IDs, right-click on a Master Model, Include File, or entity and select Compact Entities from the context menu.

Note:   This option is only available if you have selected single/multiple Include files, single/multiple child entities, or an Include file plus a child entity that has the ID range defined.


1.In the ID-Manager, right-click on the Master Model or an Include file and select ID Overflow List from the context menu.
2.In the ID Overflow List dialog, review all of the overflow IDs in the Master Model or Include file. The Name column lists all of the entities in the Master Model/Include file that contains overflow IDs, along with the number of overflow IDs in each entity within parentheses. The Correction Option column displays the correction option currently assigned to each entity.
3.Review overflow IDs in the graphics area.
Left-click on each entity in the Name column to highlight it in the graphics area.
Right-click on each entity to access additional display options from the context menu, such as Show, Hide, or Isolate.
4.Correct ID overflow.
To correct the ID overflow for a specific entity, right-click on the entity and select Correct from the context menu.
To correct all of the ID overflow listed, click Correct All.


In the ID-Manager, right-click on an Include file or entity and select Correct > Overflow from the context menu. Overflow IDs are corrected using the correction option assigned in the Correction Option column. If you do not right-click on an Include file or entity folder, then this operation will be performed on all of the overflow IDs inside of the model. A message will appear before this action is performed, warning you that all of the overflow entities in the model will be corrected once you click OK.

If the ID-Manager cannot correct all of the IDs, a warning message will be displayed and none of the overflow IDs within an Include file/entity folder will be corrected.


1.In the ID-Manager, right-click on the entity folder that contains conflicts and select Correct > Reserve Conflicts from the context menu.
Note:Nodes and element entities are isolated in the graphics area.
2.In the panel area, use the selector or other extended entity selection options to select IDs to correct.
3.Click proceed.
4.In the Correct Reserve Conflicts dialog, select a correction method to resolve conflicts with.
Move Out moves the selected IDs out of reserve range and renumbers them using the max +1 rule, which is the maximum ID available plus 1. If the ID range is full, corrected IDs will be marked as overflow. The conflict icon will only be removed if you resolve all of the conflicts.
Lock locks IDs in the reserve range and populates the Lock column. The conflict icon will display, and all of the IDs listed in the reserve range are locked.
5.Click OK.


Import/export a .csv file of ID management rules by right-clicking in the ID-Manager and selecting Import CSV file or Export CSV file from the context menu. ID management rules can be exported for only the entities that are currently displayed in the ID-Manager, or for all of the entities in the ID-Manager including those excluded by ID management filters.

ID management data related to overflow, min/max occupied IDs, number of conflicts, number of reserves, and number of locks will be calculated while reading the .csv file.


Once the ID ranges are defined for each Include file and child entity type, they will remain active and any new entities created will be assigned an ID within the ID range following the new ID rules. Entities that are imported into the Include file that have ID ranges already defined, will have the IDs that overflow after import automatically corrected by Move After Max option.

Aside from new entity creation and import, the ID-Manager will not actively correct all of the IDs in the FE model. If there are entity IDs that result in overflow because of organization issues in the Include file such as renumbering, they will remain as overflow and must be corrected manually.

hmtoggle_plus1greyID-Manager Examples

The following examples provide a more in-depth understanding of the ID-Manager functionality.


New ID Example

The example below explains how new components are assigned an ID after you have defined an ID range and established rules for ID management.

An Include file contains components with the following IDs: 4, 5, 10 through 50, and 80 through 97. From the ID-Manager, an ID range of 1 through 100 is defined for the Include file. When new components are added to the Include file, they will be assigned an ID based on the New ID option selected. The behavior of each New ID option is as follows:

After Max

New components will be assigned IDs from 98, 99, and 100. Once the Max ID of 100 reached, any new component created will use the Fill in Gap option and be assigned IDs starting from 1.

Before Min

New components will be assigned IDs from 3, 2, and 1. Once the Min ID of 1 reached, any new component created will use the Fill in Gap option and be assigned IDs starting from 1.

Fill in Gaps

New components will be assigned available IDs starting from the Min ID of 1, 2, 3, 6, and so on.


ID Correction Example

The example below explains how the different correction options correct overflow IDs.

An Include file contains components with the following IDs: 4, 5, 20 through 60, 80 through 90, 101, 105, 110, and 117. From the ID-Manager, an ID range of 10 through 100 is defined for the Include file, resulting in six overflow components. To correct the overflow IDs, a correction option is selected. The behavior of each correction option is as follows:

None

No correction is performed and the overflow IDs remain the same.

Compact and Fit

Compacts the IDs that are already occupied in the Include, and places the overflow IDs into the range starting from the Min ID of the defined range. The overflow IDs will be assigned the following new IDs:

IDs Before Correction

IDs After Correction

4

10

5

11

20 - 60

12 - 52

80 - 90

53 - 63

101

64

105

65

110

66

117

67

Move After Max

Places the IDs that overflow after the Max ID occupied in the defined range. The overflow IDs will be assigned the following new IDs:

IDs Before Correction

IDs After Correction

4

91

5

92

20 - 60

20 - 60

80 - 90

80 - 90

101

93

105

94

110

95

117

96

Move Before Min

Places the IDs that overflow before the Min ID occupied in the defined range. The overflow IDs will be assigned the following new IDs:

IDs Before Correction

IDs After Correction

4

19

5

18

20 - 60

20 - 60

80 - 90

80 - 90

101

17

105

16

110

15

117

14

Insert in Gaps

Places the IDs that overflow into the gaps in the defined range. The overflow IDs will be assigned the following new IDs:

IDs Before Correction

IDs After Correction

4

10

5

11

20 - 60

20 - 60

80 - 90

80 - 90

101

12

105

13

110

14

117

15


Reserve ID Example

The following examples explain how to reserve IDs using the ID-Manager.

An Include file contains components with the following IDs: 4, 5, 20 - 60, 80 - 90, 101, 105, 110, and 117. From the ID-Manager, an ID range of 10 through 100 is defined for the Include file, resulting in six overflow components. To correct the overflow IDs, a correction option is selected.

By reserving all of the IDs within the range 1-100, the Number of ID reserves will be populated to 46, which is number of available IDs for the ID range 1-100 (available IDs include: 1-3, 6-19, 61-79 and 91-100).

If a reserve is applied to an entity that supports ID pools, the reserves will be applied to each ID pool of that entity. For example, consider a LS-DYNA model that has 10 ID pools for properties. If an ID range of 1-100 as defined, as in the above example with the same individual IDs for properties as opposed to components, the total count of reserves will be 460 (46 per pool and a total 10 pools).