|
»Click here to display Table of Contents«
|

Trim Hole Macro |

|

|

|

|
|
Trim Hole Macro |
|
|
|

|
|
»Click here to display Table of Contents«
|
Trim Hole Macro |
|
|
|
|
|
Trim Hole Macro |
|
|
|
|
This function creates a circular hole of a given radius in the mesh at a node specifying the center of the hole. You can also specify a number of layers of washer elements to include.
Clicking Trim Hole opens a nodes selector panel. Pick nodes on your model for the centers of each hole that you wish to create, then click proceed. A dialog opens:
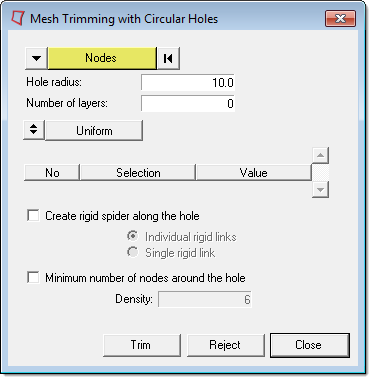
The options in the Mesh Trimming with Circular Holes dialog determine the type of hole that is created at each chosen node:
Hole radius |
Each node will receive a hole of this radius, measured from the node. |
||||
Number of layers |
This is the number of layers of washer mesh elements that you want to surround each hole. |
||||
Uniform/Varying |
This toggle only applies when the number of layers is more than zero, and specifies whether you want mesh layers to all be the same width, or to vary from one another. |
||||
No. |
The number of a specific washer layer. If you chose varying width for the layers, the table displays one row for each of the Number of layers that you specified. Otherwise, only one row displays because all layers will be set to the same values. |
||||
Scale/Width |
Determines the width of the washer layers.
|
||||
Value |
The scale factor or width of the layer(s). |
||||
Create rigid spider along the hole |
This checkbox will create a rigid spider in each of the new holes created, and enables two more options:
|
||||
Minimum number of nodes around the hole |
This determines the mesh density around the new hole(s). Each new hole will be created with at least the number of nodes that you specify in the density field, evenly spaced around its circumference. |
||||
Trim |
Click this button to create the new hole(s). |
||||
Reject |
If you do not like the results of the last trim operation, click this button to undo it.
|
||||
Close |
Close the Mesh Trimming with Circular Holes dialog. |