|
»Click here to display Table of Contents«
|

Fill Hole Macro |

|

|

|

|
|
Fill Hole Macro |
|
|
|

|
|
»Click here to display Table of Contents«
|
Fill Hole Macro |
|
|
|
|
|
Fill Hole Macro |
|
|
|
|
The Fill Hole dialog fills in one or more holes in your geometry with automatically-generated mesh.
|
When you open the Fill Hole function, a new dialog opens:
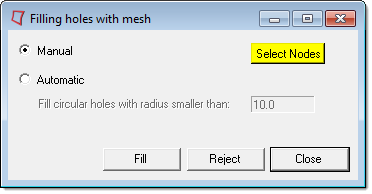
There are two methods of filling holes:
Manual |
Use this option to select the holes that you wish to fill:
|
||||||||
Automatic |
Use this option to select holes automatically based on size. Type a value into the entry field labeled Fill circular holes with radius smaller than. The model is automatically scanned for holes smaller than this value, and attempt to fill them with mesh. |
||||||||
Fill |
Click this button to perform the fill operation, whether you choose to select your holes manually or automatically. |
||||||||
Reject |
If you do not like the results of the last fill operation, click this button to undo it.
|
||||||||
Close |
Close the dialog. |