In this tutorial you will learn how to:
| • | Synchronize windows with different data types |
Tools
To access the Synchronize Window Animation dialog:
| • | From the Tools menu, select Synchronize Animation. |
| • | From the Animation Controls panel, click Time Scales. |
This dialog allows you to synchronize the animation, plot, and video windows on a page by applying appropriate scaling and offset values. This tool is useful for synchronizing windows that contain animation results in different units and/or begin at different time steps.

The dialog contains a Scaling and Offset field for each window on a page. The Scaling field multiplies the total run time of the window’s animation by the specified amount. The animation is then scaled to run within the new time boundaries. The Offset field delays the start of a window’s animation for the specified duration.
Exercise: Synchronize Various Data Types
Step 1: Load animation data from the MADYMO file driv_bag.kin3.
| 1. | From the menu bar, select File > New > Session to clear the contents of the HyperView session. |
| 2. | From the Select application menu,  , select HyperView. , select HyperView. |
| 3. | From the Load Model panel, load the file driv_bag.kn3, located in the ../tutorials/mv_hv_hg/animation/animation_synchronization folder for both Load model and Load results. |
| 4. | Click Apply to load the animation data. |
| 5. | Click  the Standard Views toolbar to view the left side of the model. the Standard Views toolbar to view the left side of the model. |
| 6. | Click  from the Standard Views toolbar to view the right side of the model. from the Standard Views toolbar to view the right side of the model. |
Step 2: Setup a three-window page layout and open the AVI file iihs2.avi in window 3.
| 1. | From the Page Window Layout dialog, select the three-window layout  . . |
| 2. | Activate window 3 (lower left window). |
| 3. | From the Select application menu, select MediaView,  . . |
| 4. | From the menu bar, select File > Open > Media. |
| 5. | Select Files of type: Windows AVI files (*.avi). |
| 6. | Open the file iihs2.avi from the animation_synchronization folder. |
Step 3: Plot xy data curves from the MADYMO file linnacc in window 2.
Using the Build Plots panel, in a single plot window, plot time versus linear acceleration for the lower torso, upper torso, and head resultant acceleration.
| 1. | Activate window 2 (the window on the right). |
| 2. | From the Select application menu, select HyperGraph 2D,  . . |
| 3. | Select the Build Plots panel  . . |
| 4. | From the file browser button  , open the file linacc from the animation_synchronization folder. , open the file linacc from the animation_synchronization folder. |
| 5. | For X type:, select Time. |
| 6. | For Y type:, select Linear Acceleration. |
| 7. | For Y Request:, select LOWER TORSO, UPPER TORSO, and HEAD. |
Press the CTRL key while selecting components to select more than one.
| 8. | For Y Component:, select Res. acceleration. |
| 9. | Click Apply to create the xy data curves. |
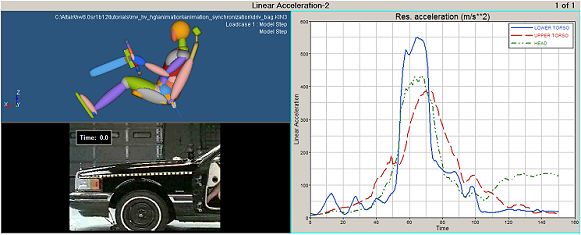
Result of loading the various data files
Step 4: Synchronize the animation, xy plot, and video data.
Synchronize the animation of all three windows using the Synchronize Window Animation dialog.
| 1. | Click  to animate the page’s windows. to animate the page’s windows. |
Notice that the animation, plot, and video windows are not synchronized.
| 2. | Click  to stop/pause the animation. to stop/pause the animation. |
| 3. | Activate window 1 (the animation window). |
| 4. | Select the Animation Controls icon,  , and then select Time Scales…. , and then select Time Scales…. |
| 5. | Move the Current time slider to 0.018. |
Note that the airbag begins to open in the HyperView window.
| 6. | Click the lock button  under Time A for Window 1 and Window 2 in the dialog box to set the start time for the plot and model. under Time A for Window 1 and Window 2 in the dialog box to set the start time for the plot and model. |
| 7. | Move the time slider to 0.138. |
Note that the head has bounced off the airbag.
| 8. | Click the lock button under Time B for Window 1 and Window 2 in the dialog box to set the end time for the plot and model. |
| 9. | Move the slider bar to 17. |
Note that the air bag begins to open in the video window.
| 10. | Click the lock button under Time A for Window 3 in the dialog box to set the start time for the video. |
| 11. | Move the Current time slider to 47. |
Note that the head has bounced off the airbag for the first time in the video.
| 12. | Click the lock button under Time B for Window 3 in the dialog box to set the end time for the video. |

| 14. | Animate page 1 and observe that the events are now synchronized. |


