In this tutorial you will learn how to:
| • | Create a report template |
| • | Use Channel Mapping to reconcile mismatched channels |
Tools
The Build Plots panel can be accessed one of the following ways:
| • | Click the Build Plots icon,  |
OR
| • | From the menu bar, select Curves > Build Plots. |
This panel allows you to construct multiple curves and plots from a single data file. Curves can be overlaid in a single window or each curve can be assigned to a new window.

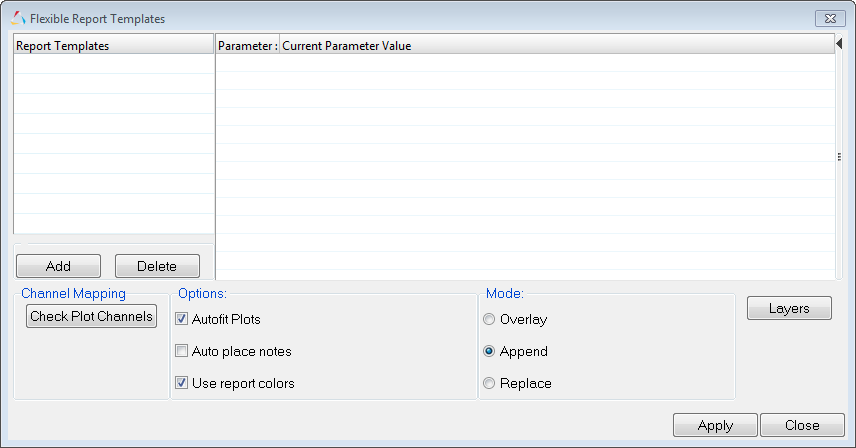
The Flexible Reports Templates panel can be accessed one of the following ways:
| • | Click the Open Report Panel icon,  , from the Reports toolbar. , from the Reports toolbar. |
The Flexible Report Templates panel allows you to add these predefined page sets to the current session. This replaces the Reports panel from earlier HyperWorks Desktop versions. The panel allows you to easily compare test and simulation data. In addition to the standard Report panel features, Channel Mapping is available, which allows you to reconcile mismatched channels (Type, Request and Component data). You can save the reconnected channels to a configuration file and use this file later. From the panel, you can directly edit parameter attributes for parameters created with the Parameter browser.
Exercise: Create a Report Template and Use Channel Mapping to Resolve Conflicts
Step 1: Open the data.lac file.
| 1. | From File menu, select New > Session to clear all contents in the HyperGraph session. |
| 2. | Verify XY Plot is selected from the plot type menu,  . . |
| 3. | Click the Build Plots icon, . |
| 4. | Click the Open File button,  , and open the file ../tutorials/mv_hv_hg/reports/Run1/data.lac. , and open the file ../tutorials/mv_hv_hg/reports/Run1/data.lac. |
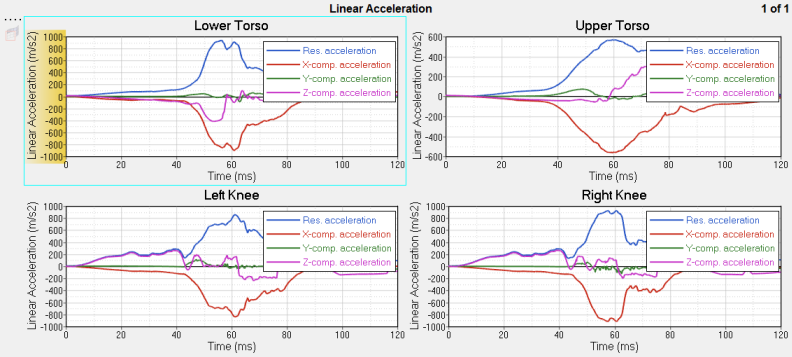
| 5. | From the Build Plots panel, choose the following: |
| • | For Y Request, select Lower Torso, Upper Torso, Left Knee, and Right Knee. |
| • | For Y Component, select all options. |
| • | From the Layout drop-down menu, select One Plot Per Request and select the four window plot layout. |
Step 2: Create a report template and check the plot channels.
| 1. | Click File > Save As > Report Template. Save the file as crash_report to your working directory. |
| 2. | Click File > New > Session. |
| 3. | Click Yes to discard all data. |
| 4. | From the Reports toolbar, click the Open Reports Panel icon, . |
| 5. | The report template you just created should be displayed in the Report Templates list. |
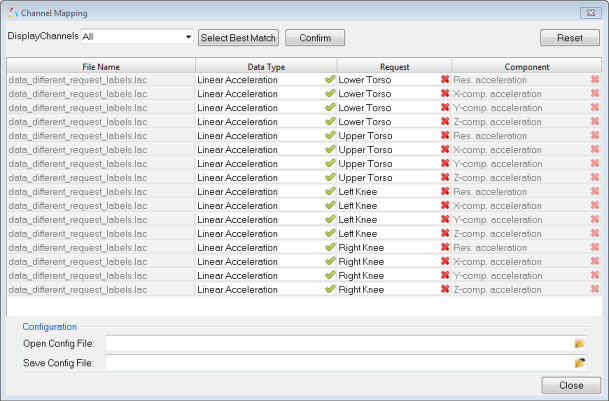
| 6. | Under Channel Mapping, click Check Plot Channels. |
All of the channels are mapped. Click Close.
| 7. | From the Flexible Report Templates panel, under Mode, select Replace and click Apply. |
Step 3: Load file with different test data.
| 1. | From the Reports toolbar, click the Open Reports Panel icon, . |
| 2. | Under Current Parameter Value, click the Open File icon, , and open the file ../tutorials/mv_hv_hg/reports/Run2/data_different_request_labels.lac. |
| 3. | Under Mode, select Replace and click Apply. |
Several error messages are displayed.
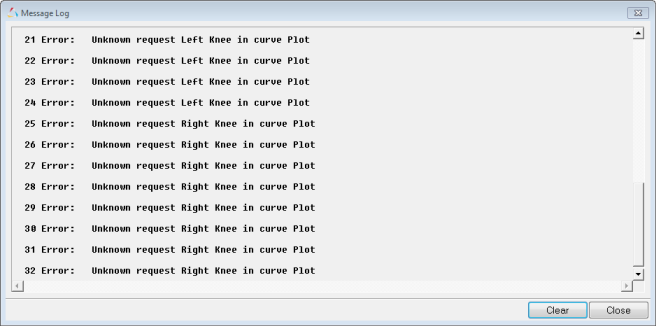
Step 4: Reconcile mismatched channels manually.
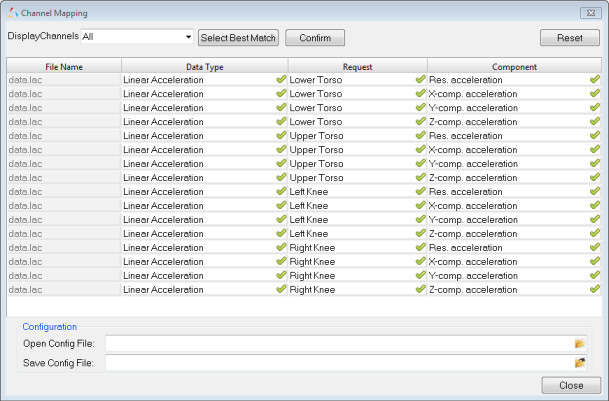
| 1. | From the Flexible Report Templates panel, click Check Plot Channels. |
Notice that several channels are mismatched.
| 1. | Click in the first cell under Request and click Lower Torso. A drop-down menu is displayed. |
| Note | The drop-down menu is not sorted according to best match. |
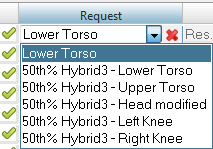
| 2. | To manually connect all four Lower Torso channels, select 50th% Hybrid3 - Lower Torso from the drop-down menu. |
All four lower torso channels are now reconciled.
Leave the Channel Mapping dialog open.
Step 5: Reconcile a selection of mismatched channels using the best match option.
| 1. | To reconcile the left knee channels, click Select Best Match. |
The best matches are inserted into the selected fields, according to the matching algorithm. The results are sorted using a string match to the shortest distance. The icon to the right of the field changes from this,  , to a yellow star,
  , upon selecting this option. The list is sorted according to the best match.
| 2. | If you are satisfied with the results, click Confirm. |
The icon displayed in the the selected fields is updated from this, , to this,  .
.
| 3. | You can also find the Select Best Match option from the context sensitive menu. |
| 4. | Select the any number of channels from the list, right-click and select Select Best Match from the context sensitive menu. |
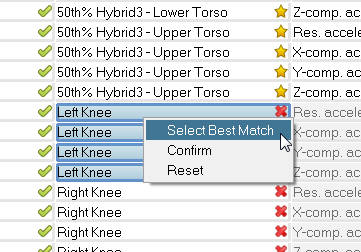
| • | If you are satisfied with the results, select Confirm from the context sensitive menu. |
| • | To undo the match, select Reset from the menu. |
Note: If the buttons at the top of the dialog are used, the actions are applied to all channels; if the context menu is used, the actions are only applied to the selected channels.
| 5. | Click Close to return to the Flexible Report Templates panel. |
Step 6: Reconcile mismatched channels manually with the sorted list.
| 1. | From the Flexible Report Templates panel, delete, then re-add the crash_report.tpl file and the data_different_request_labels.lac file. |
| 2. | Click Check Plot Channels. |
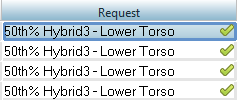
| 3. | Instead of using the drop-down menu to select a request, select right knee from the column to display the drop-down menu. The list is sorted according to the best match. |
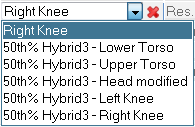
| 3. | Select 50th% Hybrid3 - Right Knee from the drop-down menu. |
All four right knee channels are now reconciled.
| 5. | You can also find the Select Best Match option from the context sensitive menu. |
| 6. | Select the any number of channels from the list, right-click and select Select Best Match from the context sensitive menu. |
| • | If you are satisfied with the results, select Confirm from the context sensitive menu. |
| • | To undo the match, select Reset from the menu. |
| Note: | If the buttons at the top of the dialog are used, the actions are applied to all channels; if the context menu is used, the actions are only applied to the selected channels. |


