The Options panel allows you to set default parameters for XY plots. You can access the options panel from the HyperGraph 2D Preferences menu, or by selecting the Options icon  from the toolbar.

Options panel for XY plots.
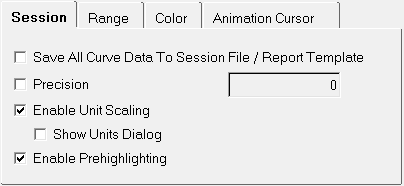
The Session tab includes these options:
Option
|
Description
|
Save All Curve Data to Script File
|
Choose this option to save all curve data to the session file.
|
Precision
|
This is generally used along with the Save all curve data to script file option. It is used to set the precision for the curve values in the session file.
|
Enable Unit Scaling
|
Enables unit scaling. You can also display the Show Units Dialog by selecting that option. See Enabling Units for more information.
|
Enable Prehighlighting
|
Enables the prehighlighting of curves. When this option is on (by default), you can hover over a curve to highlight it. The highlighted curve is displayed in gold.
See Mouseover Curve and Data Point Highlighting for more information.
|

Options panel - Session tab
|
|
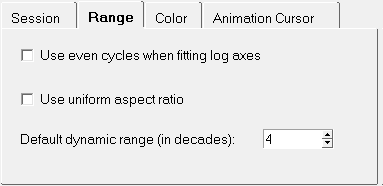
The Range tab includes three preference options:
Option
|
Description
|
Use even cycles when fitting log axes
|
By default, HyperGraph 2D fits logarithmic curves using the minimum and maximum values of the data. Select Use even cycles when fitting log axes to fit logarithmic curves using the next power of 10 greater than the maximum and the next power of 10 less than the minimum.
This option is turned off by default.
|
Use uniform aspect ratio
|
The aspect ratio of the plot area is locked. Distances between values on the x-axis are the same as those on the y-axis.
|
Default dynamic range (in decades)
|
Calculates the minimum value shown when plotting non-positive numbers on a log scale. The minimum value shown is equal to the maximum divided by 10 raised to the default dynamic range. To specify a new dynamic range, enter a new range in the Default dynamic range text field or use the  buttons. The default is 4. buttons. The default is 4.
For example, if you use the default value of 4, four tics with a difference of one decade (ten placement) are placed on the curve. 1E-005, 0.0001, 0.001, and 0.01 would be the tic increment used by default and the curve for that particular axes would change accordingly. If the value were set to 3, then the tics on those axes would change to 0.0001, 0.001, and 0.01. If the value were set to 2, then the tics on the axes would change to 0.001 and 0.01 and so on.
|

Options panel - Range tab
|
|
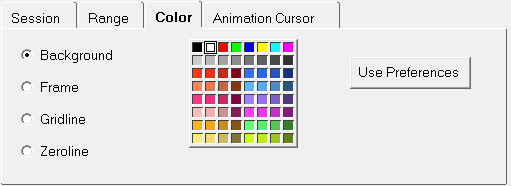
Any of the 64 colors can be assigned to plot elements such as plot background, frame, grid lines, and the zero line. Choose a plot element, then select a color from the palette to change the color of the selected element.
Option
|
Description
|
Background
|
Changes the background color of the HyperGraph 2D window. The default is black.
|
Frame
|
Changes the color of the frame around the HyperGraph 2D window.
|
Grid Line
|
Changes the grid line color.
|
Zero Line
|
Changes the zero line color.
|
Use Preferences
|
Sets the active HyperGraph 2D window's background, frame, grid line, zero line, header, footer, tic, and note colors to the defaults specified in the .preferences.mvw file.
|

Options panel - Color tab
|
|
Allows you to customize the animation cursor in HyperGraph 2D.
Option
|
Description
|
Apply to
|
You can apply the animation cursor attributes to the Current Plot, Current Page, or All Pages.
|
Display as
|
Sets the animation cursor display type. Options include:
For Custom bar, choose the size of the bar by entering a value in the % Window height field. You can enter a value directly or use the up and down arrows to choose a value.
|
Attributes
|
Select the width of the cursor line by choosing one of the four line styles shown.
|
|
Use curve color
|
Sets the animation cursor color to that of the curve that the animation cursor is on.
|
|
Use curve style
|
Changes the line style of the animation cursor (solid, dashed, etc.) to match the curve’s style.
|

Options panel - Animation Cursor tab
|
|


![]() from the toolbar.
from the toolbar. 