HyperMesh and BatchMesher

Contact Pair: Clearance Tab

Contact Pair: Clearance Tab

Previous topic Next topic Expand/collapse all hidden text  

Contact Pair: Clearance Tab

Previous topic Next topic JavaScript is required for expanding text JavaScript is required for the print function  

In the Clearance tab, you can define an initial clearance value and a contact direction for a contact pair. The Contact Manager can only be used to create a clearance definition for contact pairs that have one master-slave pair. If a contact pair has more than one master-slave pairs, then clearance has to be defined for each master-slave pair in the Entity Editor or in the Interfaces panel.

The Clearance tab is enabled when a master and slave surface are selected in the Define tab, and the Small sliding and Clearance check boxes are selected in the Parameter tab.

hmtoggle_plus1greyCreating a New Clearance Definition for a Contact Pair

The steps for creating a new clearance definition for a contact pair varies based on the type of clearance you select.

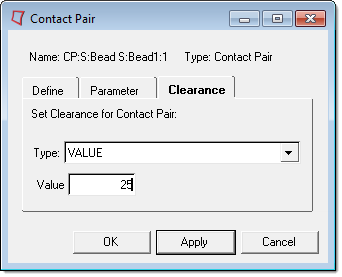
1.In the Type field, select Value.
2.In the Value field, specify an initial clearance/overclosure for the entire set of slave nodes.
Note:A positive values specifies an initial clearance, and a negative value specifies an initial overclosure.

contact_pair_clearance_value

3.Click Apply.


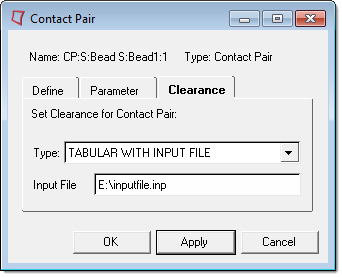
1.In the Type field, select TABULAR WITH INPUT FILE.
2.In the Input File field, specify an input file that contains the clearance data..
Note:The input file can be a file name, relative path, or complete file path. A maximum of eighty characters are allowed in this field.

contact_pair_clearance_tabular_with_input_file

3.Click Apply.


When using the TABULAR WITH BOLT clearance type, you can define clearance using nodes, node sets, or both nodes and node sets. In the example below, clearance is being defined using both nodes and node sets.

1.In the Type field, select TABULAR WITH BOLT.
2.Specify the following:
Half Thread Angle
Pitch
Major Thread Diameter
Minor Thread Diameter

contact_pair_clearance_bolt2

3.To define clearance with a node, select the node check box.
4.To add a data line to the table, click Add.
5.In the first data line, double-click the Node Id field.

contact_pair_clearance_bolt3

6.Using the node collector, select a node.
7.To apply your selection and go back to the Contact Manager, click proceed.
8.Specify the following:
Clearance Value
a(X)
a(Y)
a(Z)
b(X)
b(Y)
b(Z)

contact_pair_clearance_bolt

9.To define clearance with a node set, select the Node set check box.
10.Optional: To create a new node set or edit an existing node set using the Entity Sets panel, click Create/Edit.
11.To add a data line to the table, click Add.
12.In the first data line, click the Node Set field and then select a node set from the list.

contact_pair_clearance_bolt4

13.Specify the following:
Clearance Value
a(X)
a(Y)
a(Z)
b(X)
b(Y)
b(Z)
14.Click Apply.


When using the TABULAR WITH BOLT AND INPUT clearance type, you can define clearance using nodes, node sets, or both nodes and node sets. In the example below, clearance is being defined using both nodes and node sets.

1.In the Type field, select TABULAR WITH BOLT AND INPUT.
2.To define clearance with a node, select the node check box.
3.To add a data line to the table, click Add.
4.In the first data line, double-click the Node Id field.

contact_pair_clearance_bolt5

5.Using the node collector, select a node.
6.To apply your selection and go back to the Contact Manager, click proceed.
7.Specify the following:
Clearance Value
1st Normal
2nd Normal
3rd Normal
8.To define clearance with a node set, select the Node set check box.
9.Optional: To create a new node set or edit an existing node set using the Entity Sets panel, click Create/Edit.
10.To add a data line to the table, click Add.
11.In the first data line, click the Node Set field and then select a node set from the list.
12.Specify the following:
Clearance Value
1st Normal
2nd Normal
3rd Normal
13.Click Apply.


hmtoggle_plus1greyEditing an Existing Clearance Definition for a Contact Pair

If you created a clearance definition using the Entity Editor, Interfaces panel, or imported a clearance definition for a given master-slave pair, you can display and edit the clearance details in the Contact Manager.

1.To read and display an existing clearance definition for a master-slave pair, select the Small sliding check box in the Parameter tab.
2.In the Clearance tab, edit the clearance details.
3.Click Apply.


hmtoggle_plus1greyDeleting a Clearance Definition for a Contact Pair

To delete a clearance definition that was linked to a contact pair using the Contact Manager:

1.In the Parameter tab, clear the Small sliding check box.
2.Click Apply.


hmtoggle_plus1greyClearance Tab Options

The following options are available in the Clearance tab:

Option

Description

Type

Specify a type of clearance to define:

VALUE
TABULAR WITH INPUT FILE
TABULAR WITH BOLT
TABULAR WITH BOLT AND INPUT

Value

Initial clearance/overclosure for the entire set of slave nodes. A positive value specifies an initial clearance, and a negative value specifies an initial overclosure.

Input File

Input file that contains the clearance data. The input file can be a file name, relative path, or complete file path. A maximum of eighty characters are allowed in this field.

Half Thread Angle

Angle between the threads.

Pitch

Distance between two threads.

Major Thread Diameter

The largest extreme diameter of a thread.

Minor Thread Diameter

The smallest extreme diameter of a thread.

Node

Activates the node table, from which you can specify a node to define clearance with.

Node set

Activates the node set table, from which you can specify a node set to define clearance with.

Add

Adds a data line to the table.

Delete

Deletes a data line from the table.

Create/Edit

Opens the Entity Sets panel, from which you can create a node set.

Node Id

Activates the node collector, which can be used to select a node to define clearance with.

Node Set

Enables a drop-down list from which you can select a node set to define clearance with.

Clearance Value

A positive value indicates an opening between the surfaces, and a negative value indicates overclosure. If this field is left blank, the clearance value will be calculated automatically.

a(X)

X-coordinate of point a along the axis of the bolt/bolt hole.

a(Y)

Y-coordinate of point a along the axis of the bolt/bolt hole.

a(Z)

Z-coordinate of point a along the axis of the bolt/bolt hole.

b(X)

X-coordinate of point b along the axis of the bolt/bolt hole.

b(Y)

Y-coordinate of point b along the axis of the bolt/bolt hole.

b(Z)

Z-coordinate of point b along the axis of the bolt/bolt hole.

1st Normal

First component of the normal.

2nd Normal

Second component of the normal.

3rd Normal

Third component of the normal.


See Also:

Entity Editor

Entity Sets panel

Interfaces panel