In this tutorial, you will:
| • | Import an optimization model |
| • | Create a new set of optimization entities |
| • | Organize these into optimization problems |
Model Files
This exercise uses the cclip.fem file, which can be found in the hm.zip file. Copy the file(s) from this directory to your working directory.
Exercise
Step 1: Launch HyperMesh and set the user profile to OptiStruct.
Step 2: Import the cclip.fem file.
| 1. | Select Import Solver Deck  from the Standard toolbar. from the Standard toolbar. |
| 2. | Select OptiStruct for the File type. |
| 3. | Click the  in the File line to browse to <installation_directory>\tutorial\hm\ and select cclip.fem. in the File line to browse to <installation_directory>\tutorial\hm\ and select cclip.fem. |
| 4. | Click Import to open the file. |
Step 3: Create Problem 1 and organize optimization entities.
| 1. | In the Model browser, click  (Optimization View). (Optimization View). |
| 2. | Review the Optimization Repository. The Optimization Repository gives an overview of all optimization related entities in the database. Info types and children entities help give a clear snapshot without having to review individual entities. |
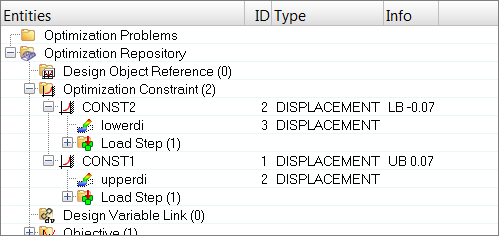
Figure 1
| 3. | Right-click the Optimization Problems folder and click Create > Optimization Problem. HyperMesh creates an optimization problem and opens it in the Entity Editor. |
| 4. | In the Entity Editor, name this problem Topology. |
| 5. | Drag and drop all the entities from the repository into the newly created problem. |
| Note: | You can drag and drop entities from the repository into problems or problems into problems. Any combination of selected entities can be dragged and dropped. |
Step 4: Define a new set of optimization entities.
| 1. | In the Model browser, right-click and select Create > Free Size Desvar from the context menu. The Free Size Optimization panel opens, from which you can define a free size design variable. |
Tip: Give the free size design variable a meaningful name so you can easily drag and drop.
| 2. | Use the props selector to select the shells property. |
| 3. | You can create new response/constraint pairs, or anything else you want to change from problem to problem. For this tutorial, we will just compare Topology to Free Size. |
Step 5: Create Problem 2 and organize optimization entities.
| 1. | In the Model browser, right-click and select Create > Optimization Problem from the context menu. |
| 2. | In the Entity Editor, name this problem Free Size. |
| 3. | Drag and drop all the entities defined in the repository to the newly created problem. |
Note: Two design variables will be defined for the Free Size problem.
| 4. | In the Free Size folder, right-click on the shell design variable and select Remove from Problem from the context menu. |
| Note: | This will not delete the problem from the repository. |
Step 6: Set problems to export and run.
| 1. | In the Model browser, right-click on the Topology problem and select Set Export from the context menu. |
| Note: | Once problems are defined, only one can be exported at a time. The problem set to export is in bold, and furthermore, the Entity State browser shows these rules. |
| 2. | Open the OptiStruct panel. |
| 3. | Set the export options to custom. |
| 4. | Save the input file as cclip_topology.fem. |
| 5. | Click OptiStruct to run the analysis. |
| Note: | The Optimization View allows one .hm for all optimization problems, and it is up to the user to wisely name each input file. |
See Also:
HyperMesh Tutorials


