Use the SPH Meshing tool to generate SPH elements for selected components in your model. You can access the SPH Meshing tool, by clicking Tool > SPH from the menu bar when the Abaqus (Explicit) user profile is loaded.
For step by step instructions on how to use the SPH Meshing tool, refer to the section below.
| 1. | Click the components selector. |
| 2. | In the panel area, click comps. |
| 3. | Select the component(s) you wish to generate SPH elements for. |
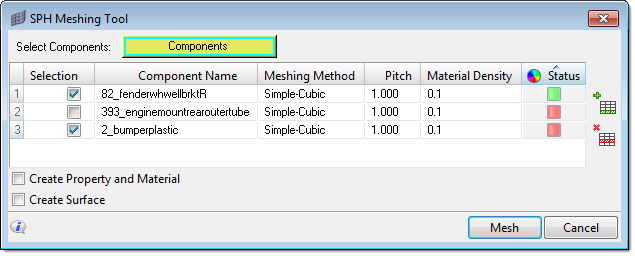
| 5. | Click proceed. HyperMesh displays the component(s) you selected in the Component Name field. |
| 6. | Click the Meshing Method field and select one of the following methods of volume: |
|
Arranges the SPH particles into groups of 8, with each particle being a corner of a cube.
|
| • | Face centered cubic (FCC) |
|
Arranges the SPH particles into groups of 14, forming the corners and the center of each face of a cube. This method is similar to a hexagonal close packed (HCP) structure, and is recommended for use in RADIOSS models.
|
|
Use this method to manually select a node and convert it into a SPH element. This method is specific to HyperMesh, and is only available in the SPH Meshing Tool when the Abaqus (Explicit) user profile is loaded.
|
| 7. | Click the Pitch field, and enter the distance you would like placed between each SPH element in the component. |
| Note: | Smaller pitch values will result in the creation of more elements within the same space, whereas, larger pitch values will result in the creation of less elements. |
| 8. | Click the Material Density field, and enter a value. The value you specify will be used to generate the material and property. |
| 9. | Optional: Select the Create Property and Material check box to create a *solid section and *material keyword for each component that you mesh. |
| 10. | Optional: Select the Create Surface check box to create a *surface (node based) for each component that you mesh. HyperMesh uses this surface later for contact definition. |
| 11. | In the Selection field, select the check boxes of the components you wish to mesh. |
| Note: | In the Status field, notice the red status boxes. A red status box indicate that the component has not been meshed. |
| 12. | Click Mesh. HyperMesh generates SPH elements for the selected component(s). |
| Note: | In the Status field, the components that was meshed now display a green status box. A green status box indicates that the component has been meshed. If the Status field contains a yellow status box, this indicates that the component you meshed already contains SPH elements. |
| 13. | Optional: If you would like to remove components from the SPH Meshing tool, select their corresponding check box in the Selection field, and then click  . . |
|
See Also:
SPH Mesh
SPH Mesh Generation Input
SPH Mesh Type and Pitch
Filling Options
Solver Interfacing
Visualization of SPH (Mass) Elements


