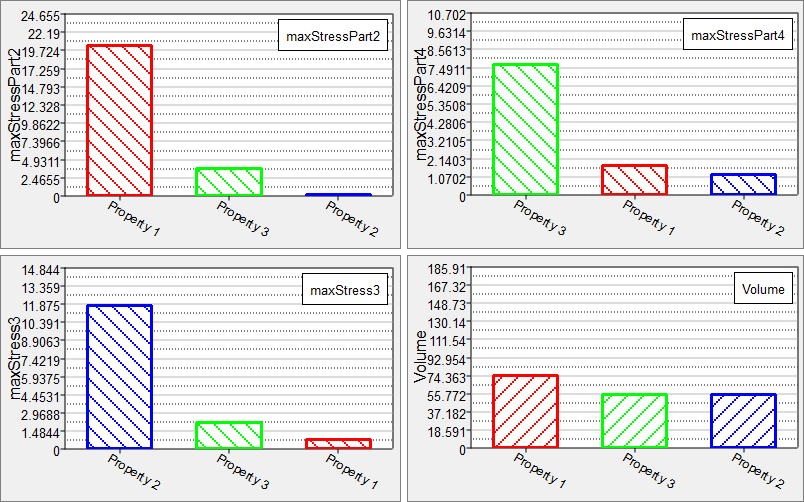
In this step you will create four output responses: maxStressPart2, maxStressPart4, maxStress3, Volume.
| 1. | Go to the Define Output Responses step. |
| 2. | Create the maxStressPart2 output response. |
| a. | From the Directory, drag-and-drop the plate_2_shell.h3d file, located in approaches/nom_1/run_00001/m_2, into the work area. |
| b. | In the File Assistant dialog, set the Reading technology to Altair® HyperWorks® (Hyper3D Reader) and click Next. |
| c. | Select Multiple items at multiple time steps, then click Next. |
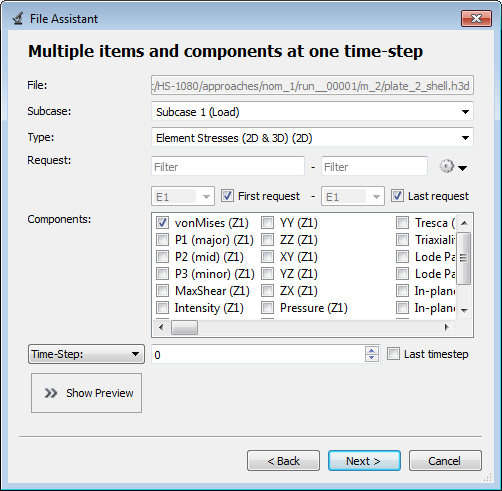
| d. | Define the following options, and then click Next. |
| • | Set Subcase to Subcase 1(Load). |
| • | Set Type to Element Stresses (2D & 3D) (2D). |
| • | For Request, select the First request and Last request checkboxes. |
| • | For Components, select vonMises (Z1). |
| e. | Label the output response maxStressPart2. |
| f. | Set Expression to Maximum. |
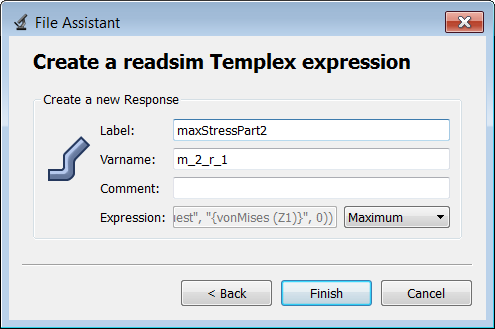
| g. | Click Finish. The maxStressPart2 output response is displayed in the work area. |
| 3. | Create the maxStressPart4 output response. |
| a. | From the Directory, drag-and-drop the plate_4_patch2.h3d file, located in approaches/nom_1/run_00001/m_2, into the work area. |
| b. | In the File Assistant dialog, set the Reading technology to Altair® HyperWorks® (Hyper3D Reader) and click Next. |
| c. | Select Multiple items at multiple time steps (readsim), then click Next. |
| d. | Define the following options, and then click Next. |
| • | Set Subcase to Subcase 1(Load). |
| • | Set Type to Element Stresses (2D & 3D) (2D). |
| • | For Request, select the First request and Last request checkboxes. |
| • | For Components, select vonMises (Z1). |
| e. | Label the output response maxStressPart4. |
| f. | Set Expression to Maximum. |
| g. | Click Finish. The maxStressPart4 output response is added to the work area. |
| 4. | Create the maxStress3 output response. |
| a. | From the Directory, drag-and-drop the plate_3_patch1.h3d file, located in approaches/nom_1/run_00001/m_2, into the work area. |
| b. | In the File Assistant dialog, set the Reading technology to Altair® HyperWorks® (Hyper3D Reader) and click Next. |
| c. | Select Multiple items at multiple time steps (readsim), then click Next. |
| d. | Define the following options, and then click Next. |
| • | Set Subcase to Subcase 1(Load). |
| • | Set Type to Element Stresses (2D & 3D) (2D). |
| • | For Request, select the First request and Last request checkboxes. |
| • | For Components, select vonMises (Z1) and vonMises (Z2). |
| • | For Timestep, select Last timestep. |
| e. | Label the output response maxStress3. |
| f. | Set Expression to Maximum. |
| g. | Click Finish. The maxStress3 output response is added to the work area. |
| 5. | Create the Volume output response. |
| a. | From the Directory, drag-and-drop the plate.out file, located in approaches/nom_1/run_00001/m_1, into the work area. |
| b. | In the File Assistant dialog, set the Reading technology to Altair® HyperWorks® (osmass.tpl) and click Next. |
| c. | Select Single item in a time series, then click Next. |
| d. | Define the following options, and then click Next. |
| • | Set Type to OptiStruct Analysis. |
| • | Set Request to Out File. |
| • | Set Component to Volume. |
| e. | Label the output response Volume. |
| f. | Set Expression to Maximum. |
| g. | Click Finish. The Volume output response is added to the work area. |
| 6. | Click Evaluate to extract the output response values. |

|