This tutorial outlines the procedure for defining discrete input variables that are conditionally linked. In this tutorial, beam thickness and material model values are used as variables. Material model values are linked to the selection of the material to be used. The variables you will use in this tutorial include: Shell Thickness, Young's Modulus, Poisson's, Ratio, and Density. The output responses you will use in this tutorial includes: Mass.
The beam.fem model file that you will use in this tutorial can be found in <hst.zip>/HS-1070/. Copy the tutorial files from this directory to your working directory.
| 2. | From the menu bar, click Tools > Editor. The HyperStudy - Editor opens. |
| 3. | In the File field, open the beam.fem file. |
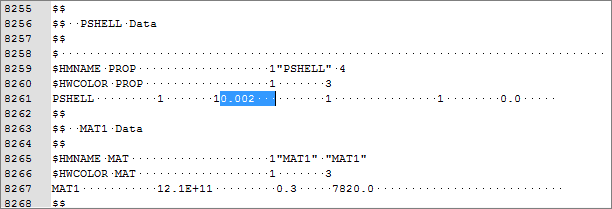
| 4. | In the Find area, enter PSHELL. |
| 5. | Click  until you find the PSHELL card. until you find the PSHELL card. |
| 6. | In the same line as PSHELL, highlight the value 0.002 for the PSHELL thickness as indicated in the image below. |
| Note: | In an OptiStruct deck, each field within a card is 8 characters long. Properly select the value for the PSHELL thickness by selecting 0.002 and the three spaces that follow. |
| 7. | Right-click on the highlighted fields and select Create Parameter from the context menu. |
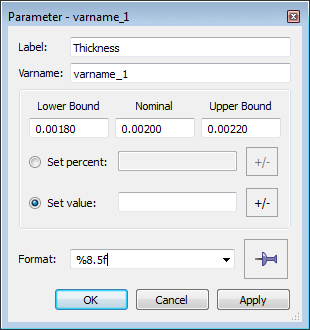
| 8. | In the Parameter - varname_1 dialog, Label field, enter Thickness. |
| 9. | Set the Upper bound to 0.0022, the Initial value to 0.0020, and the Lower bound to 0.0018. |
| 10. | Set the Format to %8.5f. |
| 12. | Add three more input variables to the template file from the MAT1 card using the information provided in the table below. |
| Tip: | Quickly highlight 8-character fields by pressing CTRL to activate the Selector (set to 8 characters) and then clicking the value. |
Parameter
|
Selection Notification
|
Selection
|
Input Variable Label
|
Lower Bound & Upper Bound
|
Format
|
Young's Modulus
|
Line number: 8267
Fields: 16 to 24
|
2.1E+11 & 1 space
|
Young
|
Lower Bound: 7E+10
Upper Bound: 2.1E+11
|
%8.1e
|
Poisson's Ratio
|
Line number: 8267
Fields: 32 to 40
|
0.3 + 5 spaces
|
Poisson
|
Keep default values
|
%8.5f
|
Density
|
Line number: 8267
Fields: 40 to 48
|
7820.0 + 2 spaces
|
Density
|
Keep default values
|
%8.3f
|
| 14. | In the Save Template dialog, save the file as beam.tpl. |
| 15. | Close the HyperStudy - Editor dialog. |
| 16. | In a text editor, open the beam.tpl file. |
{parameter(varname_3, "Poisson", 0.30000, 0.27000, 0.33000)}
{parameter(varname_4, "Density", 7820.000, 7038.000, 8602.000)}
|
with:
{if (varname_2==2.1E+11)}
{varname_3=0.3}
{varname_4=7820}
{elseif (varname_2==7E+10)}
{varname_3=0.33}
{varname_4=2700}
{endif}
|
| 18. | Save the beam.tpl file and close the text editor. |
|
| 1. | To start a new study, click File > New from the menu bar, or click  on the toolbar. on the toolbar. |
| 2. | In the HyperStudy – Add dialog, enter a study name, select a location for the study, and click OK. |
| 3. | Go to the Define Models step. |
| 4. | Add a Parameterized File model. |
| a. | From the Directory, drag-and-drop the beam.tpl file into the work area. |
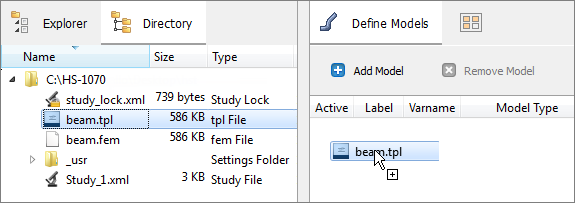
| b. | In the Solver input file column, enter beam.fem. This is the name of the solver input file HyperStudy writes during any evaluation. |
| c. | In the Solver execution script column, select OptiStruct (os). |

| 5. | Click Import Variables. Two input variables are imported from the beam.tpl resource file. |
| 6. | Go to the Define Input Variables step. |
| 8. | For the input variable Thickness, set Mode to Discrete. |
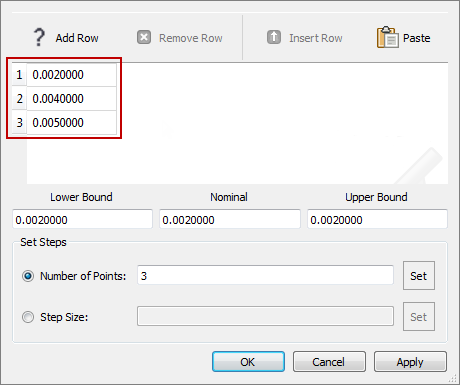
| 9. | In the Values column for the input variable Thickness, click  . A pop-up window opens. . A pop-up window opens. |
| 10. | In the Number of Points field, enter 3. |
| 12. | Change the values in the table to the following: 0.002, 0.004, and 0.005. |
| 14. | For the input variable Young, set the Mode to Discrete. |
| 15. | In the Value column of the input variable Young, click . A pop-up window opens. |
| 16. | In the Number of Points field, enter 2. |
| 18. | Change the values in the table to 7E+10 and 2.1E+11. |
| 20. | Go to the Specifications step. |
|
| 1. | In the work area, set the Mode to Nominal Run. |
| 3. | Go to the Evaluate step. |
| 4. | Click Evaluate Tasks. The run is executed using OptiStruct, and all input files are written to the study directory. |
| 5. | Go to the Define Output Responses step. |
|
In this step you will create one output response, Mass.
| 1. | From the Directory, drag-and-drop the beam.out file, located in approaches/nom_1/run_00001/m_1, into the work area. |
| 2. | In the File Assistant dialog, set the Reading technology to Altair® HyperWorks® and click Next. |
| 3. | Select Single item in a time series, then click Next. |
| 4. | Define the following options, then click Next. |
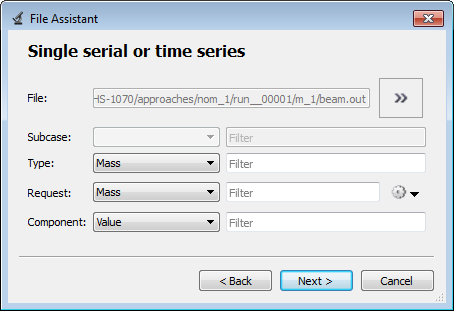
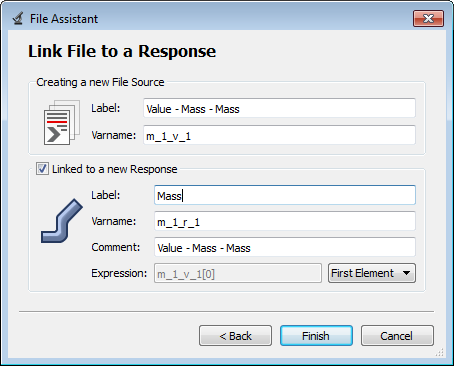
| 5. | Label the output response Mass. |
| 6. | Set Expression to First Element. |
| Note: | Since the mass is a scalar quantity, the only component of the vector is index zero, therefore a scalar mass value is properly written in the Expression field as v_1[0]. Multi-axis vectors may be accessed through each individual axis by using the corresponding index in the vector array. |
The mass value can be accessed directly out of the beam.out file and does not require any mathematical operations before being used as an output response for your study. The Expression Builder is capable of performing a full complement of mathematical functions on an arbitrary number of vector solutions in order to build an output response.
| 7. | Click Finish. The Mass output response is added to the work area. |

| 8. | Click Evaluate to extract the output response value. |
|
See Also:
HyperStudy Tutorials


