In this tutorial, you will learn how to setup an optimization study that combines MADYMO/Workspace Objective Rating together with Hyperstudy. At the end of this tutorial, you will find the maximum correlation between a MADYMO model and the hardware test results.
You will set up an Objective Rating using the following rating criteria: Sprague & Geers, CORA, peak timing and value matching. The rating is subsequently used to match results from the hardware testing of a pedestrian leg impactor with a vehicle front with a MADYMO model of this test. You will use Hyperstudy to find the maximum correlation between the test and simulation results. The simulation model contains the following input variables: scaling factors for the loading characteristics for the bumper, spoiler, headlights, bonnet leading edge and bonnet.
The files used in this tutorial can be found in <hst.zip>/HS-1600/.
| 1. | Start the MADYMO/Workspace Objective Rating application. |
| 2. | From the menu bar, click Tools > Settings. |
| 3. | In the Settings dialog, select Criteria from the list of settings. |
| 4. | From the Criteria Used in the Project list, select Global Min Time, Global Min Value, and Weighted Integrated Score. |
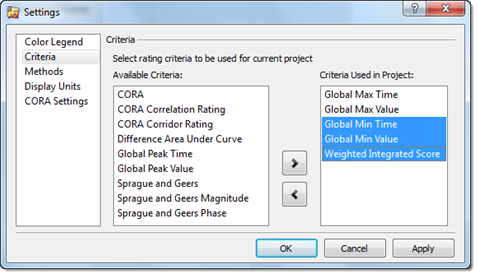
| 5. | Click  . The application removes the selected criteria from the list of rating criteria to be used in this project. . The application removes the selected criteria from the list of rating criteria to be used in this project. |
| 6. | From the Available Criteria list, select CORA and Sprague and Geers. |
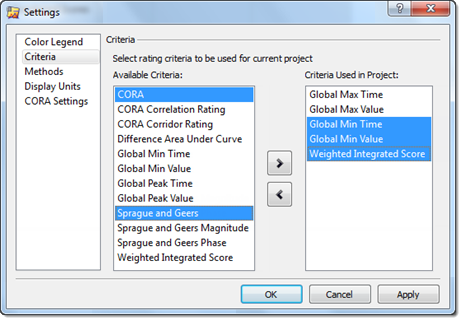
| 7. | Click  . The application adds the selected criteria to the list of rating criteria to be used in this project. . The application adds the selected criteria to the list of rating criteria to be used in this project. |
| 9. | On the toolbar, click  . . |
| 10. | From the filter field, select All Files. |
| 11. | Open the ACC.csv file. |
| 12. | On the toolbar, click . |
| 13. | Open the V3_LowerLeg_form.lac file. |
| 14. | In the Tree View, select the ACC.csv file. |
| 15. | Drag the file it into Row 1, Column 1 of the Rating matrix and then drop it into the Reference signal. |
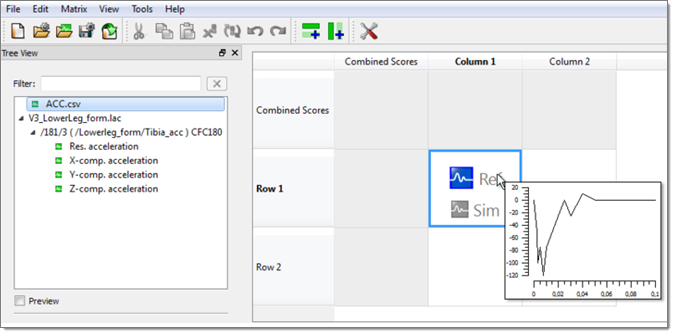
| 16. | In the Tree View, select the Res.acceleration file. |
| 17. | Drag the file it into Row 1, Column 1 of the Rating matrix and then drop it into the Simulation signal. |
| 18. | In cell 1, click the Cell Properties tab. |
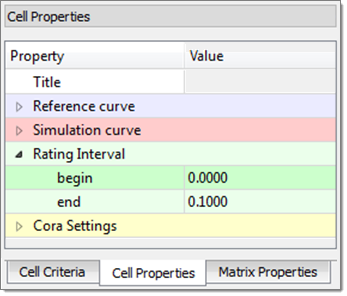
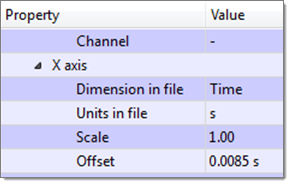
| 19. | Expand Reference curve and then select the X axis. |
| 20. | Set the Dimension in file to Time. |
| 21. | Set the Offset to 0.0085 s. |
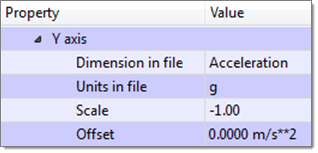
| 23. | Set the Dimension in file to Acceleration. |
| 24. | Set the Units in file to g. |
| 26. | On the toolbar, click  . . |
| 27. | In the Save dialog, navigate to your working directory and save the file as rating.obr. |
| 28. | Exit the Objective Rating application. |
|
| 2. | From the menu bar, click Tools > Editor. The Editor opens. |
| 3. | In the File field, open the V3_LowerLeg_form.xml file. |
| 4. | In the Search area, enter cnt_char_ell69_bumper. |
| 5. | Click  . cnt_char_ell69_bumper is highlighted. . cnt_char_ell69_bumper is highlighted. |
| 6. | Under the variable cnt_char_ell69_bumper, highlight the value 1.0. |

| 7. | Right-click on the highlighted fields and select Create Parameter from the context menu. |
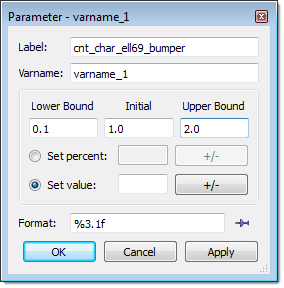
| 8. | In the Parameter - varname_1 dialog, enter cnt_char_ell69_bumper in the Label field. |
| 9. | Set the Lower Bound to 0.1, the Initial value to 1.0, and the Upper bound to 2.0. |
| 10. | Set the Format to %3.1f. |
| 12. | Repeat steps 3 through 11 for the variables listed below. Change the labels to be the name of the variable above the highlighted values. |
| • | cnt_char_ell71_headlights |
| • | cnt_char_ell72_bonnet_lead_edge |
| 14. | In the Save Template dialog, navigate to your working directory and save the file as V3_LowerLeg_form.tpl. |
|
| 1. | In a text editor, open a new file. |
| 2. | Enter the following text line: |
"C:\Program Files\Madymo\madymo_75\em64t-win\bin\madymo75.exe" -i V3_LowerLeg_form.xml
"C:\Program Files\Madymo\Workspace_75\em64t-win\bin\ObjectiveRating.exe" --batch --input Rating.obr --output Rating.obr
| Note: | This example assumes that you are using MADYMO V7.5 on a Microsoft Windows platform. |
| 3. | Save the file as madymo_optimization.bat. |
|
| 1. | From the menu bar, click Edit > Register Solver Script. |
| 2. | In the Register Solver Script dialog, click Add Solver Script. |
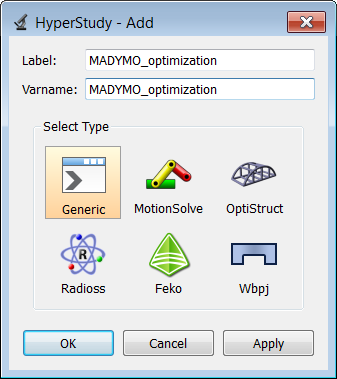
| 3. | In the HyperStudy - Add dialog, enter MADYMO_optimization in the Label and Varname fields. |
| 4. | For solver script type, select Generic. |
| 6. | In the Path column of the script MADYMO_optimization, click  . . |
| 7. | In the Open dialog, open the madymo_optimization.bat file. |
|
| 1. | To start a new study, click File > New from the menu bar, or click  on the toolbar. on the toolbar. |
| 2. | In the HyperStudy – Add dialog, enter a study name, select a location for the study, and click OK. |
| 3. | Go to the Define models step. |
| 4. | Add a Parameterized File model. |
| a. | From the Directory, drag-and-drop the V3_LowerLeg_form.tpl file into the work area. |
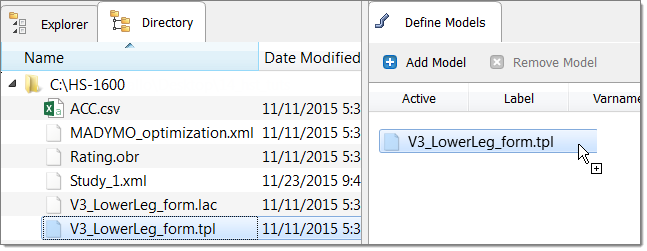
| b. | In the Solver input file column, enter V3_LowerLeg_form.xml; Rating.obr; ACC.csv. This is the name of the solver input files HyperStudy writes during any evaluation. |
| c. | In the Solver execution script column, select MADYMO_optimization (MADYMO_optimization). |
| d. | In the Solver input arguments column, add the extension .xml to the $file. |

| 5. | Click Import Variables. Five input variables are imported from the V3_LowerLeg_form.tpl file. |
| 6. | Go to the Define Input Variables step. |
| 7. | Review the input variable's lower and upper bound ranges. |
| 8. | Go to the Specifications step. |
|
| 1. | In the work area, set the Mode to Nominal Run. |
| 3. | Go to the Evaluate step. |
| 4. | Click Evaluate Tasks. An approach/nom_1/ directory is created inside the study directory. |
| 5. | Go to the Define Output Responses step. |
|
| 1. | Click Add Output Response. |
| 2. | In the HyperStudy - Add dialog, one output response and label it Rating. |
| 3. | In the Expression column of the output response Rating, click  . . |
| 4. | In the Expression Builder, click the ASCII Extracts tab. |
| 5. | Click Add Extract Source. |
| 6. | In the HyperStudy - Add dialog, add one extract source labeled OBR. |
| 7. | In the File Path column of OBR, click . |
| 8. | In the Extract file dialog, navigate to the approaches/nom_1/run__00001/m_1 directory and open the Rating.obr file. |
| 9. | Select the Keyword checkbox and enter <TOTALS>. |
| 10. | Click Next. <TOTALS> is highlighted. |
| 11. | In the Offset field, enter 157. |
| 12. | In the Length field, enter 8. |
| 14. | Click Insert Varname. The expression OBR[0] appears in the Evaluate Expression field. |
| 15. | Click Evaluate Expression. The expression OBR[0] changes to 0.47476600000000002. |
|
| 1. | In the Explorer, right-click and select Add Approach from the context menu. |
| 2. | In the HyperStudy - Add dialog, select Optimization and click OK. |
| 3. | Go to the Select Input Variables step. |
| 4. | Review the input variable's lower and upper bound ranges. |
| 5. | Go to the Select Output Responses step. |
| 7. | In the HyperStudy - Add dialog, add one objective. |
| b. | Set Apply On to Rating (r_1). |

| 10. | Go to the Specifications step. |
| 11. | In the work area, set the Mode to Adaptive Response Surface Method (ARSM). |
| Note: | Only the methods that are valid for the problem formulation are enabled. |
| 13. | Go to the Evaluate step. |
| 15. | Click the Evaluation Plot tab to monitor the progress of the optimization. |
|
See Also:
HyperStudy Tutorials


