|
»Click here to display Table of Contents«
|

RD-3560: Bottle Drop |

|

|

|

|
|
RD-3560: Bottle Drop |
|
|
|

|
|
»Click here to display Table of Contents«
|
RD-3560: Bottle Drop |
|
|
|
|
|
RD-3560: Bottle Drop |
|
|
|
|
This tutorial demonstrates how to simulate a Bottle Drop Test containing water and air. The objective is to evaluate the diffusivity of water and air in the bottle on drop.
Step 1: Load the RADIOSS User Profile
| 1. | Launch HyperMesh Desktop. |
| 2. | From the Preferences menu, select the User Profiles or click the |
| 3. | Select RADIOSS (Block140) and click OK. |
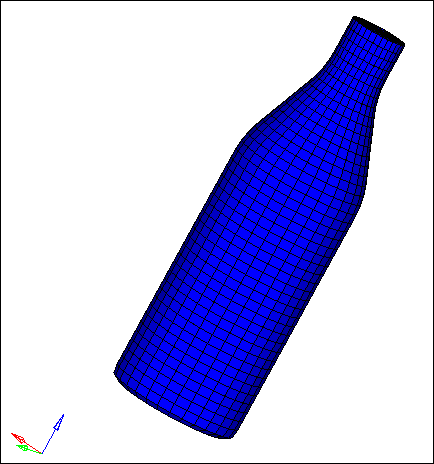
Step 2: Load the bottle.hm file
| 1. | Click the Open Model icon |
| 2. | Click Open. The model loads into the graphics area. |
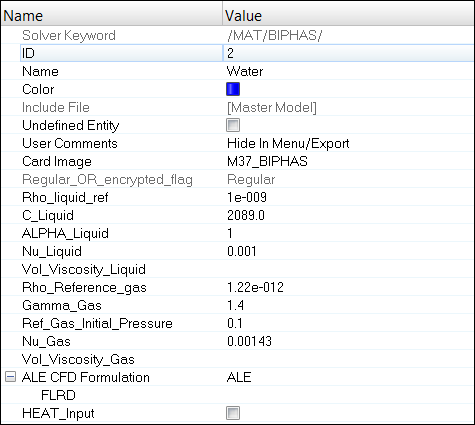
Step 3: Define Materials for Air and Water
| 1. | In the Model browser, right-click and select Create > Material. The Entity Editor is displayed below the Model browser. |
| 2. | For Name, enter Air. |
| 3. | For Card Image, select M37_BIPHAS and click Yes to confirm. |
| 4. | Input the values, as shown below. Remember to select ALE under ALE CFD Formulation. |

| 5. | Similarly create a material with the name Water using Steps 3.1 to 3.4. |
| 6. | Input the values, as shown below. |
Step 4: Load stress-strain curve from a file
To create the material for bottle (plastic) you need a stress strain curve that is available in a file from test.
| 1. | Click XYPlots > Create > Plots. |
| 2. | Enter the plot= name as stress-strain and click create plot > return. |
| 3. | Click XYPlots > Edit > Curves. |
| 4. | Toggle the create radio button. |
| 5. | Click the load button to load the stressstrain_curve.txt file. |
| 6. | With the x radio button selected, click the green + to the right of comp= and set it to x. |
| 7. | Select the y radio button, click the green + to the right of comp= and set it to y. |
| 8. | Click create > return. |

| 9. | In the Model browser, click on curve. |
| 10. | In the Entity Editor, rename it as stress_strain. The data in the file is loaded as a curve in HyperMesh. |
Step 5: Define Material for Bottle
| 1. | In the Model browser, right-click and select Create > Material. The Entity Editor is displayed below the Model browser. |
| 2. | For Name, enter Bottle. |
| 3. | For Card Image, select M36_PLAS_TAB and click Yes to confirm. |
| 4. | Input the values, as shown below: |
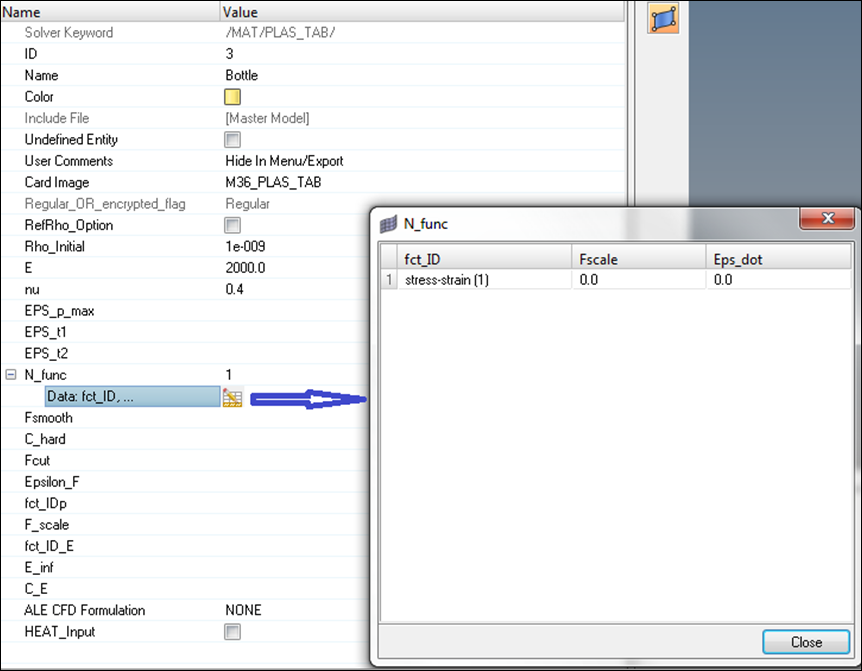
Select the stress-strain curve created for fct_ID1.
Step 6: Define property and assign material for Air
| 1. | In the Model browser, right-click and select Create > Property. |
| 2. | For Name, enter Air. |
| 3. | For Card Image, select P14_SOLID and click Yes to confirm. |
| 4. | Enter parameters, as shown below. |
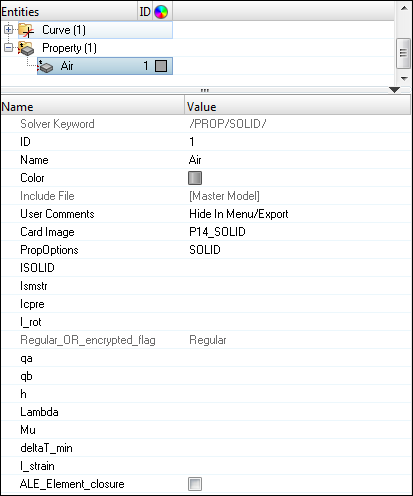
| 5. | In the Model browser, click on the air component. |
| 6. | Select material and property created for Air in the Entity Editor. |
Step 7: Define property and assign material for Water
| 1. | In the Model browser, right-click and select Create > Property. |
| 2. | For Name, enter Water. |
| 3. | For Card Image, select P14_SOLID and click Yes to confirm. |
| 4. | Enter parameters, as shown below. |
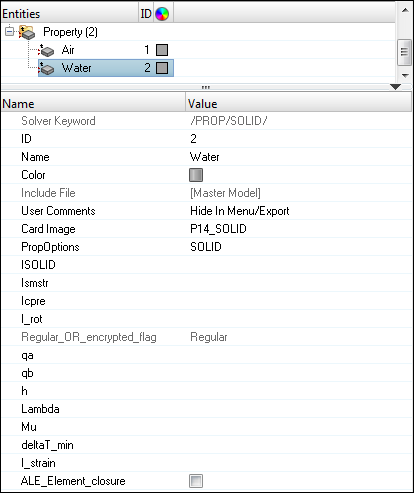
| 5. | In the Model browser, click on the water component. |
| 6. | Select material and property created for Water in the Entity Editor. |
Step 8: Define property and assign material for Bottle
| 1. | In the Model browser, right-click and select Create > Property. |
| 2. | For Name, enter Bottle. |
| 3. | For Card Image, select P1_SHELL. |
| 4. | Enter parameters, as shown below. |
N = 5
Thick = 0.3
| 5. | In the Model browser, click on the bottle component. |
| 6. | Select material and property created for Bottle in the Entity Editor. |
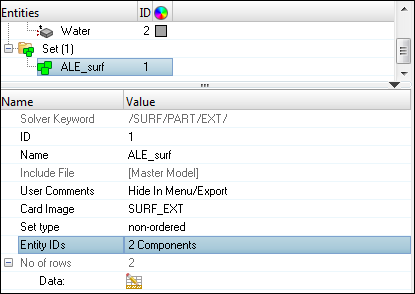
Step 9: Define an Interface between Bottle and Water
| 1. | In the Model browser, right-click and select Create > Set. |
| 2. | For Name, enter ALE_Surf. |
| 3. | Set Card Image to SURF_EXT and click Yes to confirm. |
| 4. | For Entity IDs, set the entity selector to Components. |
| 5. | Click Components and select water and air. |
| 6. | Click OK to complete the selection. |
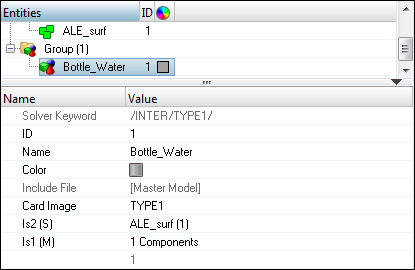
| 7. | In the Model browser, right-click and select Create > Contact. |
| 8. | For Name, enter Bottle_Water, and for Card Image, select TYPE1. |
| 9. | For ls2(S) (slave entity), set the selector to Set. |
| 10. | In the Select Set dialog, select ALE_surf and click OK. |
| 11. | For ls1(M) (master entity), set the selector to Components. |
| 12. | In the Select Components dialog, select Bottle and click OK. |
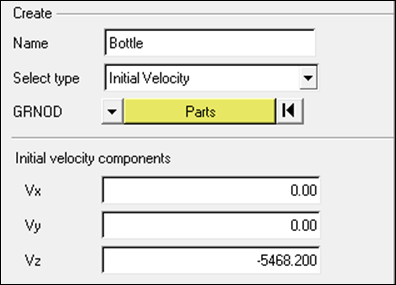
Step 10: Create Initial Velocity for Bottle
| 1. | Click Tools > BCs Manager. |
| 2. | Set the Select type to Initial Velocity. |
| 3. | For Name, enter Bottle. |
| 4. | Click Parts and bottle. |
| 5. | Set the Vz velocity to -5468.200 (Negative direction indicating opposite to Global Z-axis). |
| 6. | Click Create to create the imposed velocity boundary condition. |
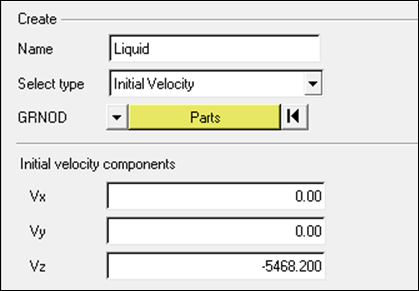
Step 11: Create Initial Velocity for Water and Air
| 1. | Set the Select type to Initial Velocity. |
| 2. | For Name, enter Liquid. |
| 3. | Click Parts and select water and air. |
| 4. | Set the Vz velocity to -5468.200 (Negative direction indicating opposite to Global Z-axis). |
| 5. | Click Create to create the imposed velocity boundary condition. |
| 6. | Select the Liquid initial velocity in the table, right-click and select Card Edit. |
| 7. | Change the Type to T+G and click return to complete the definition. |
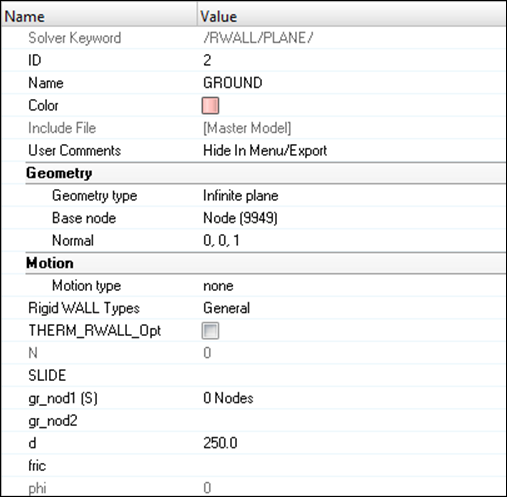
Step 12: Create Rigid Wall
| 1. | In the graphics area, press the F8 key, and create the node at the coordinates: X= 0, Y= 0, Z= -50 and create node. |
| 2. | In the Model browser, right-click and select Create > Rigid Wall. |
| 3. | For Name, enter GROUND with Geometry type as Infinite plane. |
| 4. | Select node created in Step 12.1 as base node and make sure the normal vector is in the z-direction, as shown below. |
| 5. | Set the d to 250.0. |
 \
\
Step 13: Create output requests and control cards
| 1. | Launch the HyperMesh Solver browser from View > Browsers > HyperMesh > Solver. |
| 2. | Right-click in the Solver browser general area to create the cards, shown below with the given values for each parameter: |
Keyword Type |
Keyword |
Parameter |
Parameter Value |
|---|---|---|---|
CONTROL CARDS |
TITLE |
Status |
[Checked] |
CONTROL CARDS |
TITLE |
TITLE |
Bottle_drop |
CONTROL CARDS |
MEMORY |
Status |
[Checked] |
CONTROL CARDS |
MEMORY |
NMOTS |
40000 |
CONTROL CARDS |
SPMD |
Status |
[Checked] |
CONTROL CARDS |
IOFLAG |
Status |
[Checked] |
CONTROL CARDS |
ANALY |
Status |
[Checked] |
ALE-CFD-SPH |
ALE_CFD_SPH_CARD |
Status |
[Checked] |
ALE-CFD-SPH |
ALE_CFD_SPH_CARD |
ALE_Grid_Velocity |
[Checked –] |
ENGINE KEYWORDS |
RUN |
Status |
[Checked] |
ENGINE KEYWORDS |
RUN |
Tstop |
1.5e-2 |
ENGINE KEYWORDS |
PARITH |
Status |
[Checked] |
ENGINE KEYWORDS |
PARITH |
Keyword2 |
OFF |
ENGINE KEYWORDS |
Status |
[Checked] |
|
ENGINE KEYWORDS |
N_Print |
-1000 |
|
ENGINE KEYWORDS |
TFILE |
Status |
[Checked] |
ENGINE KEYWORDS |
TFILE |
Time Frequency |
0.00015 |
ENGINE KEYWORDS |
ANIM > ANIM/ELEM |
Status |
[Checked] |
ENGINE KEYWORDS |
ANIM > ANIM/ELEM |
VONM |
[Checked] |
ENGINE KEYWORDS |
ANIM > ANIM/ELEM |
PRES |
[Checked] |
ENGINE KEYWORDS |
ANIM > ANIM/DT |
Status |
[Checked] |
ENGINE KEYWORDS |
ANIM > ANIM/DT |
Tstart |
0 |
ENGINE KEYWORDS |
ANIM > ANIM/DT |
Tfreq |
1.5e-3 |
ENGINE KEYWORDS |
DT > DT |
Status |
[Checked] |
ENGINE KEYWORDS |
DT > DT |
Tscale |
0.5 |
ENGINE KEYWORDS |
DT > DT |
Tmin |
0.0 |
Step 14: Export the model
| 1. | Click File > Export Solver Deck or click the Export Solver Deck icon |
| 2. | For File:, click the folder icon |
| 3. | For Name, enter bottle and click Save. |
| 4. | Click the downward-pointing arrows next to Export options to expand the panel. |
| 5. | Click Merge starter and engine file to export all the data in one file (or export separately). |
| 6. | Click Export to export solver deck. |
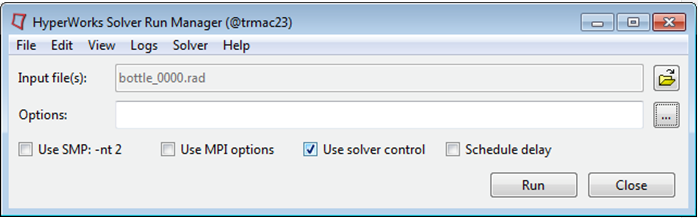
Step 15: Run the solver using RADIOSS Manager
| 1. | Go to Start > Programs > Altair HyperWorks 14.0 > RADIOSS. |
| 2. | For Input file, browse to the exercise folder and select the file bottle_0000.rad. |
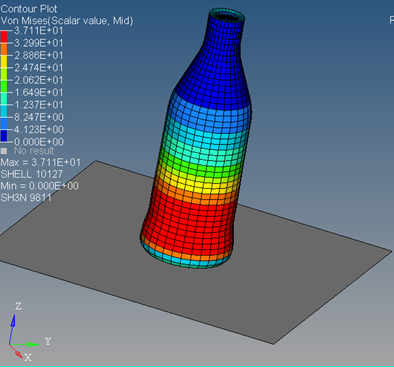
Step 16 (Optional): View the results in HyperView
The exercise is complete. Save your work to a HyperMesh file.
See Also: