The Load Export utility allows you to bridge the gap between Multi-Body Dynamics (MBD) analysis and Finite Element (FE) analysis using MotionView by:
| • | Identifying and summarizing all loads acting on one/multiple body(ies) for any given time step(s) in a tabular format. |
| • | Identifying and transferring all the forces and moments for one component at any given time step(s) to a NASTRAN input deck that contains GRID, CORD, FORCE, and MOMENT cards. |
Using Load Export
To use this utility, specify the components in the MotionView model for which loads are to be processed. You can do this by:
| • | Using the MotionView Interface. |
OR
| • | Editing the MDL model file to add force output requests on body(ies). |
When performing the MS/ADAMS solver run on the MotionView model, you will get a metadata file (an ASCII file written out from MotionView that contains information about force output on a body).
This file along with the solver output files viz. MS (*.plt) or ADAMS (*.req) become the input files for this utility. The application scope of this utility is shown in the figure below:
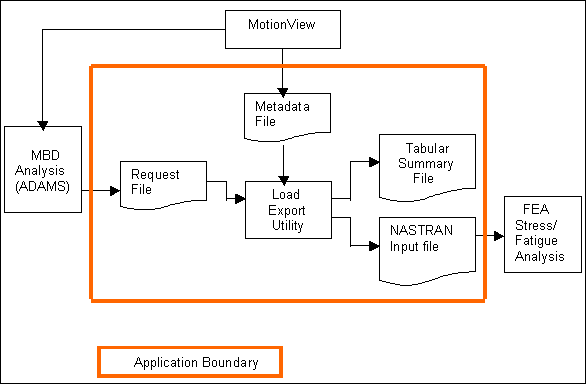
Interaction diagram
Step 1: Creating a Metadata File and Launching Load Export.
| 1. | Copy the load_export.mdl file, located in the mbd_modeling\externalcodes folder, to your <working directory>. |
| 2. | Start a new MotionView session. |
| 3. | Load the front vehicle model file load_export.mdl, located in <working directory>. |
| 4. | Right-click on The Model in the Project Browser and select Add General MDL Entity > Output, or right-click the Outputs icon,  , on the Model-General toolbar. , on the Model-General toolbar. |
The Add Output dialog is displayed.
| 5. | Accept the default selections and click OK. |
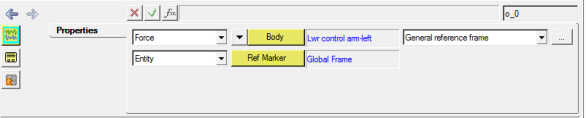
| 6. | Use the drop-down menu to change the Output type from the default Displacement to Force. |
| 7. | Double-click the Body collector. |
The Select a Body dialog is displayed.
| 9. | In the Frnt macpherson susp system folder, expand the Bodies folder and select the body Lwr control arm – left. (or you can pick the Lwr Control arm - left directly from the model in the graphics area by clicking the Body collector once). |
| 10. | Repeat steps 4 through 9 to create an output force request on Lwr control arm – right. |
| 11. | Click the Run Solver icon  . . |
| 12. | From the Main tab, change End Time to 2 seconds. |
| 13. | Save the solver input file as load_export.xml, to the <working directory>. |
| 14. | Click on the Run button, to solve the model in MotionSolve. |
MotionView creates a metadata file named load_export.meta in the <working directory>.
Step 2: Using the Load Export Utility and Generating a NASTRAN Input Deck.
| 1. | From the Flex Tools menu, select the Load Export utility. |
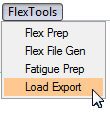
Launching the Load Export utility
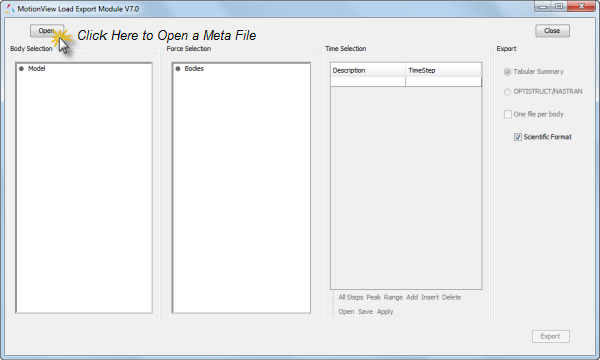
The Load Export utility
| 2. | From the Load Export panel, open the file load_export.meta, located in <working directory>. |
All bodies for which force outputs are requested are displayed in a tree structure in the Body Selection panel. You can select one or multiple bodies from the tree. In this step select the body Lwr control arm-left.
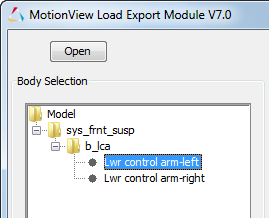
Body Selection panel
| 3. | Expand the sys_frnt_susp folder and select the body Lwr control arm – left. |
All the forces acting on the lwr control arm – left are displayed in the Force Selection panel. You can choose any number of loads acting on the body. Only the loads selected by you are exported by the utility.
| 4. | Select all three forces acting on Lwr control arm – left. |
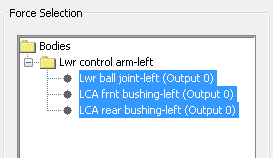
Force Selection panel
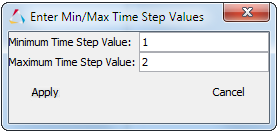
| 5. | The Time Selection panel allows you to enter/select the time steps for which the loads are to be exported. |
| 6. | Click the Range button. |
| 7. | The current simulation runs from 0 to 2 seconds. Specify a Minimum Time Step Value of 1 and a Maximum Time Step Value of 2. |
Activating the Export panel
| 9. | Enter Min/Max Time Step Values. |
| 10. | Click Apply on the Time Selection panel. |
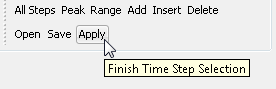
This activates the Export panel.
| Note | After time step input, you must click the Apply button to verify the validity of the time steps. If a time step entered is not present in the ADAMS request file, an error message is generated and you must make appropriate corrections. |
| 11. | Select OPTISTRUCT/NASTRAN [1] by using the radio button under the Export panel. |
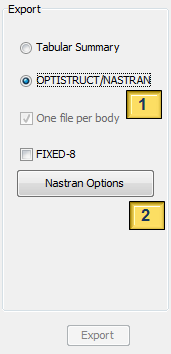
Nastran options
| 12. | Click Nastran Options [2] to launch the Nastran Export Panel. |
This dialog allows you to enter the Nastran node ID numbers in the second column of the table.
You can specify three additional options:
| - | the Nastran deck format (Large/Small) |
| - | the reference frame (LPRF/Global) in which the GRID cards are written |
| - | whether or not to explicitly output the CORD1R card in the Nastran input deck (Yes/No) |
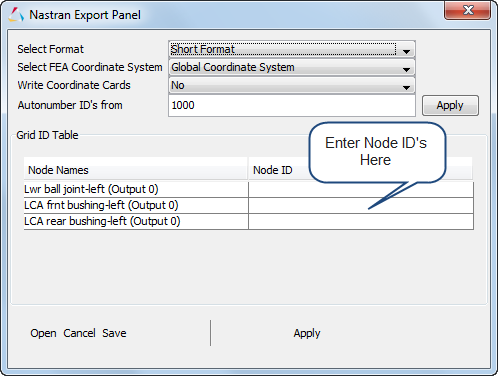
| 13. | Accept the default selections in the Nastran Export dialog. |
| 14. | Specify the Node ID’s as follows: |
| 16. | Click Export on the Load Export panel. |
This creates a subcase file, in addition to the Nastran input deck, in the same directory as the .dat file.
| 19. | Repeat steps 3 through 18 to export the loads on the Lwr control arm – right. |
| Note | In point 2 above, if you select multiple bodies, the Nastran Export Panel will look as shown below: |
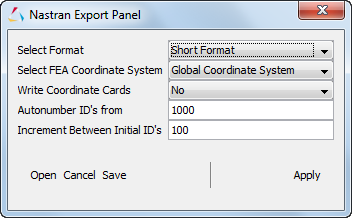
Nastran Export Panel for multiple body selection


