After you have extracted the midsurface and do not need to make further changes that require the midsurface to be re-extracted, repair surfaces, modify targets, and imprint surfaces using the final edit tools in the midsurface panel.
Create midsurfaces for failed parts by extracting a midsurface from two faces that represent the two sides using the Surface Pair subpanel. This function creates one surface that forms the midsurface.
| 1. | Using the side 1: surfs selector, select a surface that represents one side of the solid. |
| 2. | Using the side 2: surfs selector, select a surface that represents the second side of the solid. |
| 3. | Select extraction options accordingly. |
| 4. | Using the toggle, specify where to store midsurface geometry after extraction. |
|
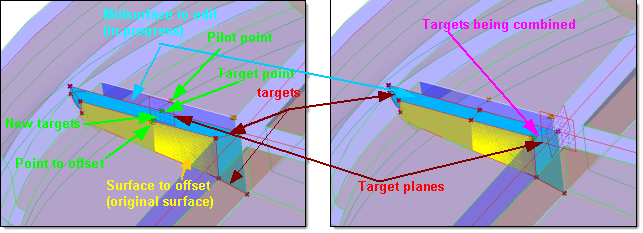
Repair or edit a midsurface by correcting its targets using the Assign Target subpanel. Targets are the red and green segments that connect the points on the initial surface with the points where the surface must be offset. You can modify a midsurface that was created earlier, or a surface that is part of the solid.
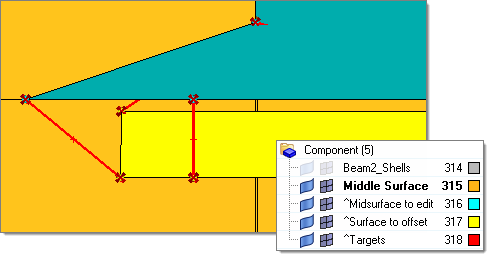
The appearance of new temporary entities are displayed in different colors.
| • | Surface to offset (yellow) |
|
the original surface from which the middle surface was created by an offset with a variable direction and distance.
|
| • | Midsurface to edit (cyan) |
|
the midsurface (in-progress) that you can modify by reassigning targets.
|
|
handles that can be used to change the direction and distance of the offset. Targets are red segments that connect points on the initial surface with the points where the surface must be offset. The offset is interpolated inbetween the assigned targets.
|
|
targets that have not been accepted, thus they do not affect the midsurface.
|
| • | Targets being combined (purple) |
|
new and existing targets that will be combined once they are accepted.
|
|
planes parallel to the offset surface drawn at target points, which can be displayed for reference.
|
| 1. | Using the point to point/edge to edge toggle, specify whether to select points or edges. |
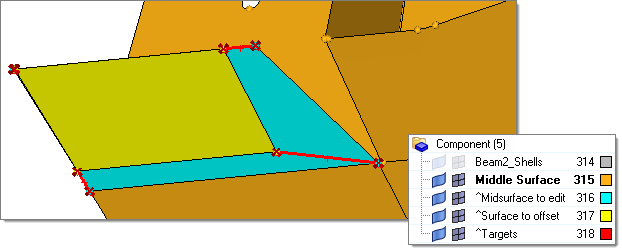
| 2. | Verify that the surf selector is active, then select a midsurface that was created earlier or a surface that is part of a solid. Temporary components are created for the midsurface to edit, the surface to offset, and targets. |
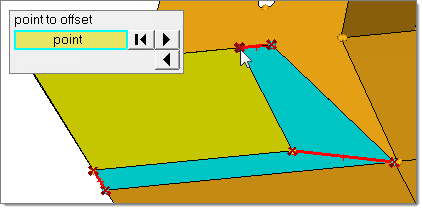
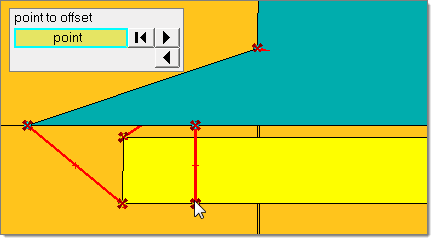
| 3. | Using the point/edge to offset selector, select an existing point/edge or create a new point on the original surface (yellow) to offset. This point serves as the beginning point of the target. |
| Note: | To create a new point, hold your mouse on the edge of the surface (yellow) until the cursor turns into a square and the edge is highlighted. Release your mouse and left-click on the highlighted edge where you want to create a new point (target). A red circle is drawn around the point or at the center of the edge to indicate the selection. |
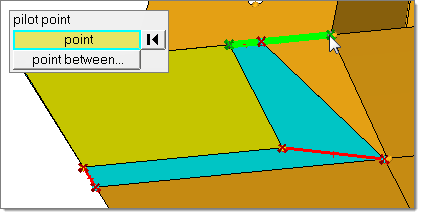
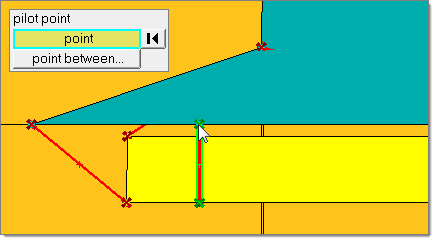
| 4. | Using the pilot point/edge selector, select an existing point/edge or create a new point to serve as the end point of the target. |
| Note: | Targets are created at the same location as the pilot point selected (as selected) or in the middle of the point/edge to offset and the pilot point/edge (midpoint). Use the target location toggle to specify where targets are created. |
| 5. | To accept the location of the targets, click accept targets. |
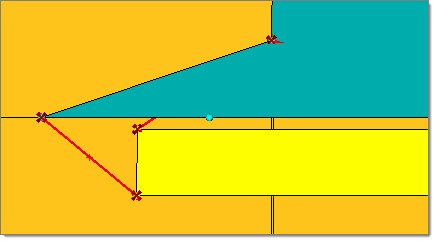
| 6. | Click offset. The midsurface is redrawn with updated targets. |
| 7. | When you are satisfied with the results of your modifications, click accept. |

|
| 1. | Using the point to point/edge to edge toggle, select point to point. |
| 2. | Verify that the surf selector is active, then select a midsurface that was created earlier or a surface that is part of a solid. Temporary components are created for the midsurface to edit, the surface to offset, and targets. |
| 3. | Using the point/edge to offset selector, select a point on the original surface (yellow), which is the beginning point of a target. |
| 4. | Using the pilot point/edge selector, select a point that serves as the end point of the target. |
|
|
Imprint solid geometry pockets, fillets, and other feature boundaries on the midsurface using the Imprint subpanel. Imprinting makes midsurface thickness calculations more accurate by creating mesh boundaries that match the feature boundaries on the original solid, and improves the meshing quality by capturing the features of the solid model.
You are not required to select the midsurface as HyperMesh automatically recognizes the midsurface corresponding to the solid/surface component from which it was derived, and imprints the lines on the surfaces in the midsurface component.
| 1. | Set the lines/surfs to imprint selector to lines. |
| 2. | Select lines to imprint. |
| 3. | Using the line extend switch, specify how to extend lines. |
| 4. | To keep line endpoints, select keep line endpoints. |
| 5. | Using the target surfaces toggle, automatically or manually select target surfaces to imprint. |
|
Surfaces (faces of solids) can be used to imprint on the midsurface instead of lines.
| 1. | Set the lines/surfs to imprint selector to surfs. |
| 2. | Select surfaces to imprint. |
| 3. | Using the line extend switch, specify how to extend lines. |
| 4. | To keep line endpoints, select keep line endpoints. |
| 5. | Using the surfs imprint toggle, specify which surface edges to imprint. |
| Note: | If surface edges are close to the Midsurface T edges or boundary, imprint all may produce bad element quality, in which case consider using smart imprint. |
| 6. | Using the target surfaces toggle, automatically or manually select target surfaces to imprint. |
|
|
See Also:
Extracting Midsurfaces
Midsurface Panel


