There are three main steps required to set up a Team library:
Each step is detailed in this section. Recommendations as well as limitations of the desktop team libraries are also discussed.
This setup is recommended when a team of less than ten members would like to access and create information or data in a shared library. Larger groups of users are not supported in the team environment and should consider a full enterprise deployment.
| 1. | All the team members should have access to the shared location where the common library is intended to be hosted. |
| 2. | The current version does not have authorization functionality or access control; hence, users who have access to the library can view the entire contents of the library. |
| 3. | HyperWorks 2017 should be installed, with Personal Data Manager feature included in the license. |
| 4. | Create a mapped network drive for the shared location from all client machines that will be accessing the team library. |
|
Follow the instructions below for each team library that is to be created.
Refer to Adding a Team Library below to add an existing team library for each user wanting access to the library.
| 1. | Launch the desired HyperMesh or HyperWorks Application and open the Data Manager tab, by using |
| a. | For HyperWorks Desktop applications: View > Browsers > HyperWorks > Organize |
| b. | For HyperMesh: Applications > Organize |
| 2. | From the Repository selection list, choose Personal. |
| 3. | From the Library selection list, click the list selection button and click New, as shown below. |
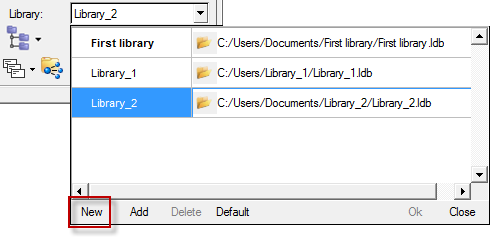
| 4. | Enter the information for the library such as name, location (the mapped network drive to point to a common location), library type such as Generic or CAE. |
| 5. | Click OK to complete the library creation. |
|
Follow the steps below to connect to a team library that was already created by your system administrator or team administrator. The steps below need to be performed only once to add a team library. Once the library is added, it is visible in the library selection list for further usage.
| 1. | Launch the desired HyperMesh or HyperWorks Application and open the Organize tab, by using |
| a. | For HyperWorks Desktop applications: View > Browsers > HyperWorks > Organize |
| b. | For HyperMesh: Applications > Organize |
| 2. | From the Repository selection list, select Personal. |
| 3. | From the Library selection list, click the selection list button and click Add Option as shown below. |
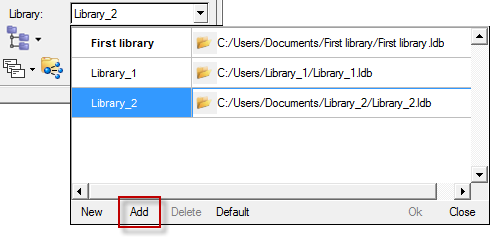
| 4. | Point to the mapped network drive and select the *.ldb DM library file to open the library. |
| 5. | Click Open to finish adding the library. The new team library is now available in the library selection list. |
|
See Also:
Teamcenter Connector


