In this tutorial, you will learn about:
| • | ANSYS Interface Online Help |
HyperMesh’s ANSYS FE input reader, template, macro menu, and user profile sets the foundation for using ANSYS with HyperMesh.
Tools
ANSYS FE Input reader
ANSYS Solver is one of the leading software products in the computer aided engineering (CAE) field. This software is used to simulate designs in general engineering and aerospace industries. ANSYS has the capability to solve structural, thermal, and fluid models. Different analysis like static structural, dynamic, modal, harmonic, buckling, spectrum, steady state and transient thermal, and radiation can be solved. Both linear and non-linear analysis are supported by ANSYS.
HyperWorks has recognized ANSYS as one of the major solvers available in the current CAE field. HyperWorks has extended its support to ANSYS solver by recognizing its element types, solution methods, and file formats. You get benefits from using both HyperWorks tools and ANSYS solver. During pre-processing of the model, you can define ANSYS elements and apply loads and boundary conditions that can be read by ANSYS. Once the analysis is done in ANSYS, both deck and result files can be read back in HyperMesh and HyperView. You can post-process the results of the analysis solved by ANSYS.
ANSYS solver writes analysis model data in the form of a script file. It also writes the model in binary file format. HyperMesh and HyperView can read the model data written in script format. These files are saved with file extension .cdb. Newer versions of ANSYS use BLOCK format to write their model data in script file. HyperMesh and HyperView can transfer the ANSYS model data into HyperMesh.
ANSYS solver writes model data in BLOCK format. Older versions of ANSYS (ANSYS 5.4 or earlier) uses APDL format. HyperMesh can read both types.
ANSYS Utility Menu
To open the ANSYS Utility menu, click View > Browsers > HyperMesh > Utility from the menu bar. The ANSYS Utility menu contains the following macros and tools.
Macro
|
Description
|
Component Manager
|
Create, edit, and view HyperMesh components.
This tool is available across all solvers, but it has been customized for ANSYS. From the Component Manager, you can list the element types, thickness for shell elements, property type, material name, number of elements, and nodes in the component for each component.
To update element attributes, click Table > Editable from the menu bar.
To create new components, click Action > New from the menu bar. If components were created incorrectly, the Remarks column will inform. Incorrect components will be displayed in red.
|
Material
|
Create, edit, and view material collectors in your model.
When started, you can create both MP and MPDATA material sets, and edit the name and ID of the material set, as well as material values.
|
Section
|
Create beam and shell sections.
When started, the Section dialog opens and lists all of the existing beam or shell sections with subtypes. Click New to create new sections. You can use HyperBeam to create sections and then attach them to beamsection card images. Click Edit to edit sections by their name, ID and type.
|
Real Sets
|
Create and update ANSYS real properties.
When started, a table that lists the real sets in the model opens, and you can review the values in each property set. Click New to create new real sets, or go to the card images of each real set. Click Edit to update by ID, element type or values.
|
ET Type
|
Create and update ANSYS ET Types.
When started, a table listing ET Types in the model opens and you can review the values in each ET Type. Click New to create new ET Types or to go to card images of each ET Type. Click Edit to update by ID, element type or values.
|
Surface Manager
|
Generates thermal, radiosity, and structural surface elements. The Ansys Surface Manager dialog has simple steps to create surface elements over base geometry elements.
|
Convert to Special 2nd Order Macro
|
Convert fully second order elements to special second order elements.
For more information on this marco, refer to the ANSYS Convert to Special 2nd Order Macro help.
|
Update Pre 8.0 HM Model
|
Updates old .hm files, prior to 70-SA2-043 update, to .hm 8.0 files.
Once you load an old .hm file, click Update Pre 8.0 HM Model. If you do not update old .hm files, interface data such as ANSYS element types, properties, and sections will be lost. For complete transfer of data, it is advised that you complete the model in all respects in older versions before transferring to the new interface.
|
Convert Legacy Contacts
|
Converts old contact pairs to new contact pairs.
Generally, HyperMesh automatically converts legacy files. However if there are discontinuities in the model, you will need to repair them before running this macro.
|
Import Tab
Access the Import tab by clicking File > Import > Session, Model, Solver Deck, Geometry, or Connectors from the menu bar, or clicking  from the Standard toolbar.
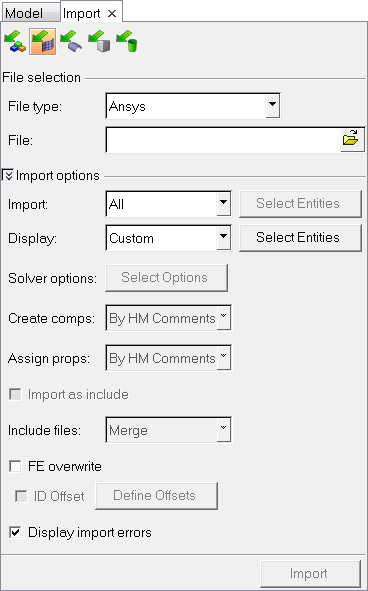
The Import tab contains the following options:
| • | Import type: Use these icons to select the type of model you will be importing. For this exercise, click  to import a FE model. to import a FE model. |
| • | File type: If you are in the ANSYS user profile, HyperMesh will automatically select ANSYS as the file type. |
| • | File: From this location, navigate to your working directory and select the file you would like to import. |
| • | Advanced Import Options: To access advanced import options, click  next to Import options. next to Import options. |
| • | Import: Select all or custom entities to import into HyperMesh. |
| • | Display: Select all or custom entities to display in HyperMesh. |
| • | Solver Options: Choose to disable contact pair conversion. When enabled, contact pairs will not be converted to new contact surfaces and groups. Contacts will remain elements. |
| • | Create Comps: Choose to create components on import by HM Comments, Property, 1 Component, or Material. |
| • | Include files: Choose if you want to preserve, skip, or merge your include files into HyperMesh. |
| • | FE overwrite: The imported models ID numbers will override the ID numbers currently in the model. |
| • | ID Offset: Define what ID numbers your entities will start their numbering. |
| • | Display import errors: Displays any errors while importing the model. |
Export tab
Access the Export tab by clicking File > Export > Model, Solver Deck, Geometry, Connectors or Curves from the menu bar, or clicking  from the Standard toolbar.
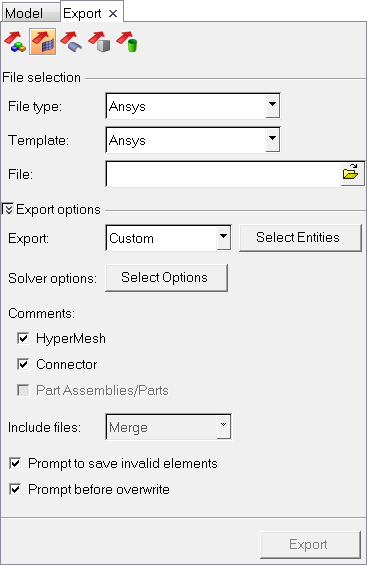
The Export tab contains the following options:
| • | Export type: Use these icons to select the type of model you will be exporting. For this exercise, click  to export a FE model. to export a FE model. |
| • | File type: If you are in the ANSYS user profile, HyperMesh will automatically select ANSYS as the file type to export a .cdb file. |
| • | Template: If you are in the ANSYS user profile, HyperMesh will automatically select ANSYS as the default template. |
| • | File: From this location, navigate to your working directory and select the name of the file you would like to export. |
| • | Export: Choose to export All, Displayed, or Custom entities. |
| • | Solver Options: Opens the Ansys Options dialog, from which you can select the Combine loads in loadstep check box. If selected, this option will combine point loads applied at the same location within a load step. |
| • | Comments: Select the HyperMesh checkbox to export all HyperMesh comments; select the Connector checkbox to include connectors during export. |
| • | Include Files: In ANSYS, this option only allows you to merge include files. |
| • | Prompt to save invalid elements: Select this check box to save invalid elements. |
| • | Prompt before overwrite: Select this check box to warn you before HyperMesh overwrites existing information. |
Model Files
This exercise uses the tuning_fork_ansys.cdb file, which can be found in <hm.zip>/interfaces/ansys/. Copy the file(s) from this directory to your working directory.
Exercise
Step 1: Load the ANSYS user profile
Setting the user profile to ANSYS saves you time.
| 1. | Start HyperMesh Desktop. |
| 2. | Select a user profile by clicking Preferences > User Profiles from the menu bar, or clicking  on the Standard toolbar. on the Standard toolbar. |
| 3. | In the User Profile dialog, select Ansys. |
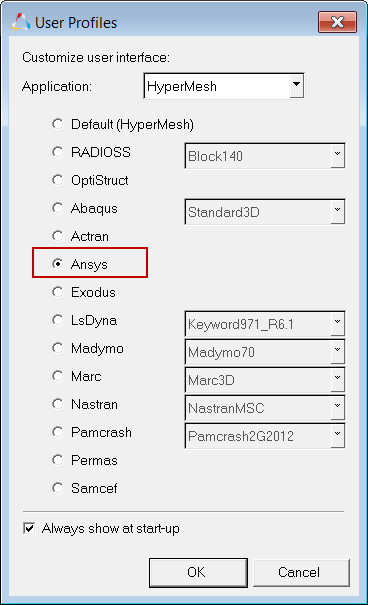
| 4. | Click OK. HyperMesh sets the defaults for ANSYS. |
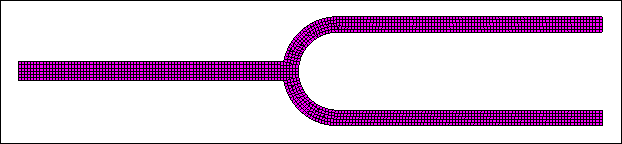
Step 2: Import a model
HyperMesh can import ANSYS model data in script format. In this step, you will import an ANSYS deck written by the ANSYS solver. The same procedure can be followed to read a HyperMesh-written deck.
| 1. | From the menu bar, click File > Import > Solver Deck. |
| 2. | Verify that (Import Solver Deck) is selected. |
| 3. | Set File type to Ansys. |
| Note: | If you are in the ANSYS user profile, HyperMesh automatically sets File type to Ansys. |
| 4. | In the File field, click  . . |
| 5. | In the Select Ansys file dialog, open the tuning_fork_ansys.cdb file. |
| 6. | Click Import. A model appears in the graphics area. |
Step 3: Export the model
HyperMesh can export ANSYS model data in script format. In this step, you will export an ANSYS model from HyperMesh.
| 1. | From the menu bar, click File > Export > Solver Deck. |
| 2. | Verify that (Export Solver Deck) is selected. |
| 3. | Set File type to Ansys. |
| Note: | If you are in the ANSYS user profile, HyperMesh automatically sets the File type to Ansys. |
| 4. | In the File field, click . |
| 5. | In the Select Ansys file dialog, navigate to the location you would like to export your file to and then save the file as 4400_export. |
See Also:
HyperMesh Tutorials


