In this tutorial, you will explore the basic concepts of HyperMesh's user interface. It is highly recommended that you review this tutorial as it provides a general overview of HyperMesh.
Tools
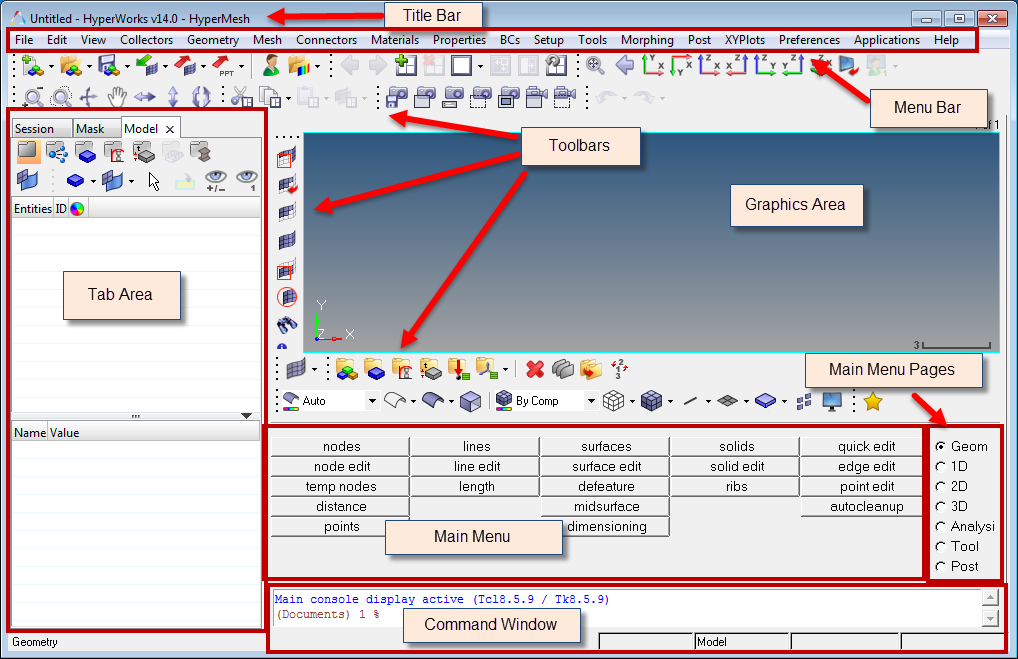
The HyperMesh interface contains several areas. Each is described below.
Feature
|
Description
|
Title bar
|
The bar across the top of the interface is the title bar. It contains the version of HyperMesh that you are running and the name of the file you are working on.
|
Menu bar
|
Located just under the title bar. Like the pull-down menus in many graphical user interface applications, these menus "drop down" a list of options when clicked. Use these options to access different areas of HyperMesh functionality.
|
Toolbars
|
Located around the graphics area, these buttons provide quick access to commonly-used functions, such as changing display options. They can be dragged and placed at the top or side of the graphics area.
|
Tab area
|
The tab area is so named because various specialized tools display on tabs in this area of the interface. Two such examples are the Model Browser and the Utility Menu.
| • | The Model tab contains the Model Browser. This tool displays the contents of a model in a hierarchical tree format. It can be used to create and edit many types of entities, and also to organize them and control their display status. |
| • | The Utility Menu contains four pages of tools that perform various functions, accessed via buttons at the bottom of the menu. The Disp page tools control how a model is displayed in the graphics area. The other pages available are QA/Model (element checking tools), Geom/Mesh (tools for working with a model’s geometry as well as for creating and editing meshes), and User (custom tools you create). The content of the Utility tab changes based upon the selected user profile. |
|
Graphics area
|
The graphics area is the display area for your model. You can interact with the model in three-dimensional space in real time. In addition to viewing the model, entities can be selected interactively from the graphics area.
|
Main menu
|
The main menu displays the functions available on each page. You access those functions by clicking on the button corresponding to the function you wish to use.
|
Main menu pages
|
The main menu pages menu divides the main menu into groups of related functions. Only one page of the main menu is displayed at a time.
The Geom page contains functions for creating and editing geometry.
The 1D, 2D, and 3D pages contain element creation and editing tools grouped according to element type.
The Analysis page contains functions to set up analysis problems and define boundary conditions.
The Tool page contains miscellaneous tools and model checking functions.
The Post page contains post-processing functions.
|
Command window
|
You can type HyperMesh commands directly into this text box and execute them instead of using the HyperMesh graphical user interface. This window is not displayed by default, but can be opened via the View menu.
|
Status bar
|
The status bar is located at the bottom of the screen. The left end of the status bar displays your current location in the main menu. By default, Geometry is displayed. The four fields on the right side of the status bar display the current Include file, current component collector, current part, and current load collector.
As you work in HyperMesh, any warning or error messages also display in the status bar. Warning messages appear in green and error messages appear in red.
| Hint: | You can hold the left mouse button down on top of a panel to see a description for it in the status bar. |
|
Starting HyperMesh
To start HyperMesh in Windows 7, go to Start > All Programs > Altair HyperWorks > HyperMesh Desktop or HyperMesh.
To start HyperMesh on UNIX, perform the following steps:
| 1. | Go to your operating system prompt. |
| 2. | Enter the full path of the HyperMesh script (e.g., <altair_home>\altair\scripts\hm) and press ENTER. |
Or
| 3. | Type in a pre-defined alias that you or a systems administrator has created in the user .alias or .cshrc file in the user home directory. |
Start Directory
By default, HyperMesh uses a "start directory" for files. HyperMesh reads and writes a number of files from the start directory:
| • | At start up, HyperMesh reads configuration files (hm.mac, hmmenu.set, etc.). |
| • | Upon closing, HyperMesh writes out a command history file (command.cmf) and a menu settings file (hmmenu.set). |
| • | By default, HyperMesh will read from/write to this directory for any open, save, save as, import, or export functionality. |
| • | Image files (.jpg) created using the F6 key are saved to the start directory. |
To determine the start directory on Windows, perform the following steps:
| 1. | Right-click the HyperMesh icon. |
| 3. | On the Shortcut tab, view the path in the Start In field. |
On UNIX, the start directory is determined by the following:
| • | Location in which you typed the command to run HyperMesh |
| • | Your "home" directory if configuration files are not found in the start directory |
HyperMesh Help
To obtain help for a particular feature, go to the Help menu and select HyperWorks Desktop or HyperWorks Help Home. The help is organized by product and contains the following types of information:
| • | How to use individual functions |
| • | Notes on interfacing HyperMesh with external data types |
Model Files
All files referenced in the HyperMesh tutorials are located in the hm.zip file unless otherwise noted.
See Also:
HyperMesh Tutorials


