|
»Click here to display Table of Contents«
|

HM-3320: Penetration |

|

|

|

|
|
HM-3320: Penetration |
|
|
|

|
|
»Click here to display Table of Contents«
|
HM-3320: Penetration |
|
|
|
|
|
HM-3320: Penetration |
|
|
|
|
In this tutorial, you will learn how to:
| • | Run the penetration check |
| • | Review the intersection results |
| • | Fix the intersection results |
| • | Interrogate the penetration results |
| • | Fix the penetration results |
To access the Penetration panel:
| • | From the menu bar, click Mesh > Check > Components > Penetration. |
| • | From the Tool page, select penetration. |
Use the Penetration panel to check the integrity of your model, visualize problem areas, and fix problem areas. You can check elements, components and groups. Typically you would use the group check to check contact definitions (for example, Abaqus/LS-DYNA).
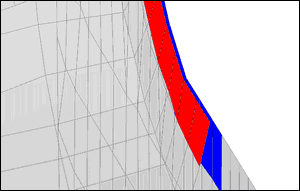
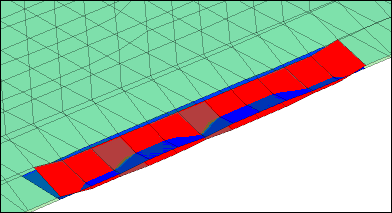
You can also use this panel to check components for element penetration and intersection. Penetration and intersection can be used individually or collectively. Penetration is defined as the overlap of the material thickness of shell elements, while intersection is defined as elements passing completely through one another.
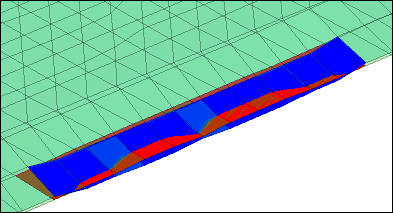
Example of penetration |
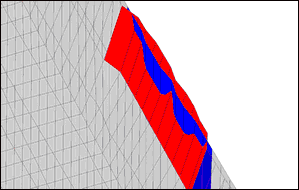
Example of intersection |
Use the following guidelines for conducting checks:
| • | Checks can be run on both 2D and 3D elements, 2D elements only, or 3D elements only. |
| • | Select include self interference to include components that bend and pass through themselves. This occurs rarely and is expensive when running the check. By default, this checkbox is cleared. |
| • | By default the check is set to all interferences, meaning both intersection and penetration. The intersections only option and the penetrations only option are also available. |
| • | Select allowable interference depth to ignore penetrations and intersections that are less than the value specified. By default, this checkbox is cleared. |
| • | Select uniform thickness to assign a global thickness to all components. |
| • | Select thickness multiplier to multiply the existing thicknesses in the model. |
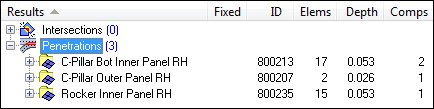
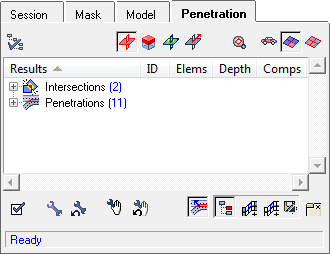
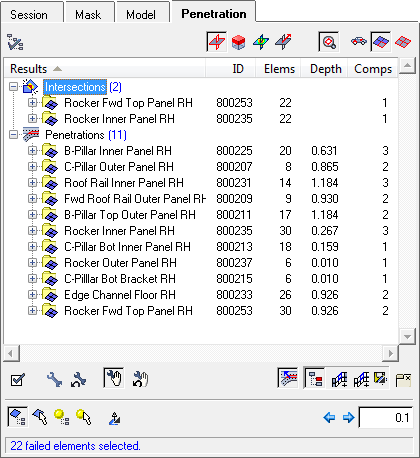
When the penetration check is invoked, a new penetration tab opens in the browser area.

The results are split into intersections and penetrations with the number of components that are clashing in brackets. In the example below, two components are intersecting and eleven components have material penetration. Expand each section for more detail as to which components have failed. The ID, Elems, Depth, and Comps columns provide information on which components' IDs are involved, the number of failed elements, the depth of penetration (not applicable for intersections), and the number of components affected in the penetration/intersection. Each of the columns can be sorted by clicking the column header. At the bottom of the tab area there is a message bar which will detail the status of the check, the number of failed elements, and any warnings and errors as the checks are invoked.
Access additional options and tools within the penetration and intersection check by right-clicking in the Penetration tab. A context menu will appear and provide additional options to fix either penetrations or intersections, depending on whether the penetration parent/child folder or intersection folder has been highlighted.
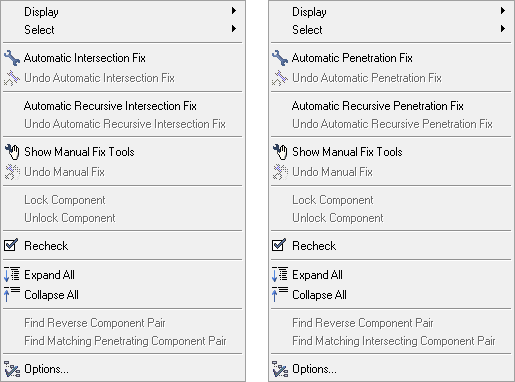
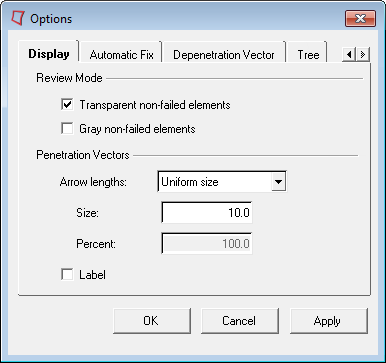
Click Options to configure the display of the tab, fix intersections and penetrations, and change the display of depenetration vector.
The fixing of penetrations and intersections falls into two categories: automatic and manual. These capabilities will be discussed in more detail in the tutorial.
This exercise uses the penetration_check.hm file, which can be found in the hm.zip file. Copy the file(s) from this directory to your working directory.
Step 1: Retrieve the model file, penetration_check.hm.
| 1. | Start HyperMesh Desktop. |
| 2. | In the User Profile dialog, select LsDyna. |
| Note: | This model is a LS-DYNA model, therefore, it is important to select the appropriate user profile so that HyperMesh can access the actual thickness values of the shell components. The thickness values are required for material penetration check. |
| 3. | Click OK. |
| 4. | From the menu bar, click File > Open > Model. |
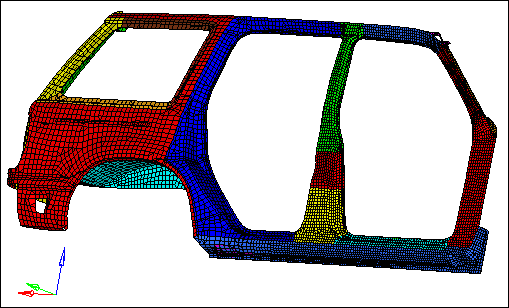
| 5. | In the Open Model dialog, open the penetration_check.hm file. A model appears in the graphics area. |
| 6. | On the Visualization toolbar, click |
| 7. | Observe the model using various visualization options available in HyperMesh (rotation, zooming, and so on). |
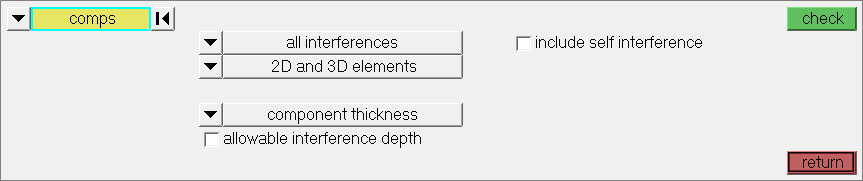
Step 2: Run the penetration check.
| 1. | Open the Penetration panel by clicking Mesh > Check > Components > Penetration from the menu bar. |
| 2. | Click comps. |
| 3. | Select all of the components listed. |
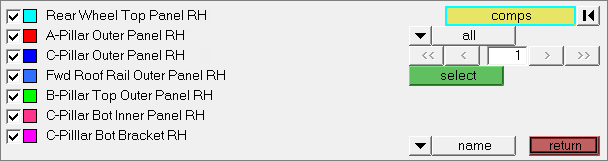
| 4. | Click select. |
| 5. | Click check. Once the check is complete, the Penetration tab populates with two intersections and 11 penetrations. |
The tab is populated by a parent/child or master/slave relationship. As an example, looking at the intersections, the top line shows the component Rocker Fwd Top Panel RH (parent), and then below is component Rocker Inner Panel RH (child). It is important to understand that there is always a reciprocal relationship; the second entry is Rocker Inner Panel RH (parent) and then the component Rocker Fwd Top Panel RH (child). In this case there is a one-to-one relationship. It is especially important to understand this when there is a one-to-many relationship (for example, Rocker Inner Panel RH under penetrations). Clicking the parent component will always show that component plus all the components below (children). Clicking a child component will show that component with the parent component only.
Step 3: Review the intersection results.
| 1. | View all of the intersections by expanding Intersections in the Penetration tab. |
| Note: | Based on which mode is chosen, certain components are displayed on the screen. |
Mode |
Description |
|
Fit View to Failed Elements |
|
Display All Elements |
|
Display Components with Failed Elements |
|
Display Only Failed Elements |
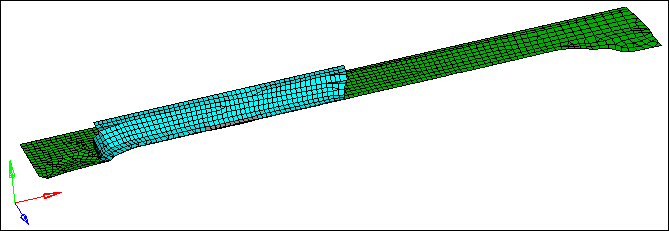
| 2. | Select |
| 3. | Under Intersections, in the Rocker Fwd Top Panel RH folder, select the Rocker Inner Panel RH component. HyperMesh automatically fits the screen to the failed intersecting elements. |
| 4. | Review other visualization modes by clicking |
Step 4: Fix the intersection results.
HyperMesh includes two methods for fixing intersections: manual and automatic.
To fix intersections manually:
| 1. | Under Intersections, in the Rocker Inner Panel RH folder, select the Rocker Fwd Top Panel RH component. |
| 2. | Ensure that the intersecting entities can be fixed by clicking |
| Note: | Additional tools display for intersection fixing. |
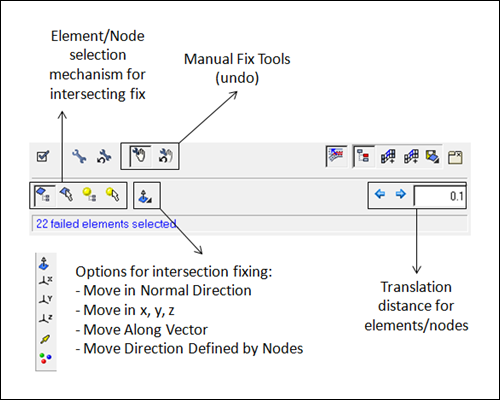
| 3. | Click |
| Note: | You will not pick any additional elements. |
| 4. | Click |
| 5. | For distance value, enter 2. |
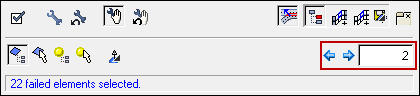
| 6. | Click |
| Note: | After the elements have been moved by a value of 4, they no longer intersect. |

| 7. | Click |
| 8. | In the dialog that appears, which reads "Current intersection/penetration results will be lost by rechecking the model. Would you like to continue?", click Yes. |
| Note: | There are no intersections, and only 11 penetrations remain. |
Alternatively, you can use the automatic fixing tools:
| 1. | Reload the file, penetration_check.hm, again. |
| 2. | Go to the Penetration panel. |
| 3. | Click comps. |
| 4. | Select all of the components listed. |
| 5. | Click select. |
| 6. | Click check. Once the check is complete, the Penetration tab populates with two intersections and 11 penetrations. |
| 7. | In the Penetration tab, right-click on the Intersections and select Automatic Recursive Intersection Fix from the context menu. |
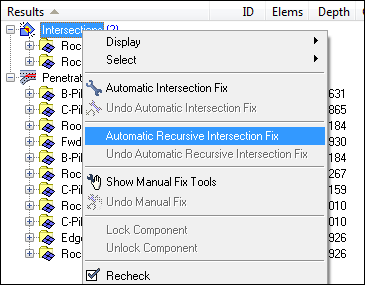
| 8. | In the dialog that appears asking if you would like to continue, click Yes. |
| Note: | Automatic Recursive Intersection Fix automatically runs through all of the passes, whereas the Automatic Intersection Fix runs through one pass at a time. Most fixes require multiple passes. |
Step 5: Interrogate the penetration results.
| 1. | Expand Penetrations. |
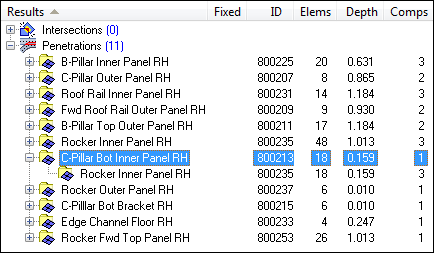
| 2. | Select the component, C-Pillar Bot Inner Panel RH. The penetration results will look as follows: |

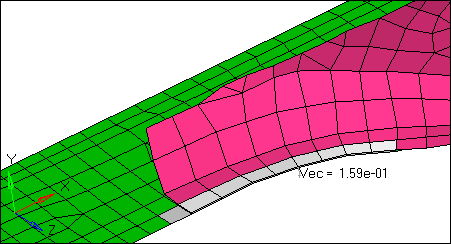
| 3. | View different types of display results for penetration by clicking the following visualization options: |

contour

vectors
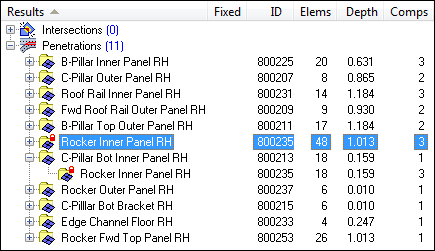
Remember that the columns can be sorted. For example, if you were only interested in the worst offending penetrations then sorting by the depth column will reorganize the tree structure, while still retaining the parent/child relationship.
In this particular example, for component C-Pillar Bot Inner Panel RH, there are 18 elements that have failed (parent and child), the maximum penetration depth is 0.159, and there is only one component penetrating.
Step 6: Fix the penetration results.
Within the checking tool there is an automatic penetration fix that will remove the penetrations within the model. This works by physically moving the failed nodes to new locations to remove the material penetration. There are two options: automatic penetration fix and automatic recursive penetration fix. Both will do the same thing, but the automatic option often requires you to use it several times successively to eliminate all penetrations, while the automatic recursive completes the fix in one click. However, the iterative option will take longer to complete, because it is essentially automatically repeating the automatic fix until it reaches a point at which no further improvements can be made. You also have the option to either fix individual penetrations by clicking on a single parent branch of the tree, or fix all penetrations at once by clicking and highlighting the complete Penetrations tree.
In some circumstances, there may be the need to lock or freeze a component that cannot be adjusted or moved by the fixing tool. To achieve this, right-click on the component and select Lock Component from the context menu. Once a component is locked, a symbol will appear by the folder indicating that the component is locked.
In the previous example, you locked the component, C-Pillar Bot Inner Panel RH. The lock symbol appears multiple times to correspond with the multiple references to the same component. To unlock the component, right-click again on the locked component and select Unlock Component from the context menu. For the purpose of this tutorial you will not be using the lock functionality.
To fix the penetrations in the model you will use the Iterative Fix:
| 1. | In the Penetrations tab, right-click on Penetrations and select Automatic Recursive Penetration Fix from the context menu. |
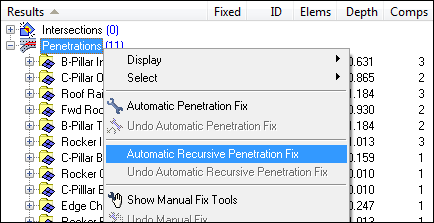
| 2. | In the dialog that appears, asking if you would like to continue, click Yes. |
| Note: | After the process has finished, a majority of the penetrations have been fixed. Three penetrations remain which require manual editing to fix. |