Before starting this tutorial it is recommended that you complete the introductory tutorial, HM-1000: Getting Started with HyperMesh.
Model Files
This tutorial uses the SEAT_MODEL.hm file, which can be found in <hm.zip>/interfaces/lsdyna/. Copy the file(s) from this directory to your working directory.
Seatbelt Routing
From the Analysis page, select the Safety panel and click belt routing to access the Belt Routing panel. Use the Belt Routing panel to create seatbelt segments that wrap around a dummy’s torso or lap.
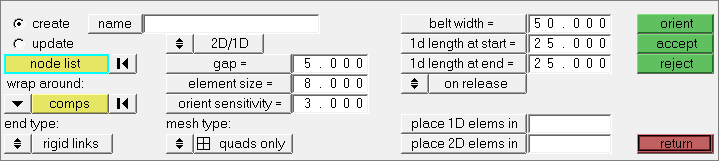
Belt routing panel
Exercise
Step 1: Create a shoulder belt
| 1. | From the menu bar, click File > Open > Model. |
| 2. | In the Open Model dialog, navigate to your working directory and open the file SEAT_MODEL.hm. |
| 3. | From the Analysis page, click safety > belt routing. |
| 4. | Go to the create subpanel. |
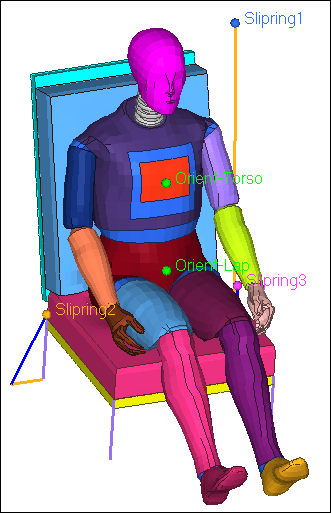
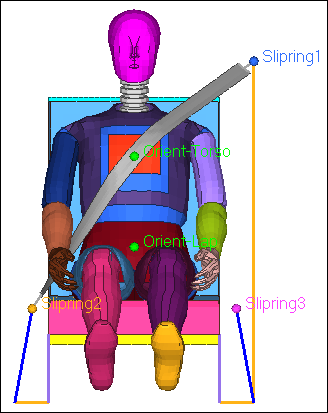
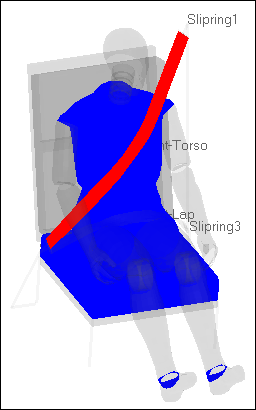
| 5. | Using the node list selector, select Slipring1, Orient_Torso, and Slipring2, respectively. These nodes will be used as orientation nodes to guide a smooth profile belt. |
| Tip: | To display the node attached to each tag, click  on the Visualization toolbar, click on the Visualization toolbar, click  in the Visualization tab, and then set Tag icon to Text and Icon. in the Visualization tab, and then set Tag icon to Text and Icon. |
| 6. | Activate the wrap around: comps selector. |
| 8. | Click comps >> by assems. |
| 9. | Select the assembly, Torso-Belt. |
| 12. | Set the 2D/1D:1D toggle to 2D/1D (default) to create a combination of linear and plate belt elements. |
| 13. | For belt width, enter 50.0. |
| 14. | For 1d length at start, enter 50.0. |
| 15. | For 1d length at end, enter 50.0. |
| 16. | For element size, enter 8.0. |
| 18. | For orient sensitivity, enter 3.0. |
| 19. | Double-click place 1D elements in, then select a collector to place 1D elements. |
| Note: | If nothing is selected, HyperMesh will create the collector seatbelt1_1D. By default, this collector is assigned the property *SECTION_SEATBELT and the material *MAT_SEATBELT (along with loading and unloading curves for forces vs. engineering strain). |
| 20. | Double-click place 2D elements in, then select a collector to place 2D elements. |
| Note: | If nothing is selected, HyperMesh will create the collector seatbelt1_2D. By default, this collector is assigned the property *SECTION_SHELL with a thickness of 1.20mm and the material *MAT_FABRIC. |

Belt routing panel settings
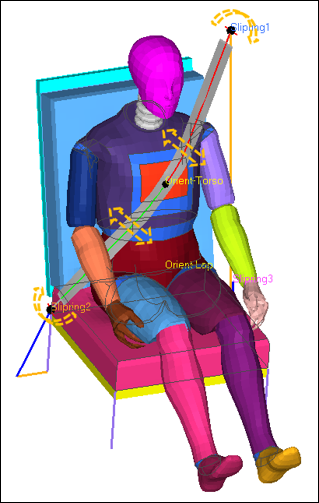
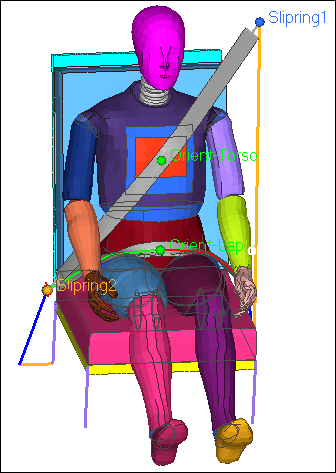
| 21. | Create the belt by clicking orient. A preview of the full belt representation with multiple red and green line segments (two lateral lines at the ends of the belt, and additional lines along the length of the belt) displays. |

| 22. | Select each line segment and interactively control the profile and smoothness of the belt by rotating the lateral end segments, or moving and placing lines segments along the length of the belt. Once a final position is achieved, release the mouse to create a mesh that follows the specified path. |
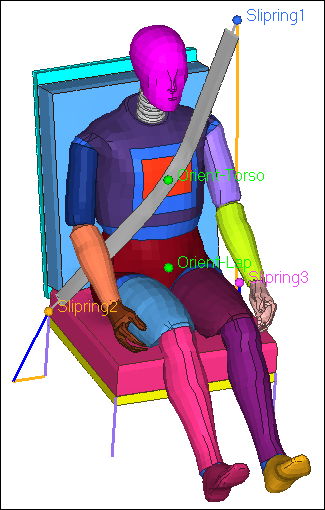
| 23. | Once the belt is properly oriented, click accept to create seatbelt1. |
| Note: | Transition between shell and liner elements for seatbelt1 by setting the end type toggle to rigid links or tria surfaces. Transition between quads and R-trias elements for the seatbelt mesh using the mesh type toggle. |
Step 2: Create Belt Segments that Wrap Around the Lap
The steps for creating belt segments that wrap around the lap are similar to the steps for creating belt segments that wrap around the torso. When creating belt segments that wrap around the lap, you must select new end points and lap components.
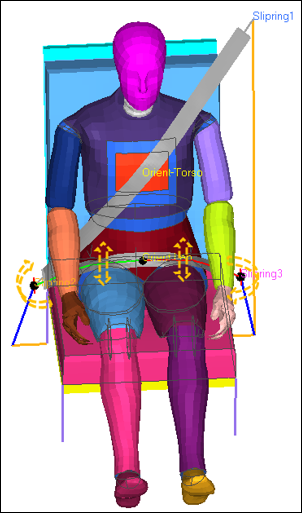
| 1. | Using the node list selector, select Slipring3, Orient_Lap, and Slipring2, respectively. These nodes will be used as orientation nodes to guide a smooth profile belt. |
| 2. | Activate the wrap around: comps selector. |
| 3. | Click  to clear any previously selected components. to clear any previously selected components. |
| 5. | Click comps >> by assems. |
| 6. | Select the assembly, Lap-Belt. |
| 9. | Create the belt by clicking orient. A preview of the full belt representation with multiple red and green line segments (two lateral lines at the ends of the belt, and additional lines along the length of the belt) displays. |
| 10. | Select each line segment and interactively control the profile and smoothness of the belt by rotating the lateral end segments, or moving and placing lines segments along the length of the belt. Once a final position is achieved, release the mouse to create a mesh that follows the specified path. |
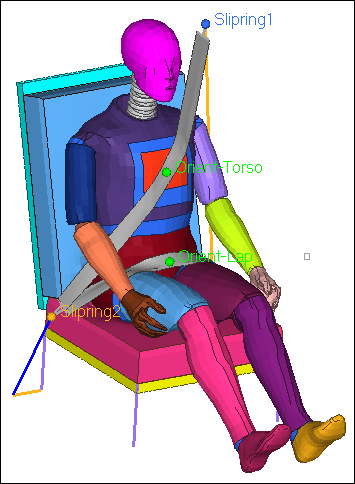
| 11. | Once the belt is properly oriented, click accept to create seatbelt2. |
Step 3: Modify the Seatbelt Using the Belt Routing Panel or the Entity Editor
Panel:
| 1. | From the belt routing panel, go to the update subpanel. |
| 3. | Select the seatbelt to be modified. |
| 4. | Modify the seatbelt's parameters accordingly. |
| 5. | Select each line segment to interactively orient them to a specific location. Once a final position is achieved, release the mouse to create a mesh that follows the specified path. |
| 6. | Once the belt is properly oriented, click accept. |

Entity Editor:
| 1. | In the Model browser, SeatBelt folder, select the seatbelt to be modified. The Entity Editor opens, and displays the seatbelt's corresponding data. |
| 2. | Interactively modify the seatbelt and orient it to a new location by: |
| • | Clicking Pick Nodes, and using the Nodes selector to reselect nodes. |
| • | Clicking Components, and selecting a new component to wrap the seatbelt around. |
| 3. | Modify the seatbelt's parameters accordingly. |
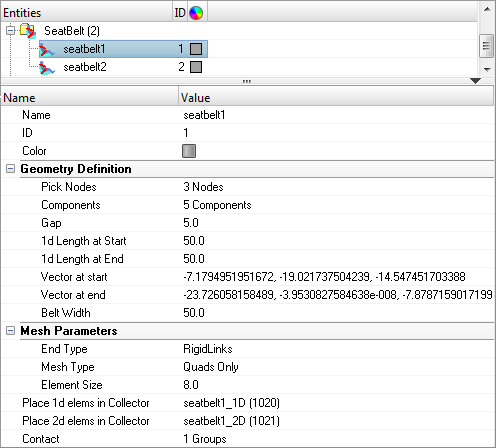
Entity Editor open for seatbelt1
| 7. | By default, the contact *CONTACT_AUTOMATIC_SURFACE_TO_SURFACE is created for each seatbelt entity. The seatbelt_2D component is assigned as the slave, and the component selected for wrap around is assigned as the master. |
| 8. | In the Solver browser, *CONTACT, *CONTACT_AUTOMATIC_SURFACE_TO_SURFACE folder, right-click on seatbelt1_contact and select Review from the context menu to review the contact. |
See Also:
HyperMesh Tutorials


