Use the Editor to:
| • | Create and edit template files |
| • | Parameterize an ASCII file |
| • | Create variables or shape templates |
| • | Recognize and edit Templex statements in files. Using these statements or expressions, you can create customized template files. Refer to the Templex Reference Guide for detailed information. |
| • | Execute parameterized files (to check for the correct insertion of Templex statements) |
| • | Perform advanced editing (such as syntax highlighting, search, replace, recent files, colors and displays, and so on) |
To invoke the Editor, click Tools > Editor from the menu bar. The Editor is also invoked when you load a resource file in the Resource column of the Define models step.
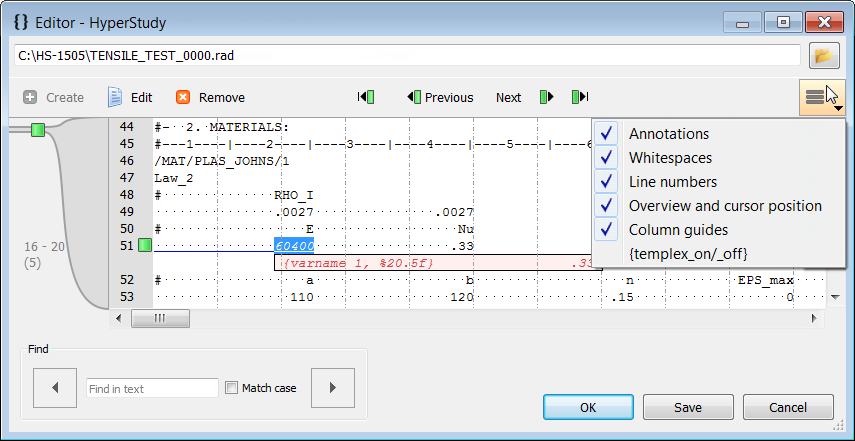
**For more information on the different features in the Editor, click on their corresponding icons within the image below.**
Before creating parameters, the HyperStudy Editor requires a format to be set. For more information, see Setting Format Specifiers for Parameters.
| 1. | Highlight the appropriate fields in the text area. |
| Tip: | To assist in selecting a specified number of fields, press CTRL to activate the Selector, enter the number of fields to select, then click a field in the text area. HyperStudy highlights the number of fields specified. |
| 2. | Click Create, or right-click on the highlighted fields and select Create Parameter from the context menu. |
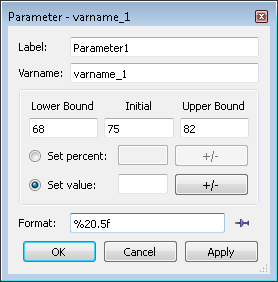
| 3. | In the Parameter - varname dialog, define the new parameter. |
|
Before you edit parameters, the HyperStudy Editor requires a format to be set. For more information, see Setting Format Specifiers for Parameters.
| 1. | Highlight the parameter you wish to edit in the text area. |
| 2. | Click Edit, or right-click on the parameter and select Edit from the context menu. |
| 3. | In the Parameter - varname dialog, edit the parameter. |
or
| 1. | In the row that contains the parameter you wish to edit, click  . . |
| 2. | From the context menu, click Edit > varname. |
| 3. | In the Parameter - varname dialog, edit the parameter. |
|
| 1. | Highlight the parameter you wish to remove in the text area. |
| 2. | Click Remove, or right-click on the parameter and select Remove from the context menu. |
or
| 1. | In the row that contains the parameter you wish to remove, click . |
| 2. | From the context menu, click Remove > varname. |
|
| 1. | Highlight the appropriate fields in the text area. |
| 2. | Right-click on the highlighted fields and select Attach to > varname from the context menu. |
To detach a parameter from an existing parameter:
| 1. | Highlight the parameter you wish to detach in the text area. |
| 2. | Right-click on the highlighted fields and select Detach > varname from the context menu. |
or
| 1. | In the row that contains the parameter you wish to detach, click . |
| 2. | From the context menu, click Detach > varname. |
|
| 1. | In the text area, highlight the fields (usually nodes) to be replaced by a shape template. |
| 2. | Right-click on the highlighted fields and select Include Shape from the context menu. |
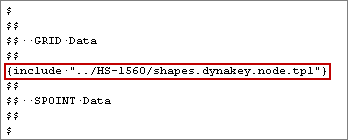
| 3. | In the Shape Template dialog, open the shape template (.node.tpl file generated by HyperMesh). HyperStudy replaces the selected text with an include statement linked to the selected .node.tpl file. |
|
To select all of the GRID, *NODE, or /NODE cards at once:
| 1. | Right-click anywhere in the text area. |
| 2. | Select Select Nodes > GRID, *NODE, or /NODE from the context menu. HyperStudy selects and highlights all of the nodes for the card you selected. |

|
When text is selected for replacement with a parameter, the HyperStudy editor recognizes the format and size of the highlighted text. This specifier controls how the data is written to the file. The formatting should be adjusted as required.
| • | A specifier begins with a % and ends with an alphabetic character that controls the basic format type. Some common types are: |
| o | f for floating point number |
| • | Between the % and the type character is a number to define the width of the field. For example: |
| o | %8i is an integer printed to be 8 characters wide |
| o | %7s prints a string 7 characters wide |
| • | For numeric data, the number of digits of precision can be controlled explicitly by inserting a period and a number after the format. Consider the number -5: |
| o | Formatting -5 with %8.5f will result in -5.00000, a floating point number 8 characters wide with precision 5. |
| o | Formatting 123.456789 with % 8.2e will result in 1.23e+002 on Windows and 1.23e+02 on Linux and Unix based operating systems. |
| • | By convention, the formatting is right justified. In order to force left justification, the – character can be used before the field width. For example: |
| o | 5.1 formatted as %-8.2 will produce “5.10 “. Note that the quotes in this example are not part of the formatting but used to show the whitespace padding. |
The format specifiers in HyperStudy conform to conventional syntax. A more detailed explanation on the syntax can be found in references on computer programming.
|
See Also:
Parameterized File Model
Variables, Expressions, and Formatting
Formatting Numeric Output
Formatting Character and String Output


