In this tutorial you will learn how to use HyperStudy to perform an optimization with MotionSolve. The input variable is the angle q (swing angle) of the pendulum. The output response target is to achieve Y-velocity of 6m/s at the tip of the pendulum. At the end of this tutorial, you will know how to:
| • | Use MotionView to start HyperStudy and create the input variables. |
| • | Run a system identification optimization study. |
The files used in this tutorial can be found in <hst.zip>/HS-1030/. Copy the tutorial files from this directory to your working directory.
| 2. | To start a new study, click File > New from the menu bar, or click  on the toolbar. on the toolbar. |
| 3. | In the HyperStudy – Add dialog, enter a study name, select a location for the study, and click OK. |
| 4. | Go to the Define Models step. |
| 5. | Add a MotionView model. |
| a. | From the Directory, drag-and-drop the MotionView (.mdl) file Pendulum.mdl into the work area. |
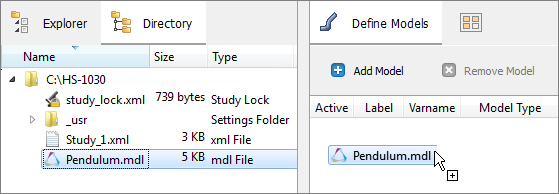
| b. | In the Solver input file column, enter m1.xml. This is the name of the solver input file HyperStudy writes for any evaluation. |

| 6. | Click Import Variables. |
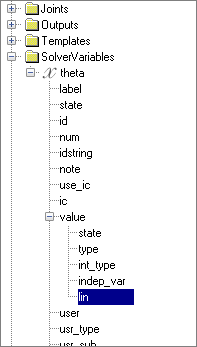
| 7. | In the Model Parameter Tree dialog, select parameters to import into HyperStudy. |
| a. | Expand SolverVariables > theta > value, and select lin (scalar value for the swing angle). |
| 8. | Go to the Define Input Variables step. |
| 9. | In the work area, change the Lower Bound to 0 and the Upper Bound to 2. |

| 10. | Go to the Specifications step. |
|
| 1. | In the work area, set the Mode to Nominal Run. |
| 3. | Go to the Evaluate step. |
| 4. | Click Evaluate Tasks. An approach/nom_1/ directory is created inside the study directory. The approaches/nom_1/run__00001/m_1 directory contains the .res file, which is the result of the nominal run. |
| 5. | Go to the Define Output Responses step. |
|
In this step you will create one output response.
| 1. | From the Directory, drag-and-drop the m1.mrf file, located in approaches/nom_1/run_00001/m_1, into the work area. |
| 2. | In the File Assistant dialog, set the Reading technology to Altair® HyperWorks® and click Next. |
| 3. | Select Single item in a time series, then click Next. |
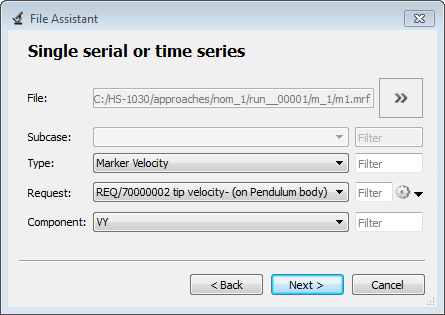
| 4. | Define the following options, and then click Next. |
| a. | Set Type to Marker Velocity. |
| b. | Set Request to REQ/70000002 tip velocity- (on Pendulum body). |
| 5. | Optional. Enter labels for the vector source and output response. |
| 6. | Set Expression to Maximum. |
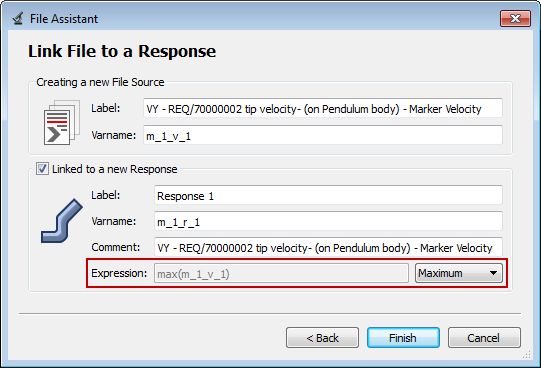
| 7. | Click Finish. The output response is displayed in the work area. |

| 8. | Click Evaluate to extract the output response value. |
|
| 1. | In the Explorer, right-click and select Add Approach from the context menu. |
| 2. | In the HyperStudy - Add dialog, select Optimization and click OK. |
| 3. | Go to the Select Input Variables step. |
| 4. | Review the input variable's lower and upper bound ranges. |
| 5. | Go to the Select Output Responses step. |
| a. | Click the Objectives tab. |
| c. | In the HyperStudy - Add dialog, add one objective. |
| • | Set Type to System Identification. |
| • | Set Apply On to Response 1 (r_1). |
| • | For Target Value, enter 6.0. |

| 8. | Go to the Specifications step. |
| 9. | In the work area, set the Mode to Adaptive Response Surface Method (ARSM). |
| Note: | Only the methods that are valid for the problem formulation are enabled. |
| 11. | Go to the Evaluate step. |
| 12. | Click Evaluate Tasks to start the optimization. |
|
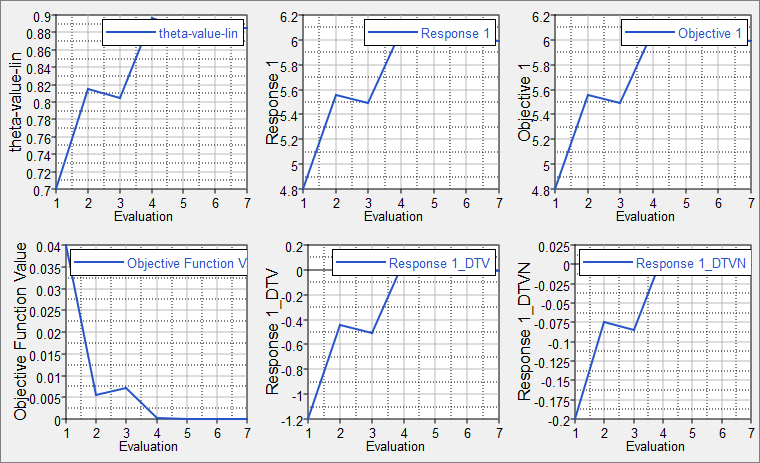
| 1. | Click the Iteration History tab to view a table with the Optimization's iteration results. The optimal design is highlighted in green. |
| 2. | Click the Evaluation Plot tab to compare all of the entities of the Optimization (input variables, output responses, and objectives) against the iteration. |
Use the Channel selector to select all of the input variables, output responses, and objectives.
| 3. | Go to the Post-Processing step. |
|
The Post-Processing step in an optimization approach offers additional tools to review the results. Statistics, histograms, and scatter plots can be used to help compare and analyze designs.
Click the Integrity tab to view a series of statistical measures on input variables and output responses.

|
See Also:
HyperStudy Tutorials


