HyperStudy can be connected to HyperMath either using HyperMath as a solver or by registering HyperMath functions to be used in HyperStudy’s evaluation (this tutorial). ,+36-9
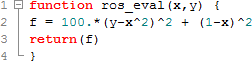
In this tutorial you will learn how to register a HyperMath function in HyperStudy using the Preference file (.mvw) and then use the registered function for output response evaluation in the study. The Rosenbrock function is defined as an HML script and registered in HyperStudy. The example defines two input variables labeled x and y, respectively. The objective of the optimization is to minimize f(x,y)= 100*(y-x^2)^2 + (1-x)^2. The range for x and y is set to [-2 ; 2] , and the start point is [1.2 ; 1.1].
The files used in this tutorial can be found in <hst.zip>/HS-1040/. Copy the tutorial files from this directory to your working directory.
| 2. | From the menu bar, click File > New. |
| 3. | In the Create New File dialog, select HyperMath File. |
| 4. | Click OK. HyperMath opens a new .hml file. |
| 5. | In the editor, enter the following HyperMath commands: |
| 6. | Form the menu bar, click File > Save As. |
| 7. | In the Save As dialog, navigate to your working directory and save the file as ros_function.hml. |
| 8. | Quit HyperMath by clicking File > Exit from the menu bar. |
|
| 1. | In a text editor, open the HML_prefs.mvw file. |
| 2. | Replace <path> with the actual location of the .hml file. |
*Id("HyperStudy v12.0")
*BeginDefaults()
*BeginPlotDefaults()
*RegisterHMATHFunction("ros_eval", "<path>/ros_function.hml", 2)
*EndPlotDefaults()
*EndDefaults()
|
| 3. | Save the changes you made to the preference file. |
|
| 2. | From the menu bar, click File > Use Preferences File. |
| 3. | In the HyperStudy - Set Preference File dialog, open the HML_prefs.mvw file. |
| 4. | To start a new study, click File > New from the menu bar, or click  on the toolbar. on the toolbar. |
| 5. | In the HyperStudy – Add dialog, enter a study name, select a location for the study, and click OK. |
| 6. | Go to the Define Models step. |
| 7. | Add an Internal Math model. |
| b. | In the HyperStudy - Add dialog, select Internal Math and click OK. |
| 8. | Go to the Define Input Variables step. |
| a. | Click Add Input Variable. |
| b. | In the HyperStudy - Add dialog, add two input variables labeled X and Y. |
| c. | Change both input variable's lower, initial and upper bounds to the values indicated in the image below. |

| 10. | Go to the Specifications step. |
|
| 1. | In the work area, set the Mode to Nominal Run. |
| 3. | Go to the Evaluate step. |
| 4. | Click Evaluate Tasks. An approach/nom_1/ directory is created inside the study directory. |
| 5. | Go to the Define Output Responses step. |
|
| 1. | Click Add Output Response. |
| 2. | In the HyperStudy - Add dialog, add one output response. |
| 3. | In the Expression column of Response 1, click  . . |
| 4. | In the Expression Builder, click the Functions tab. |
| 5. | From the list of available functions, select ros_eval. |
| 6. | Click Insert Varname. The function ros_eval() appears in the Evaluate Expression field. |
| 7. | Click the Design Variables tab. |
| 8. | In the work area, select the input variables X and Y. |
| 9. | Click Insert Varname. The input variables appear in the expression as ros_eval(XY). |
| 10. | In the Evaluate Expression field, enter a comma in-between the input variables X and Y. |
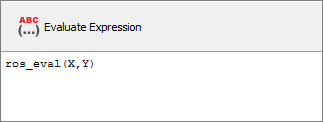
| 11. | Click Evaluate Expression. The expression ros_eval(X,Y) changes to 404. |
| 12. | Click OK. This completes the study setup. |
|
| 1. | In the Explorer, right-click and select Add Approach from the context menu. |
| 2. | In the HyperStudy - Add dialog, select Optimization and click OK. |
| 3. | Go to the Select Output Responses step. |
| a. | Click the Objectives tab. |
| c. | In the HyperStudy - Add dialog, add one objective. |
| d. | In the Type column, select Minimize. |

| 6. | Go to the Specifications step. |
| 7. | In the work area, set the Mode to Adaptive Response Surface Method (ARSM). |
| Note: | Only the methods that are valid for the problem formulation are enabled. |
| 9. | Go to the Evaluate step. |
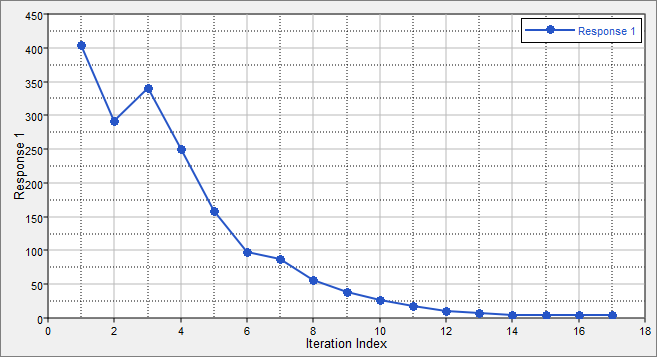
| 11. | Optional. Click the Iteration Plot tab to monitor the progress of the optimization. |
|
See Also:
HyperStudy Tutorials