In this tutorial, you will learn how to pshape parameterization using HyperStudy.
| • | erform a shape optimization started from inside HyperMesh using the direct link to HyperStudy. The finite element solver is Ansys. HyperMorph is used to do the shape parameterization. The objective is to minimize the maximum stress of a plate with a hole. The solution can be expected to be some kind of ellipse. Hence, the input variables are the half-axes of the hole. |
By the end of this tutorial, you will know how to:
| • | Do a Run a study from inside HyperMesh. |
| • | Run an optimization study. |
The files used in this tutorial can be found in <hst.zip>/HS-1540/. Copy the tutorial files from this directory to your working directory. The tutorial directory includes the following files:
plate.cdb -
|
Original Ansys input file.
|
ansys.bat -
|
Sample execution script for the educational version of Ansys.
|
Double symmetric plate model.
| 1. | Start HyperMesh Desktop. |
| 2. | In the User Profiles dialog, set the user profile to Ansys. |
| 3. | From the menu bar, click File > Import > Solver Deck. |
| 4. | Set File type to Ansys. |
| 5. | In the File field, open the plate.cdb file. |
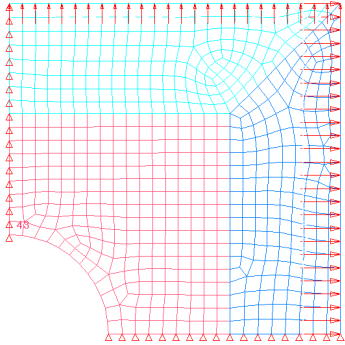
| 6. | Click Import. A finite element model appears in the graphics area. |
|
| 1. | From the Tool page, click HyperMorph. |

| 3. | Go to the create subpanel |
| 4. | Click the first arrow and select auto functions. |
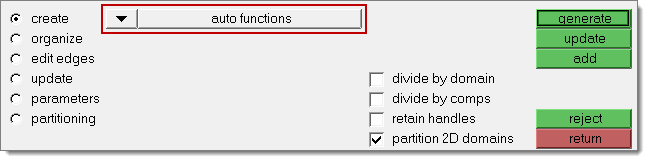
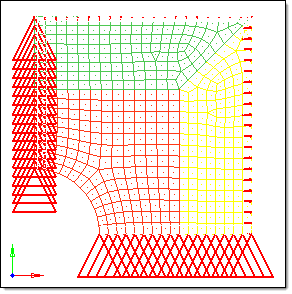
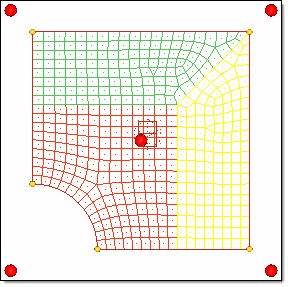
| 5. | Click generate. HyperMesh generates the domains and handles that you will use to manipulate the shape of the mesh and to generate shape perturbations for shape optimization. |
| 7. | In the panel area, click morph. |
| 8. | Go to the set biasing subpanel. |
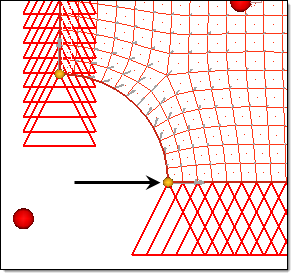
| 9. | In the graphics area, click the two yellow handles located in the corner of the quarter circle. |
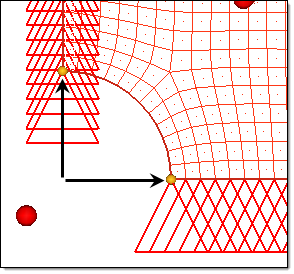
| 10. | In the bias= field, enter 2.000. |
| 12. | Go to the alter dimensions subpanel. |
| 13. | Define the radius as a shape by clicking the first arrow and selecting radius. |
| 14. | Click the bottom arrow, and select hold center. |
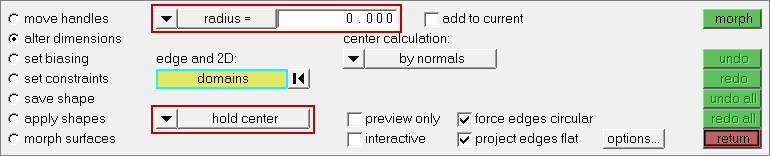
Settings for steps 2.13 and 2.14.
| 15. | In the graphics area, click the red edge of the hole. |
| 16. | In the radius= field, enter 20.0000. |
| 17. | Click morph. The first shape is generated. |
| 18. | Go to the save shape subpanel. |
| 19. | In the name= field, enter sh1. |
| 21. | Click undo to prepare for the generation of the next shape. |
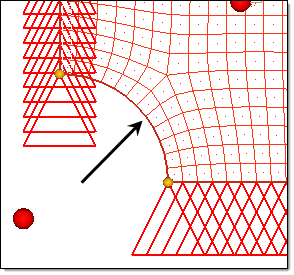
| 22. | Go to the move handles subpanel. |
| 23. | Click the second arrow and select translate. |
| 24. | Click the third arrow and select along xyz. |
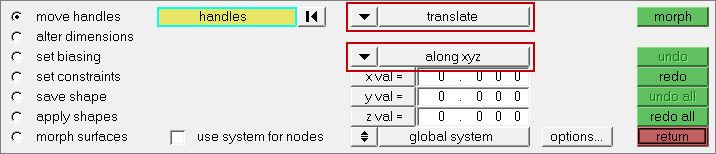
Settings for steps 2.23 and 2.24.
| 25. | In the graphics area, click the lower yellow handle located in the corner of the quarter circle. |
| 26. | In the x val= field, enter 10.0000. |
| 27. | Click morph. The second shape is generated. |
| 28. | Go to the save shape subpanel. |
| 29. | In the name= field, enter sh2. |
| 31. | Click undo to prepare for the generation of the next shape. |
| 32. | Go to the move handles subpanel. |
| 33. | In the graphics area, click the upper yellow handle located in the corner of the quarter circle. |
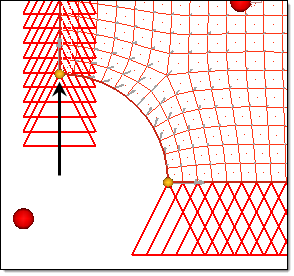
| 34. | In the x val= field, enter 0.000. |
| 35. | In the y val= field, enter 10.0000. |
| 36. | Click morph. The third shape is generated. |
| 37. | Go to the save shape subpanel. |
| 38. | In the name= field, enter sh3. |
| 40. | Click undo to restore the initial mesh. |
| 41. | Save the HyperMesh model by clicking File > Save As > Model from the menu bar. |
| 42. | In the Save Model As dialog, save the file as plateDV.hm. |
| 43. | Close HyperMesh Desktop. |
|
| 2. | From the menu bar, click Edit > Register Solver Script. |
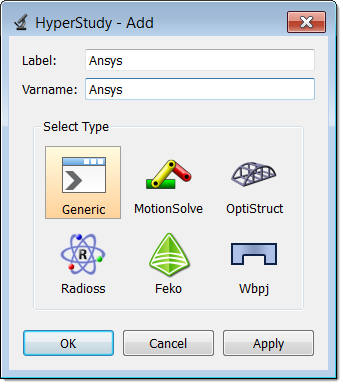
| 3. | In the Register Solver Script dialog, click Add Solver Script. |
| 4. | In the HyperStudy - Add dialog, enter Ansys in the Label and Varname fields. |
| 5. | From the list of solver script types, select Generic. |
| 7. | In the Path column of the script Ansys, click  . . |
| 8. | In the Open dialog, open the ansys.bat file. |
| Note: | The script ansys.bat is a sample of an execution script for Ansys on Windows. Copy ansys.bat to your working directory to use it. |
| 10. | In the Save Preferences dialog, navigate to your working directory. |
| Note: | On UNIX, the preference file can also be saved in your home directory or in the working directory from which you launched HyperStudy. |
| 11. | In the File name field, enter a name for the new user preference file (example: userprefs.mvw). |
| Note: | Do not overwrite the system preferences file, which is located in <install_directory>/hw by default. |
| Note: | When you start a new HyperStudy session, you can load your preference file by clicking File > Set Preference File from the menu bar, and then selecting the preference file you just saved. HyperStudy reads the default preference file in the installation directory, followed by the preference file that you specify. This will ensure that all solvers, readers and import templates are available. |
You can also append the current user preference file using Append, or you can exit solver registration using Close. In the last case, the solver will only be registered for the current study.
|
| 1. | To start a new study, click File > New from the menu bar, or click  on the toolbar. on the toolbar. |
| 2. | In the HyperStudy – Add dialog, enter a study name, select a location for the study, and click OK. |
| 3. | Go to the Define models step. |
| a. | From the Directory, drag-and-drop the HyperMesh (.hm) file plateDV.hm into the work area. |

| b. | In the Solver input file column, enter plate.cdb. This is the name of the solver input file HyperStudy writes during any evaluation. |
| c. | In the Solver execution script column, select Ansys. |
| d. | In the Solver input arguments column, enter plate.out plate after $file. |

| 5. | Click Import Variables. |
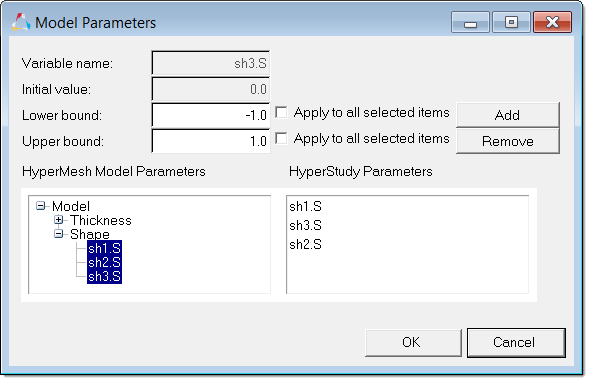
| 6. | In the Model Parameters dialog, select parameters to import into HyperStudy. |
| a. | Expand Shape, and select sh1.S, sh2.S, and sh3.S. |
| b. | Verify that the Lower bound is -1.0 and the Upper bound is 1.0. |
| 7. | Go to the Define Input Variables step. |
| 8. | Review the input variable's lower, initial, and upper bounds. |
| 9. | Go to the Specifications step. |
|
| 1. | In the work area, set the Mode to Nominal Run. |
| 3. | Go to the Evaluate step. |
| 5. | Go to the Define Output Responses step. |
|
| 1. | From the Directory, drag-and-drop the plate.rst file, located in the approaches/nom_1/run__00001/m_1 directory, into the work area. |
| 2. | In the File Assistant dialog, set the Reading technology to Altair® HyperWorks® and click Next. |
| 3. | Select Multiple items at multiple time steps (readsim), then click Next. |
| 4. | Define the following options, and then click Next. |
| b. | Set Type to Stress (2D). |
| c. | Set Request to E132 - E423. |
| d. | Set Component to vonMises. |
| 5. | Optional. Enter labels for the vector source and output response. |
| 6. | Set Expression to Maximum. |
| 7. | Click Finish. Output response 1 is added to the work area. |
| 8. | Click Evaluate Expressions. |
|
| 1. | In the Explorer, right-click and select Add Approach from the context menu. |
| 2. | In the HyperStudy - Add dialog, select Optimization and click OK. |
| 3. | Go to the Select Input Variables step. |
| 4. | Review the input variable's lower and upper bound ranges. |
| 5. | Go to the Select Output Responses step. |
| 7. | In the HyperStudy - Add dialog, add one objective. |
| b. | Set Apply On to Response 1 (r_1). |

| 10. | Go to the Specifications step. |
| 11. | In the work area, set the Mode to Adaptive Response Surface Method (ARSM). |
| Note: | Only the methods that are valid for the problem formulation are enabled. |
| 13. | Go to the Evaluate step. |
|
| 1. | Click the Iteration History tab to review the Optimization results. |
| Note: | The optimal design is highlighted in green. |
| 2. | Click the Iteration Plot tab to plot the optimization results. |
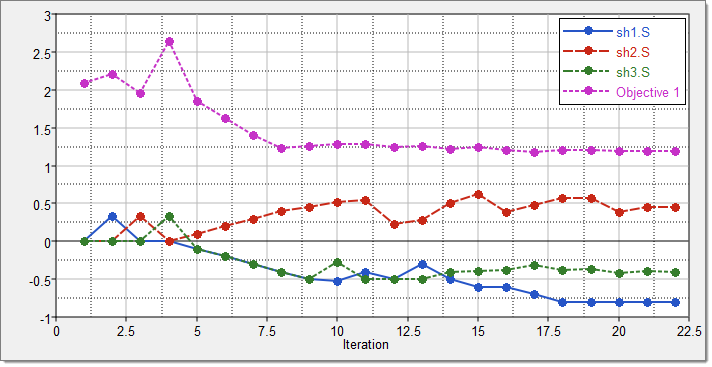
|
See Also:
HyperStudy Tutorials


