Button
|
Action
|

|
Recheck: use this button to re-run the check on exactly the same entities. You can even make adjustments in the Penetration tab such as changing the thickness adjustment, and then re-run the check. However, you cannot run a re-check if you change your selection of elements/comps/groups.
|

|
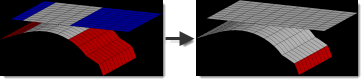
Fix controls: Automatic Intersection/Penetration Fix. Click this button to attempt to automatically fix the intersections or penetrations, based on the settings found in the Options window. The fix is performed on the component that you select (highlight) in the tree view, as well as any interacting components that fall within its folder in the tree view. Fixing a parent component automatically also fixes each of its child comps. You can even perform a fix on the entire "intersections" or "penetrations" group.
|

|
Fix controls: Undo Automatic Fix. If the results of the automatic fix are unacceptable, click this button to undo them. You can undo fixes on a per-component basis, regardless of the order in which the fixes were performed, by clicking a "fixed" comp in the tree view and then undoing its fix. Undoing the fix on a parent also undoes the fixes of its children.
|

|
Fix controls: Show Manual Fix Toolbar. This button toggles an additional toolbar on and off. The extra toolbar contains tools used to perform manual, rather than automatic, penetration fixes.
| Note: | manual fixes only function at the child level on the tree. (You cannot perform manual fixes on a parent). |
|

|
Fix controls: Undo Manual Fix. Click this button to discard and undo every manual fix performed since you first began manually editing the mesh. Notice that this does not necessarily restore the mesh to its original state when you loaded the model! For example, if you performed an automatic fix, and then performed additional manual fixes, undoing the manual fixes would restore the affected mesh to the point at which you began the manual fixes — thus retaining the changes already made by the automatic fix.
|

|
Display Depenetration Vector: when you highlight a child (end-level) entry in the tree control and this button is active, an estimated vector is displayed along which the penetrating elements could be moved in order to reduce or eliminate penetration. This vector is the inverted average of all penetration vectors for the highlighted component, so it may not be ideal in the case of a complex penetration.
|

|
Selection: Only on Child Component. This modal button affects what can/will be saved when you click the save penetration data button described below. When depressed, only the entities in the bottom-level of a tree branch can be saved; otherwise you can save the entities in an entire branch
|

|
Selection: Add Adjacent Elements on Face. Clicking this button adds every element directly adjacent to the currently highlighted ones to the selection so that you can save an expanded selection; in other words, it adds a single row of additional elements:

Note, however, that the addition can be restricted by the feature angle setting in the Options panel.
To de-select these extra elements and return to the original selection, click another entry in the tree and then click the original entry again.
|

|
Selection: Add Attached Elements on Face. Clicking this button adds every element directly attached to the currently highlighted ones to the selection, so that you can save an expanded selection. This can even select elements of an adjacent component, but is restricted by the feature angle setting in the Options panel:
To de-select these extra elements and return to the original selection, click another entry in the tree and then click the original entry again.
|

|
Save penetration data: click this button to save penetration entities to the user mark. Right-click (or click the bottom-right corner) to select the type of entity saved:
|
|
 | Save Failed Elements: highlighted elements are saved to the user mark, so that you can recall them later in other panels (such as the translate panel). |
|
|
 | Save Penetrating Nodes: the nodes of highlighted elements are saved to the user mark, so that you can recall them later in other panels. This might not save all of an element’s nodes, just the ones that penetrate another element. |
|
|
 | Save Penetrating Vectors: the vectors of highlighted elements’ nodes are saved to the user mark, so that you can recall them later in other panels. |
|


