| 1. | From the menu bar, select Preferences > User Profiles. |
The User Profile dialog appears.
| 2. | Select OptiStruct as the profile name and then click OK. |
| 3. | Open the Auto Contact dialog in the following ways: |
| • | From the menu bar, select BCs > Create > Auto-Contact. |
| • | From the menu bar, select Tools > Auto-Contact. |
| • | From the Utility Browser, click the FEA page and select Auto-Contact under the Tools: section. |
| 4. | Click the Type of interface menu and then select the type of interface to create. |
The type of interface selected here will be used as initial configuration for all found interfaces, but can be individually edited afterwards in the Auto Contact Browser.
| 5. | Next to Select components:, double click Component. |
The Component Selection panel opens.
| 6. | Click Comps and then begin to select your components. |
The selected components will be automatically placed in the Components list inside of the Auto Contact dialog.
The Auto Contact dialog re-appears.
| 9. | In the Proximity distance: field, enter a value for the proximity distance. |
Contact pairs will be generated between components that are closer to each other by less than this proximity distance.
| 10. | In the Max reverse angle: field, enter a value for the maximum reverse angle. |
If the angle between the normals of two elements or element faces within the proximity distance exceeds this value, the element will not be included in the contact. Default value is 15 deg.
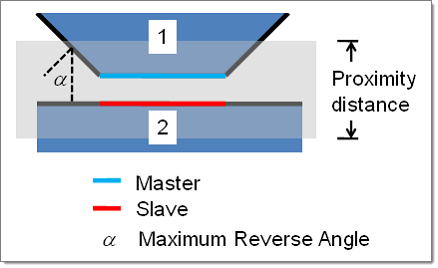
Definition of Proximity distance and Maximum reverse angle.
The status bar activates. Once it is complete, the Auto Contact Browser automatically opens.
| 12. | Use the Auto Contact Browser to review all of the found interfaces and make any necessary adjustments to contacts and contact surfaces. When you are finished, click Create. |
Contact surfaces and contacts are created for all items marked as Accepted. Clicking Cancel will close the Auto Contact Browser without creating any contacts.
See Also:
Auto Contact
Auto Contact Browser


