Model Files
This exercise uses the bottle.hm file, which can be found in the hm.zip file. Copy the file(s) from this directory to your working directory.
Exercise: Creating a Circular Bead on the Bottle
In this exercise you will first create a bead using the default continuous edge connectivity. You will then update the edges to free and see how it affects the bead creation.
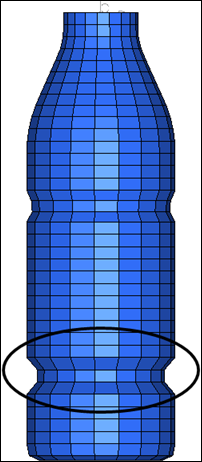
Figure 1: Adding beads to the bottle
Step 1: Load and review the model.
Open the HyperMesh file bottle.hm
Step 2: Create morph volumes.
| 1. | From the menu bar, select Morphing > Create > Morph Volumes. |
| 2. | Switch create morphvol to create matrix. |
| 4. | Select elems >> displayed. |
| 5. | Toggle global system to local system. |
| 6. | For syst, select the system located at the top of the bottle. |
| 7. | Use the default values for the remaining settings. |
| 8. | Click create to create the morph volumes. |
| Note: | Morph volumes are created encompassing the bottle, with red colored handles created at the corners of each morph volume. |
| 9. | Click return to exit the panel. |
Step 3: Create symmetry.
| 1. | From the menu bar select Morphing > Create >Symmetries. |
| 2. | Under domain, activate morph volumes & mapping. |
Symmetries can either be linked to domains or to morph volumes. In this case, you are associating the symmetries to the morph volumes.
| 3. | Change 1 plane to cyclical. |
| 4. | Change 180 degrees to set freq. |
| 6. | For syst select the cylindrical coordinate system located at the top of the bottle. |
| Note: | A cyclical symmetry is created. |
| 8. | Click return to exit the panel. |
Step 4: Split the morph volumes.
| 1. | On the toolbar, click XZ Left Plane View  . . |
| 2. | From the menu bar, select Morphing > Create > Morph Volumes, then select the split/combine subpanel. |
| 3. | Set the toggles to split mvols and by edges. |
| 4. | Set single split to 0.8. |
| 5. | Select an edge of Morph Volume 1 (Figure 2). |
| 7. | Set single split to 0.2. |
| 8. | Select an edge of Morph Volume 2 (Figure 2). |
| 10. | Click return to exit the panel. |
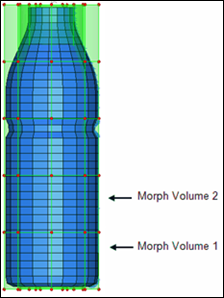
Figure 2: Splitting morph volumes
Step 5: Morph the part.
| 1. | From the menu bar select Morphing > Morph, then select the move handles subpanel. |
| 2. | Switch the morphing method from interactive to translate. |
| 3. | Switch the translate option to along xyz. |
| 5. | For system =, select the cylindrical coordinate system located at the top of the bottle. |
| 6. | Select a handle as shown in figure 3. |
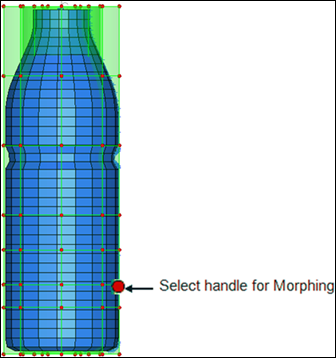
Figure 3: Selecting a handle for morphing
As the bead is created, the upper and lower portions of the bottle deform too (figure 4). This is not the intention, as you want to create a bead without affecting the other parts of the bottle.
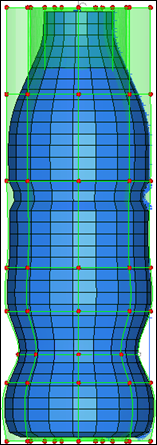
Figure 4: Morphing using continuous morph volumes
| 8. | Click undo to undo the morphing operation. |
Step 6: Update the morph volume edges.
To stop this bulging effect of the upper and the lower portions of the bottle, you will use the free edge connectivity between these morph volumes.
| 1. | From the menu bar select Morphing > Create > Morph Volumes, and then select the update edges subpanel. |
| 2. | Toggle update nodes to update ends. |
| 3. | Switch edge tangency to free. |
| 4. | Update the edges, working your way around the bottle (see figures 5 and 6 below). |
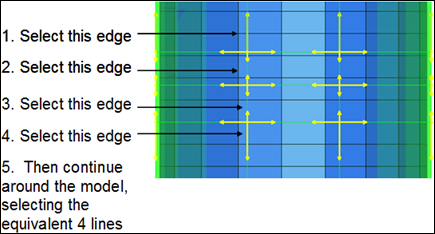
Figure 5: Selecting edges to update the tangencies
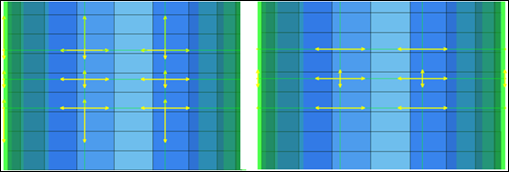
Figure 6: Changing the tangencies from continuous to free
| 5. | Click return to exit the panel. |
Step 7: Morph the part.
| 1. | From the menu bar select Morphing > Morph, then select the move handles subpanel. |
| 2. | Verify that the morphing method is translate. |
| 3. | Switch the translate option to along xyz. |
| 5. | For system =, select the cylindrical coordinate system located at the top of the bottle. |
| 6. | Select the handle as shown previously in figure 3. |
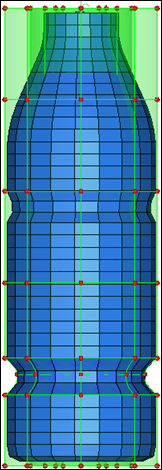
Figure 7: Bead created with free edge connectivity
Summary
Using morph volumes with appropriate tangencies and symmetries you were able to create a bead on the given bottle.
See Also:
HyperMesh Tutorials


