After a contour plot has been applied in the Contour panel, the Cache feature will become active and allow you to add the currently active contour result to an internal cache. This will cache all of the results that are likely to be viewed multiple times in a given session, thereby avoiding re-computation and allowing you faster switching between scalar results.
The Cache/Delete Cache button (located in the lower middle section of the Contour panel) will be disabled whenever the panel shows information that does not match the currently contoured result. You must apply a particular contour result which matches the information on the panel in order for the button to be enabled.

Contour panel
| Note | This feature is only available for scalar results (and for scalar components of vectors and tensors). |
Cached results are identified internally based on a unique identifier. This unique identifier (checksum) is based on the following parameters below:
HyperView will automatically re-compute the data whenever any of the above parameters are changed.
Creating Cached Results
Only the currently active contoured result may be added to the internal cache (using one of the following methods):
| • | From the Contour panel, click Cache. |
| • | From the graphics area context menu, right-click and select Create > Cached Result > Contour. |
| • | From the browser white space context menu, right-click and select Create > Cached Result > Contour. |
| Note | Whenever a result is cached, it is computed for each frame the first time a frame is loaded, thereby making the time taken for the first time load greater. The times for all subsequent loads will be significantly reduced. |
Applying Cached Results
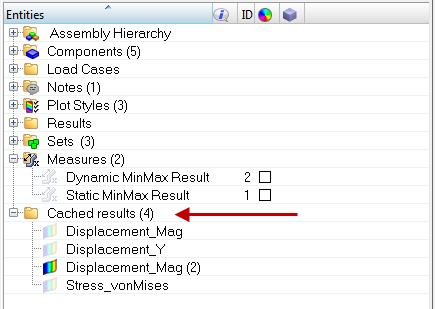
All created cached results are displayed in the Results browser as a flat list in a separate folder named Cached Results.

The names listed in the browser are a combination of the data type and the component. When there is more than one combination of the same data type and component (for example, with different layers or averaging types), a number in parentheses will be added next to the name (as shown in the example above).
Cached results can be applied or turned off by toggling their corresponding icons (located next to each line item in the tree view).
| • | A bold icon next to a cached result indicates that it is currently applied. |
| • | A dimmed icon next to a cached result represents that it is currently turned off/not applied. |
You can quickly switch between (or apply) cached results by clicking on the data item icon in the browser, or by right-clicking on the data item in the browser and selecting Plot > Contour.
Deleting Cached Results
The Cache button automatically changes to Delete cache whenever the result information matches the currently contoured result and the result has been previously cached.

HyperView will hold the cached data until it is deleted (using one of the following methods):
| • | From the Contour panel, click Delete cache. |
| • | From the browser data item context menu, right-click on the item and select Delete. |
| • | To delete all of cached results simultaneously, right-click on the Cached results folder in the browser and select Delete from the context menu. |
Cached results are automatically deleted whenever the active subcase is changed or a currently active derived subcase is modified, a new session is started, or a model is deleted.
Additional Information
| • | Caching is not supported for complex results. |
| • | Caching is a run-time feature only; therefore cached results cannot be saved in a session file or an H3D file. Only results that are contoured when an H3D is exported, or a session is saved, are restored. |
| • | The copy/paste option is not available for cached results. |


