In this tutorial, you will learn how to:
| • | Track an entity during animation |
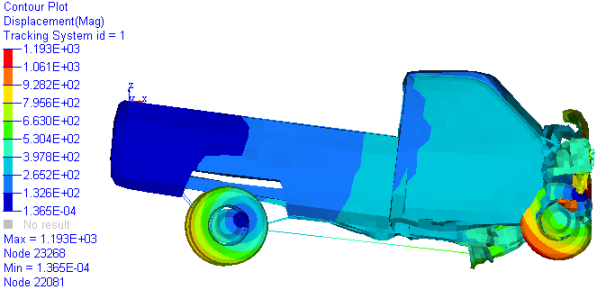
| • | Contour displacement results relative to a defined tracking system |
Tools
To access the Tracking panel:
| • | Click the Tracking panel button  on the Result toolbar. on the Result toolbar. |
OR
| • | Select Results > Create > Tracking Systems from the menu bar. |

The Tracking panel allows you to track any entity during an animation with respect to a node, a plane, or a component.
Exercise: Using the Tracking Panel
This exercise uses the model file, truck.key and the corresponding d3plot file as the results file.
Step 1: Load and animate a file.
| 1. | Load the truck.key model file and the d3plot results file, located in the animation\truck folder. |
| 2. | Choose the left view of the truck, by clicking on the XZ Left Plane View button  on the Standard Views toolbar. on the Standard Views toolbar. |
| 3. | Animate the model  . . |
| 4. | Open the Animation Controls panel  and slow down the animation. and slow down the animation. |
Observe the animation without any tracking system defined. The whole truck moves forward as it is animated.
Step 2: Define a tracking system with respect to a node.
| 1. | Click the Tracking panel button  on the Result toolbar. on the Result toolbar. |
| 2. | Click Add, to add a tracking system. |
| 3. | Change the name of the system. |
| - | Right-click on Tracking System 1 (or anywhere within the Tracking Systems list). |
| - | Select the Rename option from the context menu. |
The Rename dialog is displayed.
| - | Enter System 1 into the Rename text box. |
| 4. | Verify that the Track option is set to Node. |
| 5. | In the graphics area, pick a node located on the top left corner of the truck bed. |
Observe how the animation varies, with the tracking system that was created. The truck is animated with regard to the node that was chosen.
Step 3: Contour displacement results relative to a defined tracking system.
| 1. | Click the Contour panel button  on the Result toolbar. on the Result toolbar. |
| 2. | Verify that Result type is set to Displacement, and that the Data Component is set to Mag. |
| 4. | Under System, activate the Use tracking system option  . . |
Observe the changes in the contour, as well as the Legend values that are displayed.

This allows you to view the selected result with respect to the tracking system that was created.
See also
Tracking Panel
Animation Controls Panel
Contour Panel
HyperView Tutorials for a complete list of HyperView tutorials


![]()
![]()