| 1. | Load the Ansys user profile. |
| 2. | Click Contact Manager in the ANSYS Utility menu. |
| 3. | Click Auto. This opens the Auto Contact dialog. |
| 4. | In the Contact Type field, select the type of contact pair to create. |
| 5. | Click the yellow components button to select your components. |
The components are automatically placed in the Component table in the Auto Contact dialog.
The proximity distance is the maximum distance between two selected components. When you create the pair, any surfaces that are farther away than the value entered here will not be created as a contact pair. The default value is zero.
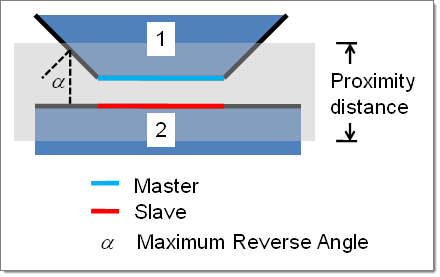
| 6. | In the Maximum reverse angle field, enter a value. If the angle between two normals of elements or element faces exceeds this value, the element will not be added to the master or slave surface. |
| 7. | Click Find. The status bar activates and the Auto Contact browser opens. |
| 8. | Use the Auto Contact browser to make any necessary adjustments to the interface and surfaces. When finished modifying, click Create. |
The interfaces and surfaces marked as Accepted are created. The Contact Manager window reopens with the new information listed.
See Also:
ANSYS Contact Manager
Auto Contact


