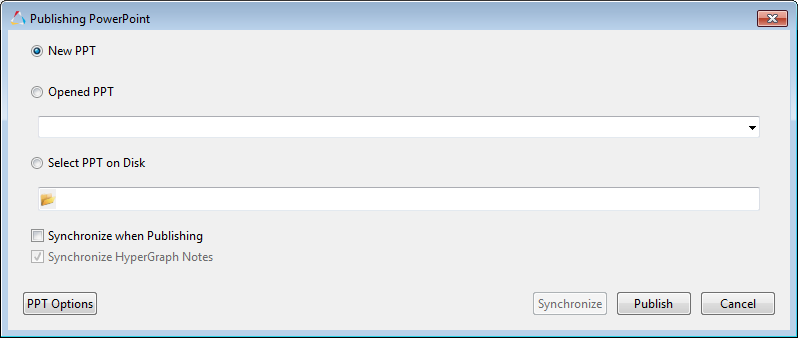
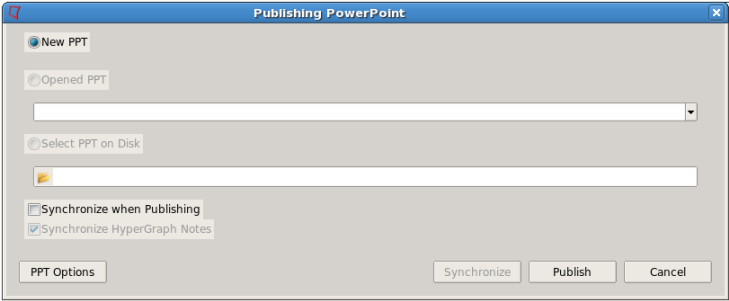
Export options must be defined before exporting your session to PowerPoint. From the Preferences > Export Settings menu, select PPT Options. Or, from the Publishing PowerPoint dialog, click PPT Options. All settings will be saved in the hwsettings.xml file and will be available in the next HyperWorks desktop session.

PowerPoint Options dialog for HyperWorks Desktop on Windows
Defining PowerPoint Export Options on Windows - Use PPT Presentation resolution with Scale Factor
When using HyperWorks Desktop for Windows with no more than two windows above or beside each other, the Use PPT Presentation resolution with Scale Factor option is the preferred method. If you have five or more windows in your HyperWorks Desktop session, the Fixed Resolution option should be used.
When you sync your session data with PowerPoint and the Use PPT Presentation resolution with Scale Factor option is active, the sync feature automatically takes care of the following situations:
| • | Changes to the PowerPoint master aspect ratio. |
| • | Changes to the distances between the graphical area and the PowerPoint borders. |
| • | Changes to the aspect ratio or the size of images or animations in PowerPoint. |
Using the scaling factor makes it easy to control the proportion of text in the legend in relation to the images in the PowerPoint file.
The height and the width of the exported images in PowerPoint, either at the first export defined by the borders in the Visual Position section or at sync time defined by the size in PowerPoint, is multiplied by the scaling factor to maintain the session's correct appearance when published to PowerPoint. If the scale factor is set to 1, the image will be captured in the exact same pixel size as it has in PowerPoint, which could lead to disproportionately large legends or labels.
Only this option allows you to deform the images/plots in PowerPoint (from your HyperWorks Desktop session) and return them to their preferred appearance by selecting Altair > Sync Live in PowerPoint. The aspect ratio will be maintained.
Defining PPT Export Options on Windows and Linux - Fixed Resolution and Use HyperWorks Desktop area resolution
Both the Fixed Resolution and Use HyperWorks Desktop area resolution options are available on Windows and Linux. When using HyperWorks Desktop on Linux, or if you have pages with many windows, the Fixed Resolution option is the preferred method because:
| • | The export is independent from the Linux screen resolution. |
| • | You can maintain the aspect ratio when you: |
| o | Maintain the existing PowerPoint master file resolution (saved in the hwsettings.xml file). |
| o | Maintain the distances between the graphical area and the PowerPoint borders (saved in the hwsettings.xml file) |
| o | Maintain the aspect ratio in PowerPoint. You can shrink or enlarge an image using ONLY the corner handles, not the top or bottom middle image anchors. If the corner handles aren't used to re-size the image, and if you export the session again from HyperWorks Desktop to PowerPoint, the images will not be displayed properly in PowerPoint; the aspect ratio will not be maintained. |
| o | On Linux, you can increase or decrease the resolution in the PPT Export Options dialog and sync those changes from the XML file using Altair > Sync File when you change the width ONLY (the height automatically adjusts). If you change the Visual Position values in the dialog or the PPT Aspect Ratio option, the aspect ratio will not be maintained. |
Note: It is recommended that you document your settings in case you delete your hwsettings.xml file.
If you are using HyperWorks Desktop on Linux and select the Use the HyperWorks Desktop area resolution, the following occurs:
| • | PowerPoint Publishing keeps the HyperWorks Desktop graphical resolution and fits it proportionally into the PowerPoint window with the first export, maintaining the aspect ratio. |
| • | Synchronization behaves as follows: |
| o | On Windows, the sync captures the images in the exact same size as they have in PPT and fits it into the PowerPoint window, maintaining the aspect ratio. No scaling factor is used. |
| o | On Linux, it captures the HyperWorks Desktop resolution and fits it into the PowerPoint window size as it was created upon the first export. If you change the ratio/window size in HyperWorks Desktop, it can look distorted in PowerPoint. |
When a PowerPoint presentation is synced on Linux with data from a new run using the XML file with the Sync files feature in the PowerPoint plug-in (see Synching Data from PowerPoint to HyperWorks Desktop), we recommend the following:
| • | Always export using the Fixed Resolution option. |
| • | Always use the same settings/values for the margins, picture resolution, and aspect ratio in the PPT Export Options dialog (they are saved in hwsettings.xml when you restart HyperWorks Desktop). |
| • | Never change the aspect ratio of the tagged images in PowerPoint (changing the size and position is acceptable). |
Thumbnail Mode on Windows
PowerPoint Publishing offers a thumbnail mode, which is available on Windows only and in the following situations:
| • | Each time you use the option Use PPT Presentation Resolution with Scale Factor (first export and update). |
| • | When you select Use HyperWorks Desktop area resolution and the Sync Live option in PowerPoint. Upon the first export, a 1:1 scale factor is used to capture the area and fit it into the PowerPoint area. |
| • | This feature is triggered if either the height or width of an image in PowerPoint is below 300 pixels. |
| • | It is not used when you select the Fixed Resolution option. |
In thumbnail mode, the height of the captured image is always 540 pixels when capturing in HyperWorks Desktop. The width is calculated according to the aspect ratio in PowerPoint to keep the aspect ratio.
Other options in the dialog include the following:
Item
|
Description
|
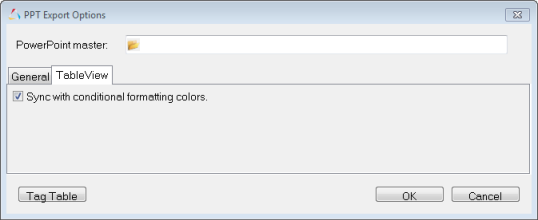
PowerPoint master
|
Click the file browser icon to select a PowerPoint master template.
|
Title attributes
|
Use Separate TextBox for each HWD Page Title - Select this to overwrite the master template and use a separate text box for each page title in your HyperWorks Desktop session.
Select the font icon,  , to overwrite the default font options. , to overwrite the default font options.
Use title attributes from Master PPT - Select this option to use the title attributes from the master PowerPoint template.
|
Visual Position
|
Positions the page title and graphics area object to a defined position in the PowerPoint slide. Enter values as the percentage of the whole page width and height for the following:
| • | Title From Top (default: 5) Positions the page title from the top of the page. |
| • | Title From Left (default: 5) Positions the page title from the left of the page. |
| • | Graphical Area from Top (default: 20) Positions the graphical area from the top of the page. |
| • | Graphical Area from Bottom (default: 10) Positions the graphical area from the bottom of the page. |
| • | Graphical Area from Left (default: 10) Positions the graphical area from the left of the page. |
| • | Graphical Area from Right (default: 10) Positions the graphical area from the right of the page. |
If you change the values described under Visual Position, the height will automatically change without distorting the published output in PowerPoint.
|
Page
|
Select Publish each window to a separate slide, if necessary.
|
Tag Table
|
Click to open the Tag Table dialog, which displays the tag name for each object in your session and its format. A tag is a label used to identify two linked objects in HyperWorks Desktop and PowerPoint. In PowerPoint, objects can be text boxes, images or animations, which correspond in HyperWorks Desktop to page titles, notes or windows. To change the tag's format, click in the Format cell and select a new type from the drop-down menu.
Note: The Tag Table is only available on Windows.
When you select a tag from the Tag column, the object is displayed in a thumbnail preview in the bottom portion of the Tab Table.
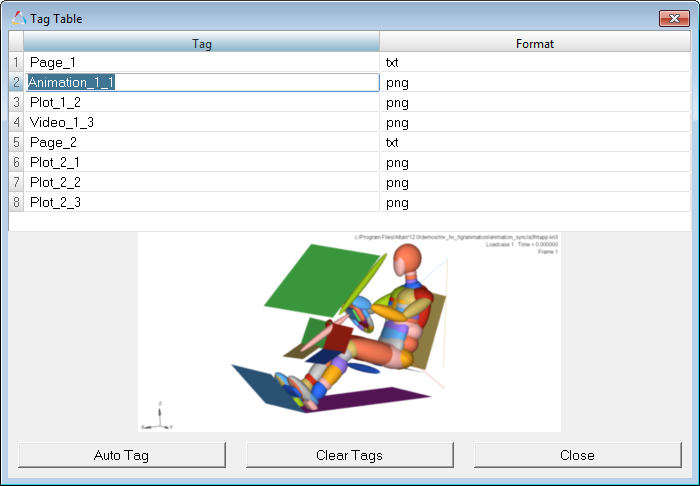
| • | Rename Tags: Click on the tag name to rename it. Page titles and images are auto tagged. To edit the tag names for better orientation, use Auto Tag and then rename the tags before publishing for the first time. |
| • | Auto Tag: Automatically applies tags to the HyperWorks Desktop session objects. |
| • | Clear Tags: Clears the current tags, allowing you to assign new tag names to objects before publishing. |
| • | Close: Closes the dialog. |
|
OK
|
Accepts the current settings and saves them to hwsettings.xml.
|
Cancel
|
Cancels all changes and does not modify hwsettings.xml; closes the dialog.
|
|