|
»Click here to display Table of Contents«
|

Context Sensitive Menu |

|

|

|

|
|
Context Sensitive Menu |
|
|
|

|
|
»Click here to display Table of Contents«
|
Context Sensitive Menu |
|
|
|
|
|
Context Sensitive Menu |
|
|
|
|
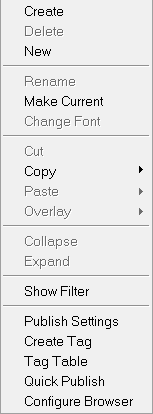
Clicking the right mouse button on a session, page, or window within the browser’s tree structure allows you access to a variety of options. The visibility of browser context menu items is dependent on the current selection - only functions valid for the selected items are activated. Options selected in an empty space apply to the entire model.
Session browser context sensitive menu
Option |
Available for |
Description |
||||||||
|---|---|---|---|---|---|---|---|---|---|---|
Create |
All |
Creates a new page (for session), creates a new page in front of the selected one (for page), or creates/adds a new page to the end of the existing page list (for window). |
||||||||
Delete |
Page |
Deletes the selected page(s). |
||||||||
New |
Window |
Clears the content of the selected window(s). |
||||||||
Rename |
Page |
Changes the name of the current page by entering a new name in the name text field and pressing ENTER. You can cancel the rename operation by pressing ESC. |
||||||||
Make Current |
Page and Window |
Selects which page or window will be the current page/window (when more than one is displayed). |
||||||||
Change Font... |
Session and Page |
Displays the Font Selector dialog and applies the selected font to the page title of all pages (for session) or the selected pages only (for page). |
||||||||
Copy |
Page and Window |
Copies the selected page or window to the clipboard (leaving the originals behind). The duplicated pages can then be inserted into the list using the Paste or Overlay options (see below). |
||||||||
Cut |
Page |
Cuts/removes the selected page from the list and retains the contents on the clipboard. The cut pages can be inserted back into the list using the Paste or Overlay options (see below). |
||||||||
Paste |
Page and Window |
Pastes a previously copied or cut page (for page), or a previously copied window (for window). The copied/cut page is inserted after the selected page in the list (if a page is not selected, the cut/copied page is added to the end of the page list). The copied window will be inserted into the selected window in the list. |
||||||||
Overlay |
Page and Window |
Overlays a previously copied or cut page (for page), or a previously copied window (for window). The selected page/window will be overlayed with the page/window on the clipboard. |
||||||||
Collapse |
Session and Page |
Collapses the entire tree (for session), or collapses the currently selected page only (for page). |
||||||||
Expand |
Session and Page |
Expands the entire tree (for session), or expands the currently selected page only (for page). |
||||||||
Show/Hide Filter |
All |
Displays the content filter area at the top of the browser. The filter allows you to determine which windows should appear in the browser’s tree structure based on their client type, as well as search/filter by the match string on a page label. |
||||||||
All |
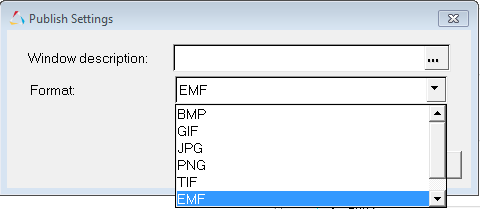
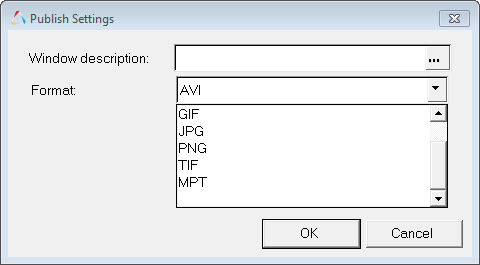
Opens the Publish Settings dialog. Input a description for single or multiple windows/pages and select the data type to be included in a published session file.
Note When exporting a HyperGraph window as an .xls file, it is embedded in the PowerPoint presentation as an Excel object. The curve values are contained within the .xls file if you want to change the curve values in PowerPoint. A TextView window can be saved as a text file. |
|||||||||
Create Tag |
All |
To create a tag for a new entity in the Session browser, right-click on the entity and select Create Tag. The following dialog is displayed:
Enter a tag name and select its format from the drop-down menu. |
||||||||
Tag Table |
All |
To view, rename, delete, or change the format for tags while in the Session browser, right-click and select Tag Table from the context menu. See the Tag Table definition in the PowerPoint Publishing topic for more information. |
||||||||
Quick Publish |
Page and Window |
Transfers data to PowerPoint from the HyperWorks Desktop session with respect to what is selected/highlighted in the Session browser (the publishing settings will be ignored). Quick Publish always create new pages in the PowerPoint file. See PowerPoint Publishing for more information. |
||||||||
Configure Browser |
All |
Opens the Browser Configuration window. Select which entity types, columns, and options are displayed in the Session browser. |