The fatigue manager allows you to write stress and strain results from a finite element analysis to an external file that can be used to set up a fatigue analysis. Stress and strain results are used for fatigue analysis of shell elements. You may choose to write the results for the entire finite element model or for selected entities.
To activate the Fatigue Manager panel, you must load the durability.mvw file (located in the <install_directory>/utility/Fatigue directory). The Durability menu is added to the menu bar after the file is loaded. From the Durability menu, select Fatigue to display the panel. See To activate the fatigue manager for additional information.

Fatigue Manager panel - example
| Note | Currently, only nSOFT and feSafe format files can be written. For additional details on using the
HyperView/nSOFT interface, please see Interfacing with nSOFT. |
Fatigue solver
|
Select a fatigue solver (nCode or feSafe) from the drop-down menu.
|
Entity selection
|
Before you can write out results for a model or selected entities, you must pick one or more entities from the model. You can do this by picking entities directly from the screen, using the quick window selection, or clicking the Elements, or Components input collector and using the extended entity selection menu. See Selecting Entities Using the Input Collector for more information on selecting entities.
|
Result type
|
Allows you to select a particular result type, from the list of available result types, using the drop-down menu.
| Note | Tensor result types are denoted as
-result type name+ (t). |
|
Use corner data
|
If corner data is available, the Use corner data option is activated by default. If this option is activated, the corner data at each node will be exported per element. If this option is deactivated, centroidal data will be exported.
|
Result location 2D
|
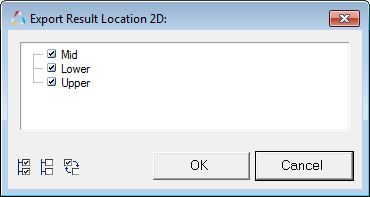
Click the expansion button  to display the Export Result Location 2D dialog. to display the Export Result Location 2D dialog.

Export Result Location 2D dialog
From this dialog, you can select the layer(s) (Mid, Lower, or Upper) from which the elemental results will be exported.
You can also use the All  , None , None  , and Reverse , and Reverse  buttons at the bottom of the dialog to select/deselect layers: buttons at the bottom of the dialog to select/deselect layers:
| - | Select All to select all simulations. |
| - | Select None to deselect all selections. |
| - | Select Reverse to reverse the current selections. |
| - | Select OK to apply the selections and close the dialog. |
| - | Click Cancel to disregard changes and exit the dialog. |
|
Subcase
|
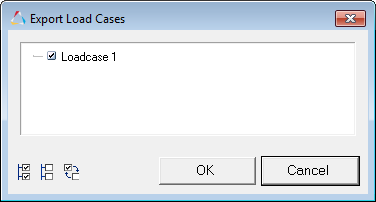
Click the expansion button  to display the Export Load Cases dialog. to display the Export Load Cases dialog.

Export Load Cases dialog
From this dialog, you can you can select which load cases are to be extracted by placing a check mark in the box next to the desired the load case.
You can also use the All  , None , None  , and Reverse , and Reverse  buttons at the bottom of the dialog to select/deselect load cases: buttons at the bottom of the dialog to select/deselect load cases:
| - | Select All to select all simulations. |
| - | Select None to deselect all selections. |
| - | Select Reverse to reverse the current selections. |
| - | Select OK to apply the selections and close the dialog. |
| - | Click Cancel to disregard changes and exit the dialog. |
|
Simulation
|
The From, To, and By Step fields allow you to define the time step values:
| - | Select a start time from the From drop-down menu. |
| - | Select an end time from the To drop-down menu. |
| - | Select a time step increment from the By Step option. Click the up or down arrow to increase or decrease the increment. |
|
Export
|
The Output file folder allows you to designate the file name and file folder to which you want to save the file using the Export Fatigue File dialog
The following settings allow you to define the analysis type and output format of the fatigue file:
| - | Select Transient or Static/Modal as the analysis type. |
| - | Select ASCII or BINARY as the output format (for nCode only). |
Note - ASCII is the only output format available for feSafe.
Click the Export button to export/write the fatigue analysis file.
|
| 1. | From the File menu, select Load > Preference File. |
The Preferences dialog is displayed.
| 2. | From the Preferences dialog, click the Register button and navigate to the durability.mvw file (located in the <install_directory>/utility/Fatigue directory) and click Open. |
The durability.mvw file is added to the Registered Preferences list.
| 3. | Select durability.mvw from the list and click the Load button. |
The menu Durability is added to the menu bar.
| 4. | After loading the durability.mvw file, you need to load a model with results into HyperView. See Load Model for more information on supported model and result types. You can also use the Contour panel to view the stress and strain results for the current model. See Contour for more information on using this panel. |
| Note | The fatigue manager only supports post-processing from the full stress or strain tensor, or a user-defined group. The full tensor data types are denoted in HyperView as Stress(t) and Strain(t). |
| 5. | After loading a model and results, you can activate the fatigue manager by going to the Durability menu and selecting Fatigue from the list. |
The Fatigue Manager panel is displayed.
| Note | Even after loading the file durability.mvw, you can still access any of the other panels in HyperView. To return to the fatigue manager, select Fatigue from the Durability menu. |
|
| 1. | From the File menu, select Load > Preference File. |
The Preferences dialog is displayed.
| 2. | From the Preferences dialog, click the Register button and navigate to the durability.mvw file (located in the <install_directory>/utility/Fatigue directory) and click Open. |
The durability.mvw file is added to the Registered Preferences list.
| 3. | Select durability.mvw from the list and click the Load button. |
The menu Durability is added to the menu bar.
| 3. | From the File menu, select Open > Model to enter the Load Model panel. |
| 4. | Load a model and results file. See Load Model for more information on doing this. |
| 5. | Select the Contour panel,  , from the Results toolbar to view the stress and strain results for the current model. This step is optional. See Contour for more information on using this panel. , from the Results toolbar to view the stress and strain results for the current model. This step is optional. See Contour for more information on using this panel. |
The fatigue manager only supports post-processing from the full stress or strain tensor. These data types are denoted in HyperView as Stress(t) and Strain(t).
| 6. | Once you have loaded a model and results, go to the Durability menu and select Fatigue. |
The fatigue manager is displayed.
| 7. | From the Fatigue solver drop-down menu, select nCode or feSafe as the fatigue solver. |
| 8. | Under Entity selection, select Elements or Components as the entity type. |
| 9. | Select elements on the model by clicking on them in the graphics area. |
OR
Use the entity selection input collector to select elements on the model:
| - | Click the Elements/Components button and select By Window to select the model elements/components that are contained in the window that you create. |
The Extended Entity Selection subpanel is displayed.
| - | Select Entities inside the window. |
| - | From the Visibility filter combo box, select Displayed. |
| - | Use the SHIFT + left mouse button to draw/define the window in the graphics area. |
| - | Click Return to return to the fatigue manager. |
| 10. | Use the Result type drop-down menu to select a result type. |
| 11. | Under Result location 2D, click the expansion button to display the Export Result Location 2D dialog: |
| - | Select Mid, Lower, or Upper as the layer. |
| 12. | Under Subcase, click the expansion button to display the Export Load Cases dialog: |
| - | Select the subcase(s) that you would like extract and click OK. |
| 13. | Use the Simulation options to define the time step values: |
| - | Select a start time from the From drop-down menu. |
| - | Select an end time from the To drop-down menu. |
| - | Use the By Step up or down arrows to select a time step increment. |
| 14. | Click the Output File folder to display the Export Fatigue File dialog. |
| - | Designate the file name and file folder to which you want to save the file. |
| 15. | Use the Analysis type selection box to select Transient or Static/Modal as the analysis type. |
| 16. | Use the Output format selection box to select ASCII or BINARY as the output format. |
Note ASCII is the only output format available for feSafe.
| 17. | Click Export to export/write the fatigue analysis file. |
| Note | Even after loading the file durability.mvw, you can still access any of the other panels in HyperView. To return to the fatigue manager, select Fatigue from the Durability menu. |
|


