|
»Click here to display Table of Contents«
|

User Interface |

|

|

|

|
|
User Interface |
|
|
|

|
|
»Click here to display Table of Contents«
|
User Interface |
|
|
|
|
|
User Interface |
|
|
|
|
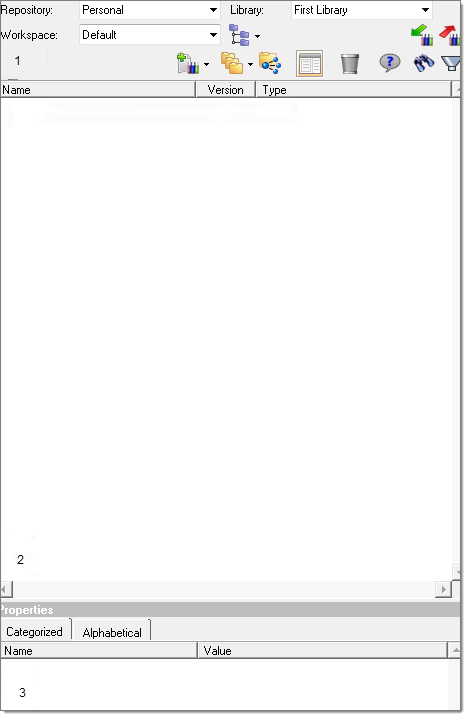
The below illustrations describe the different user interfaces for the Organize browser.
Name |
Description |
Toolbar Area (1) |
This area contains all the toolbars - Query, Find, Filter, Workspace, Library and Content. |
Content browser (2) |
This area displays the content that is associated with the repository and library that you select. |
Properties panel (3) |
This area displays the properties associated with selected contents. |
Below illustrates the different toolbar areas:
Name |
Description |
Repository (1) |
HyperWorks has two out-of-the-box repositories: My Computer and Personal. |
Workspace (2) |
A local directory where files are retrieved from the vault so they can be viewed and/or modified by you. |
Library (3) |
Libraries can be created within a repository to logically organize or group the contents, that is data and files, stored within a repository. Repositories can contain multiple libraries. |
Below illustrates the different icons with the Organize browser, when a managed repository (Personal) is selected. The icons associated with an unmanaged repository (My Computer) are a subset of those described below. The one exception is that unmanaged libraries have the Add Folder icon ![]() which can be used to select a folder to index to add contents to the active unmanaged library.
which can be used to select a folder to index to add contents to the active unmanaged library.
![]()
Icon |
Name |
Description |
||
|
Clicking the Import Bar icon will allow you to select a library to import into the current library. |
|||
|
Clicking the Export Bar icon will display the Export Contents dialog to export the selected contents to a new library. |
|||
|
You have two options by selecting the repository view icon - Workspace view (yellow icon) and Repository view (blue icon). |
|||
|
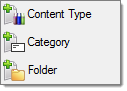
Use this option to author content into the selected repository.
Content Type - Adds a new content type definition to the library. You will be prompted to browse for a content definition (.xml) file. Out of the box CAE content definition files are located in <AH>/hw/tcl/hweDataMgr/cae, where <AH> refers to Altair Home for your HyperWorks installation. Category - Adds a new category to the library. Categories can be nested. Use the Categories field on the New Categories dialog to see a hierarchical list of existing categories and to choose a parent for the new category to be created. Folder - Adds a new folder to the library. In addition, you will see options to create new Contents depending on what Content Types are defined in the active Library. |
|||
|
Use this option to select the browser view mode.
Category Mode - View the library contents according to category. Folder Mode - View the library contents according to what folders they reside in. |
|||
|
Allows you to view the References of Contents in the browser tree. |
|||
|
Allows you to view the Properties panel. |
|||
|
Allows you to view the Recycle Bin, showing deleted contents. |
|||
|
By clicking the Show/Hide Query bar icon, you have the option of displaying the Query bar (a), as shown below. Results will be displayed in the browser.
Query Box (A) - Allows you to enter text to search on in the Query field and click the query button to query the library. The simple text queries performed will search based on content metadata as well as a full text search for indexed files. Query Button (B) - Click this icon to query the library. Open Query Dialog (C) - By clicking the Open Query dialog icon, a Query Editor dialog is displayed. For more information on Query Editor, see Advanced Queries. The simple text queries performed will search based on content metadata as well as a full text search for indexed files. Options for querying (D) – This option is displayed when you select the Show/Hide Query bar icon. You have three options from the drop-down, as shown below. You can select one of the three options.
By default, queries are done based on metadata only. Queries will be slower when searching inside files using full text retrieval. |
|||
|
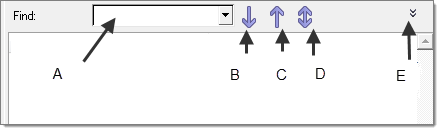
By clicking the Show/Hide Find bar icon, you have the option of displaying the Find bar (a), as shown below.
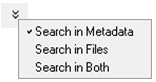
Find Box (A) - Enter text to search on in the Find to find contents containing the string. Find Next (B) - By selecting this option, allows you to find the next match. Find Previous (C) - By selecting this option, allows you to find the previous match. Find All (D) - By selecting this option allows you to highlight all occurrences you are searching for. Options for searching (E) - This option is displayed when you select either the Show/Hide Find bar icon or the Show/Hide Filter bar icon. You have three options from the drop-down, as shown below. You can select one, all, or none.
|
|||
|
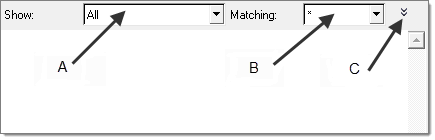
By clicking the Show/Hide Filter bar icon, you have the option of displaying the Filter bar (a), as shown below.
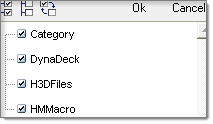
Show (A) - The Show combo box allows you to select which content types to display. Select from the category or content types to display. Unchecked types will be filtered from the browser display.
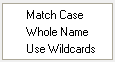
Matching (B) - Refine the filter by entering text into the Matching field. Contents not containing the entered text will be filtered from the browser display. Options for searching (C) - This option is displayed when you select either the Show/Hide Find bar icon or the Show/Hide Filter bar icon. You have three options from the drop-down, as shown below. You can select one, all, or none.
|